Wednesday, November 30, 2011

6Pak

They are doing a winter 6Pac at Stitcher's guild and I think I'm in. I need new clothes because everything is too big on me now. The six pac suggestion is:

1 - winter coat or heavy jacket in a dark neutral
2 - overlayer top, jacket or cardigan in a neutral
3 - overlayer top, jacket or cardigan in a colour
4 - underlayer top in neutral
5 - underlayer top in colour
6 - trousers in neutral
(7) - if you like to live dangerously in winter, or live somewhere not very cold, an optional skirt in neutral

I've already made the pants, so now I'm working on a LH Biarritz jacket. As far as I can tell, this is not much different from the Garbo or Textile Studios Capris jacket. Well, there is an inset collar, which is different. And there are narrow darts in the front, but other than that, not too much different in the overall look. When I was in LH's shop in Carmel last year, she had several of these made up in a beautiful olive-colored knit which I loved. As it turned out, Casual Elegance had this same fabric on their website (She carries most of Loes' fabrics) Of course, I ordered some, and I got the end of the bolt. Well, this fabric is really making me mad! I didn't look at it carefully enough when I received it or I probably would have sent it back! (another reason NOT to let fabric languish in the stash for so long.) It has excessive pilling all over it..


Now Sharon, the owner of CE Fabrics, did tell me that she gave me some extra fabric because my piece had more "slubs" than most. But I don't call this slubbing - it is pilling. I've been picking off these fuzz balls for days. What I'm most worried about, though, is that the fabric will pill like crazy when I wear it. Let me tell you, the fabric at CE is not inexpensive. It's not terribly expensive, but it certainly isn't like buying at Fabric.com, or Fabric mart - so I would expect better quality. I'm hoping that if I ever get rid of all these little fuzzes, that they will stay gone for good!

Saturday, November 26, 2011

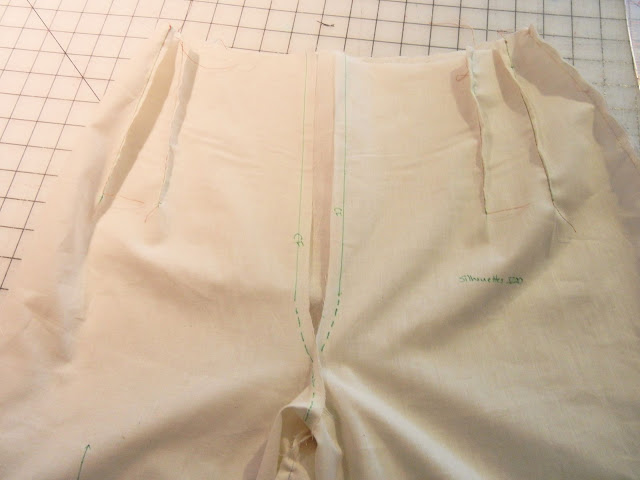
New Pants - Sally


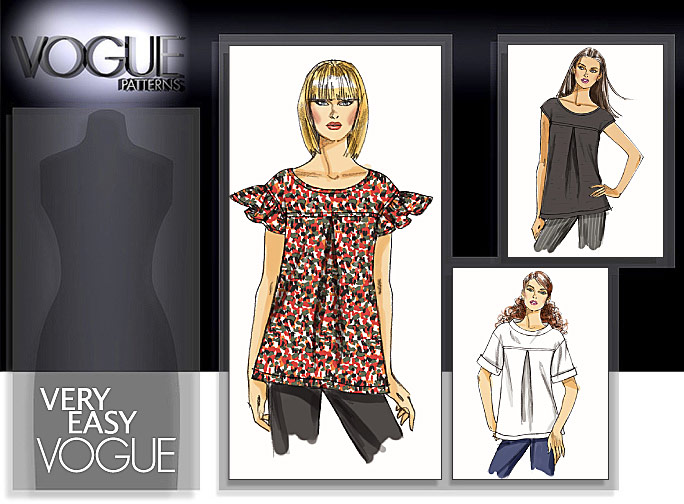
These are the Sally Pants by Silhouette patterns. I would have NEVER chosen these pants by the envelope. Just look:


After viewing Peggy Sagers webcast on pants fitting, I knew I wanted to try these since they are her basic sloper for all of the pants patterns. I still have some tweaking to do in the back, but overall, these fit well and are comfortable. They are made of a wool blend I got some time ago, so I'm not sure of the fabric content. I did prewash the fabric in the washing machine and throw it in the dryer and it came out fine. I will probably hang them to dry from now on though just incase.

I started off with too big a size, so I've made so many alterations to these I'm not sure what size they really are. I suppose I should put my traced pattern back on the original pattern and compare and adjust. Just for kicks. But not today.


The fly application on this pattern was easy to do and has a nice finish. I like a two piece fly. Even though it takes a little more time, I like the way it turns out. There are no pockets in these pants, but I didn't want any. I don't need to add any fullness to the hip area!

After making these, I'd have to say that the Sally Pant is really a great pants pattern. The fit is good and all of the pattern pieces line up nicely. Peggy Sager is great about helping you with fit questions. I know there are some pattern designers like Nancy Erickson who are now charging quite a bit for this service.

I have several other Silhouette Patterns that I would like to try and am hoping that I can get more sewing done now.


I also like the way the waistband is just assembled, turned under at the seam allowance and top-stitched on to the top of the pants. This works well, looks nice, and saves time.


Scarf blouse update: I am always drawn to Hot Patterns because they have such cute styles. Hwever, I don't think I've made a single one of their patterns that I did not have issues with! The fabric I'm using is a bear, so just to be sure the problems weren't from the fabric, I pulled out the pattern to check. I was having a terrible time trying to get the front dart to line up correctly. Well, after folding the paper pattern, I can see why. It's not laid out right.


So, I had two choices since I'd already cut the fabric. Either 1) lower the bust dart point considerably to make it work (not such a great idea) or 2) make a smaller dart. Since this is a loose fitting pattern, and other's have said it comes out big, I figured making a smaller dart wouldn't be to much of a problem. I re-folded the dart from the point to the bottom line and redrew the top line. This worked much better.


Now the problem is that I have somehow lost one of my front pieces and cannot finish the blouse until I find it!!!

Friday, November 25, 2011

Hot Patterns Scarf- shirt


Today I finished a pair of wool pants (pictures tomorrow I hope) that I've been working on for a while.

Several months ago I fell in love with the Hot Pattern scarf shirt pattern. I bought 2 different fabrics to make it in, but then never made it! In fact, one of the fabrics ended up being something else. Well, I wanted to make a new blouse to go with the pants that I just finished, so I dug in my fabric closet to see if the other fabric I'd bought for the scarf top would work. Yes! It is a polyester chiffon, so it will be tricky to work with. The pattern has a layout that has you use the fabric in one layer. I don't like cutting out like this because not only does it take longer, I don't have a table wide enough to cut out 60" wide fabric in one layer. The fabric was difficult to keep straight, but fortunately the print has lines in it that helped me keep it somewhat on grain! All I got done on that today was cutting, fusing, and hemming the scarf. I'm hoping to put the rest of it together tomorrow.

They're starting the SWAP over at Stitcher's Guild again this year. I like the guidelines this year as the focus seems to be on developing TNT patterns. That's exactly what I need to do more of. So, I may join. Also, 2 garments can be made ahead of time, So I may even include this blouse and pants depending on what my overall plan ends up looking like. I know one thing for sure, I will be using all fabric from my stash. It's pretty bad when you can't even buy new fabric because there is no where to put it!!


OK< it looks like blogger may have changed their posting again. I used to be able to size patterns by grabbing a corner and making them larger or smaller. Now that doesn't work. Anyone else out there using blogger that knows how to fix this?

Black Friday =Sewing Day

Well, I haven't been doing much sewing, and since I didn't have a camera for so long, I haven't made any posts lately.

We've had a new addition to our family, little Emma was born October 19. Since then, we've had a lot of changes at home, but all of them good.


The only sad (sort of ) thing is that I lost my sewing room. THis was my choice, so I'm not complaining. We have an extra bedroom, which I have been using as a sewing room and have loved it. We also have a very small office off of our bedroom that has a twin size bed in it. The problem with that is that you don't want someone else sleeping in your bedroom! So, since Emma's father stays over quite frequently (which we love), I felt sorry for him sleeping on the sofa every night. The sofa is NOT comfortable. So, I decided to give up the sewing room so we could move the bed into that room. My little office will suffice for now, but I won't be able to do any cutting in there, my fabric will still have to be stored in the now "guest room" and I still have a LOT of cleaning to do in the new sewing room.
But not today! I cleaned and cooked for the last 2 days, so today i s sewing day. I am going to the gym in about 1/2 hour, and making ONE stop at Macy's to buy ONE thing, and then I'm home to sew. Hope to have some pics later.

I hope you all had a WONDERFUL Thanksgiving.

Saturday, August 27, 2011

I've been meaning to...

clean out my bathroom cabinets,
organize my dresser drawers,
sort out my itunes collection
get some prints from my pictures on my computer,

and so much more....
but now, I'm either forced to or don't have the opportunity to any more. We were robbed this week (or maybe I should say burglarized) They broke in in the middle of the day Wednesday coming in through the sliding glass door in the back yard, which was apparently unlocked. They took my laptop and my daughters, both of our cameras, my grandmother's mink capelet, DHs wedding ring, and lots of other jewelry including DD's diamond bracelet that she just got from her father, among other things. Now that we're over the shock, we're counting our blessings. No one was hurt, not even the animals. Nothing was broken or damaged, they only hit half of the house, and our house was not set on fire (like someone else's misfortune we heard about this week.) So, it could have been much worse.

However, it's still a big pain to clean up all the mess (everything pulled out of dressers and cabinets), and the loss of everything including pictures of my late dad on my computer. So, since I don't have a camera or computer right now, it will be awhile until I post anything on my blog.

I did finish a simple tank out of a brown rayon jersey knit and I really like it. I used Pamela's Patterns twinset. Be Careful if you make this pattern - it has 1/4 inch seam allowances.

Sunday, August 21, 2011

CJ A line Skirt


I finally sewed the first true piece for my 6PAK. It is the A-Line Skirt in the Bell Sleeve Wrap pattern by Christine Johnson. The pattern is designed for a knit, but I used a woven. There is a sheet inside of all of her patterns that lets you know what size to make based on the stretch of the knit. I just calculated it with a zero percent stretch to figure what size to make. I'm very happy with the fit, but because I lined it, I have to either put it on over my head or lose 5 pounds!! The fabric is something that I've had in my stash for ever, so I'm not sure where I got it. I'm thinking maybe a fabric mart bundle from a few years ago! I'm pretty sure it's a poly woven, but it has a very nice drape and is lightweight. Because of this, I decided to line it. I had some brown poly lining in my stash, so used that. I serged the elastic to the top and turned it under. It would have been nice if I had black elastic, but I didn't.


The last blouse I made was a little full above the bust. I contacted Peggy Sagers and she replied right away. She said to try cutting a size one in the shoulders, 2 in the bust, and 3 at the hips. I am going to do this probably next because I would like to use this pattern for my 6 pack. I have another basic blouse that I made several years ago and have worn that thing to death. I really like the Silhouettes blouse, so I think I will be making several.


I really wanted to get more sewing and cutting done this weekend, but ended up working all day Saturday in my classroom. After I got home, DH and I ran some errands and went out to eat. After that, I fell asleep at about 6pm!! We were at church all morning today, but I did get to at least make this skirt this afternoon. It was really quick and easy. I'll definitely be making this one again.


Wednesday, August 17, 2011

My Newest Obsession


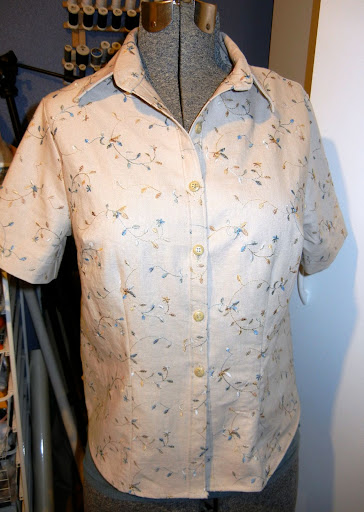
Lately I have been obsessed by Peggy Sagers and Silhouette Patterns. I have been watching the live webcasts and even the reruns that are on her site. I have ordered several patterns, and tonight I finished this version of the classic blouse. There were several things about this pattern that I really like.

First of all, all of PS's patterns use 3/8" seams. I like this because it eliminates the step of trimming the seams. It also makes it easier to fit curves and smaller corners. The instructions are very simple, but there is the assumption that you know how to sew. For example, on the blouse it just says to add buttons and buttonholes. They are marked on the pattern, but that's about it.


The most interesting thing is the way the collar and the front facing are done. The front facing is folded over to the front, and that is what creates the front band. The collar is assembled first, and then the seam allowances on the neck edge are pressed inward. Then, after the blouse shoulders are sewn, the collar is just slipped over the raw edge of the neck and top stitched on. This is the fastest, easiest way to make a collar I have ever done. This pattern has a one piece collar, but you could do the same thing with a two piece collar. Also, I used Peggy's method of turning under the seam allowances at the point and not clipping the corner. You can click on the picture to see more detail of how nicely it turned out. I made the short sleeves for this blouse, but next time I would like to change that to a cap sleeve. I will also (at some point) make the longer sleeve.

I used a size 2 with the D cup. The one thing I always have a problem with in blouses is too much fabric between the bust and the shoulder. When I am standing up, the bust darts are in the right place. I did lower the shoulder seam 1/4 inch front and back, which eliminated a bit of the problem. I feel like the shoulder seam is in the right place, although I may bring it in 1/4 " on my next attempt. I'm wondering if maybe I should have cut a size 1 and just made it bigger at the hips, although it seems to fit fine in the bust.

I would have to say that this blouse fits better than any other that I have tried with the least amount of adjustment. I love that the pattern pieces are marked by cup size so that I do not have to fiddle with a FBA. I can't wait to make this again and to try some of her other patterns.

Monday, August 01, 2011

The 6PAC

There is a thread over on Stitcher's Guild for the "6PAC" which is a 6 piece Autumn Collection. I love the introduction. Here's the basics:

The point of these sew-alongs is to create the bones of a mix-and-match handmade wardrobe. The pace is relatively slow (two items a month) to allow you also to add the fun items that aren't the bones. The ideal pieces for this collection are BORING pieces that you wear EVERY DAY. These pieces in your wardrobe need to be beautifully fit, beautifully finished, and made with wonderful fabric. In order to work as separates they should be in a very limited colour palette -- I suggest for autumn this is one or two dark neutrals, one light neutral, and one colour. Good neutrals to pick are neutrals echoed in your hair colour; good colours are in your skin and eyes; but probably you have your own favourite colours.

The pieces are maximised for layering:

ONE jacket -- neutral
ONE bottom (skirt or trousers, though for autumn, I like trousers) -- dark neutral if you're pear-shaped, lighter if you carry weight on top
TWO underlayer tops, one ideally in a print combining your colours, one in a contrast neutral
TWO overlayer tops, one coloured, one neutral
and possibly
ONE more bottom -- skirt if you've done trousers, trousers if you've done a skirt, or a dress if you like them
You can read more about the 6PAC here if you're interested in joining.

I am also trying to follow the basic plan from Nancy Nix-Rice. #21 on

It is still pretty hot here in the fall, so I'm not making a jacket, but a cardigan and then maybe a lightweight jacket. My base color is going to be dark brown and this is what I'm going with:

Brown Rayon knit - tank and cardigan
Brown RPL - cropped pants
Brown poly crepe - skirt
Camel and Dark brown leaf print microsuede - cropped jacket
one other top - probably another tank or T. I haven't decided on that yet. Possibly a coral colored dupioni blouse.

The reason I'm going with the camel is that I have a pair of pants that color already and another that will coordinate. I have lots of different knits that will work or blouse fabrics, so the top will be easy. Also, since I had already narrowed my color down to brown, it was easy to do a little shoe shopping while in the Bay Area a couple of weeks ago and landed a great pair of Fidji shoes. I first fell in love with this brand when I saw them at an airport in Seattle. I've never seen this brand in my area and they are made in Portugal. They are kind of pricey, but if they don't hurt my feet, it will be worth it. I'm really loving these shoes (well, I think so, I haven't worn them yet because it's too hot for anything but sandals here right now.) The color is called Pewter, but there is nothing gray about it. They are really kind of a bronze and black mottled together, so they actually look great with tons of colors, including brown and black. I think these will be great for wearing to work.


Oh, and while I was at it, I had to pick up these as well. Of course, shoes always feel perfectly fine when you're trying them on and walking around in the store. It's after you get them home and wear them for a couple of hours that they kill your feet! I don't think I'll be able to wear these to work, but definitely for church and going out.
The color looks a little off in this picture, but the Nine West are a pinkish taupe color and the Via Spiga pumps are camel.


The 6PAC doesn't start until August, so I'm still sewing some summer things for now...

Today was the first day back to work, and by the time I got home, I was too tired to even sew! I guess for a while, my sewing will be relegated to the weekends.

Oh, some of you commented about my new hair cut - but it's not. It's just up in a bun.

Sunday, July 31, 2011

Boatneck Top

I bought Christine Johnson pattern 311 for the boyfriend jacket, but it also came with a nice little boat neck shell. I decided to give it a shot. A couple of weeks ago I ordered a few 1 yard pieces of ITY knit from Fabric.com just to make some tanks and tops to wear under jackets or alone.

This was super simple to make - only a front and back piece. The armholes and neck edge are just turned under and stitched. I did this on my coverstitch, but I still don't have enough confidence with that to just turn and stitch so I pressed all the edges under first. This took a bit of time since polyester doesn't press well unless you use a clapper or something similar.

I'm finally figuring out to look at clothes that I already have and like to get some measurements from . This is what I did on this one.

To get the correct size, I took my fabric and wrapped it around me to the desired ease. I then measured the fabric edge and this became my finished bust circumference.

To get the hip size, I took a favorite top and measured the width. I also measured the length from the armscye down to make sure it would be long enough. I think I added 4" to this pattern. I also liked the wider hem on my RTW top, so I added enough to make a 2" hem on this top.

All in all, I'm pretty pleased with the result and will probably wear it to work tomorrow. That's right, I go back to work (officially) tomorrow. Kids don't come until Thursday, but our district starts ridiculously early. I still need more summer vacation!!!

Tuesday, July 26, 2011

Pants fitting

If you have not been watching the webcasts by Peggy Sager, you are really missing out. I hadn't been interested because I thought the patterns looked dated, but somehow I stumbled across the pants fitting one and was VERY impressed. She also explains how to get the look you want (style) from the basic pattern once you get the fit right. So don't be fooled by the envelope pictures! You can see past webcasts (and there are a lot - and they're free!) at silhouettepatterns.com. Scroll down and click on the link for webcasts. I am trying to follow her method as I make this muslin.

I am using the Sally pant as my base pattern. Now, I would never have chosen this style based on the envelope picture, but this is her basic fit pattern, so I decided to start with that. Also, she makes 2 different versions of this in the webcast, and they both look very different. Peggy Sager uses finished measurements for her patterns - not body measurements. You take your hip measurement then sit down. It will spread a couple (or a few) inches. This is the measurement you use to determine your size.


I then took a pair of my favorite fitting pants and measured the circumference at the thigh (at the crotch), the knee, and the hem. I also measured the crotch to knee and the inseam and wrote all these measurements down. I then compared them to the pattern. This pattern has a very narrow width at the hem, but at the above ankle length, which is how I want to make them, they were the same as my pants. All of the measurements for the size 14 lined up with my pants, so that is the size I will start with.


First, cut out the pattern in muslin and mark the grain line, darts, center front and back. Silhouette patterns use 3/8" seam allowances, so I marked this with pen just on the CF. Oh, I usually have to raise the waist on pants because of a low, flat butt, so I added 1" to the top. Sine the pattern is designed for someone 5'8" tall, most people would not have to do that. I am only 5'6, but I added it to be safe. It is a muslin, so I will cut it off if it is not needed.


Next, sew the darts in front and back. Then sew the rest of the pants together except for the CF seam. I sewed about 3 inches past the crotch point.

End of session one! (Actually, I had a hair appointment, so this is when I stopped!)


Session Two:

I tried on the pants (or tried to) but they were way too small. First of all, I made the mistake of not measuring the hip measurement on my RTW pants or the Waist! Duh... I should have cut a 16 or 18! But the most foolish thing I did was to not TRACE my pattern first, so now I have not 16 or 18 left on the pattern. There are other pattern pieces with the "W" sizes, but the waist would be way too big on me.

So, the next thing I did was to measure the gap in the front to get the Center Fronts to match. It was 4" This means that I have to add 1" to each front and back piece. I cut the muslin from hem to waist between the darts and the side seams. The reason I did not cut it up the middle is because the darts should be 4-5 inches away from the CF and I did not want to have to reposition the darts should this work. For my muslin, I only did the correction on one leg front and back to see the difference.

Well, now the CF comes to my center, but it is still too tight. Might be OK in a heavy stretch twill, but not in any kind of light weight fabric. So now, I'm thinking, "What do I do?" I could add another 1/2" to each piece, or I could cut the W size and try to grade it down. Either way, I think I would lose the integrity of the lines of the pattern. Since this pattern happens to be the "fit" pattern for all of the other pants in the Silhouette line, I wanted to make it right. I contacted Peggy Sager asking what the best way to approach it would be, and she graciously offered to send me another pattern at no charge and suggested to make the 18 and then work from there. I am anxiously awaiting the new pattern and want to really get a pant with a good fit. So far, I really like these, but they are just too tight. I am seriously wanting to get Peggy's complete set of DVDs and will probably do it right after payday. In the meantime, I am going to watch all of her webcasts. I have found them very informative and inspiring.

Saturday, July 16, 2011

I Should Start Listening to Myself - Vogue 8495


For some reason, I have been having a lot of headaches recently. I've always had migraines, but not usually so many in the summer. (Actually, I was hoping that the recent hysterectomy would have rectified that!) Anyway, I have told myself numerous times that I should not sew when I have a headache. It usually ends up in one problem or another.
Well, I cut out Vogue 8495 yesterday and I wanted to get it sewn up. I woke up with a headache today, but it didn't seem that horrible, so I went ahead. I had everything cut out to make view C with the collar and sleeves. I laid out my pattern carefully and had all of my border prints the way I wanted them.

This pattern has you do a weird thing with the yoke lining. You sew the front yoke and lining together and then the back yoke and lining together. Then, you join the yokes at the shoulders and slipstitch the inside shoulderseam. I have made sleeveless dresses that were lined with this same method, but have never liked the results. The stitching never seems to stay secure at the shoulder and you don't get a nice smooth curve. But, it had been a long time since I had done this so I decided to give it a go. Well, I got all of this done and the yoke sewn to the bodice, and all of the hand stitching when I realized - I was following the directions for view A (no sleeves or collar) and had enclosed the neck and armholes, so it was too late to put them in!! I must remember not to sew when I have a headache!

The top came out OK, but it is a little tight across the front where the yoke meets the bodice. I think the problem is because the armholes are too high. So, tonight I took out the bias binding, undid the yoke and recut the armholes. I only lowered them 1/4 inch, but I think that will be enough. It felt better when I tried it on, but maybe I will wear it tomorrow after church and see how it feels. Oh, yeah, you can probably tell by this picture that I still have the headache.

Friday, July 15, 2011

Uganda part 6 - School in Uganda


I know I've posted about schools in Uganda before, but being a teacher, I am always amazed at the conditions of the schools. We complain about the number of students we have and the condition of our classrooms, but there is no comparison to the schools in the villages or the cities.


The cities have somewhat better school buildings, but it all depends on where you go to school. All schools are "pay" whether you go to private or public. Apparently there are very few public schools and they are in worse shape than the ones I will show you here! This year I did not visit any of the city schools, but I did get to visit the school in Busanna and peek in at the classrooms in Kasana since they were right next door to where we were sewing (in the church)


Many of the schools in Uganda are owned by one church or another. There are many Muslim schools, and they offer some tuition-free schools in order to build up their "clientele". There are also a lot of Christian schools and then schools that teach both Muslim and Christian theology (I don't see how that happens)


Teachers are allowed to beat the children. However, you never see any discipline problems and all of the students are quiet and attentive. Even with 50+students in a classroom! It is my understanding that many of the teachers in Uganda are working for free right now and many have not been paid in 2 years! I don't know if this is only in the villages, or in the cities as well. The pastor of the church in Kasana is also a fourth grade teacher, so I am going to try to get some pen-pal letters going with my students as soon as school starts.


Most of the schools in Uganda do not have books. Can you believe it? One school I visited a couple of years ago in Kampala had a whole room full of books, but there were no class sets of anything, so they really couldn't be used for instructional purposes. The students have composition books and copy whatever the teacher writes on the board. The teachers do not even have teacher's manuals. School in the city starts at 7am and goes until 5pm. Many of the schools are boarding schools, so even though the parents may live in the same city, the children would live at the school. Students start in "baby class" at age 3 and they have a shorter day - they only go until 1:00. I think the shorter day goes all the way up to second grade. In the villages some of the schools get out earlier, like at 2:00, but it just depends on the age of the students and the village. Many go until 4.


The students put on an assembly for us. Here they are lining up


We don't have any of these at my school. When the director saw me taking a picture of the goat, he asked me why. I said, "We don't keep goats at our school" He laughed and said, "These goats do not belong to the school! They belong to a neighbor. We are just keeping them here" (oh, that explains it.)


I am getting ready to start school again. Our teachers go back on August first and the students come on the fourth. I will not have 50 students in my class. I will have desks, books, and teachers manuals. I will get paid. I will have to remember these things when I am going crazy and feeling all of the stress and pressure that our schools have today!


I have more pictures here if you are interested.