clean out my bathroom cabinets,
organize my dresser drawers,
sort out my itunes collection
get some prints from my pictures on my computer,
and so much more....
but now, I'm either forced to or don't have the opportunity to any more. We were robbed this week (or maybe I should say burglarized) They broke in in the middle of the day Wednesday coming in through the sliding glass door in the back yard, which was apparently unlocked. They took my laptop and my daughters, both of our cameras, my grandmother's mink capelet, DHs wedding ring, and lots of other jewelry including DD's diamond bracelet that she just got from her father, among other things. Now that we're over the shock, we're counting our blessings. No one was hurt, not even the animals. Nothing was broken or damaged, they only hit half of the house, and our house was not set on fire (like someone else's misfortune we heard about this week.) So, it could have been much worse.
However, it's still a big pain to clean up all the mess (everything pulled out of dressers and cabinets), and the loss of everything including pictures of my late dad on my computer. So, since I don't have a camera or computer right now, it will be awhile until I post anything on my blog.
I did finish a simple tank out of a brown rayon jersey knit and I really like it. I used Pamela's Patterns twinset. Be Careful if you make this pattern - it has 1/4 inch seam allowances.
Saturday, August 27, 2011
I've been meaning to...
Sunday, August 21, 2011
CJ A line Skirt

I finally sewed the first true piece for my 6PAK. It is the A-Line Skirt in the Bell Sleeve Wrap pattern by Christine Johnson. The pattern is designed for a knit, but I used a woven. There is a sheet inside of all of her patterns that lets you know what size to make based on the stretch of the knit. I just calculated it with a zero percent stretch to figure what size to make. I'm very happy with the fit, but because I lined it, I have to either put it on over my head or lose 5 pounds!! The fabric is something that I've had in my stash for ever, so I'm not sure where I got it. I'm thinking maybe a fabric mart bundle from a few years ago! I'm pretty sure it's a poly woven, but it has a very nice drape and is lightweight. Because of this, I decided to line it. I had some brown poly lining in my stash, so used that. I serged the elastic to the top and turned it under. It would have been nice if I had black elastic, but I didn't.

The last blouse I made was a little full above the bust. I contacted Peggy Sagers and she replied right away. She said to try cutting a size one in the shoulders, 2 in the bust, and 3 at the hips. I am going to do this probably next because I would like to use this pattern for my 6 pack. I have another basic blouse that I made several years ago and have worn that thing to death. I really like the Silhouettes blouse, so I think I will be making several.
I really wanted to get more sewing and cutting done this weekend, but ended up working all day Saturday in my classroom. After I got home, DH and I ran some errands and went out to eat. After that, I fell asleep at about 6pm!! We were at church all morning today, but I did get to at least make this skirt this afternoon. It was really quick and easy. I'll definitely be making this one again.

Wednesday, August 17, 2011
My Newest Obsession
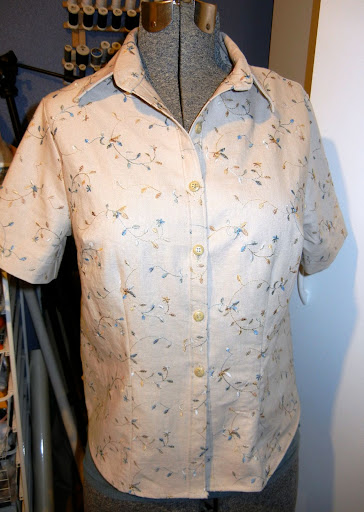
Lately I have been obsessed by Peggy Sagers and Silhouette Patterns. I have been watching the live webcasts and even the reruns that are on her site. I have ordered several patterns, and tonight I finished this version of the classic blouse. There were several things about this pattern that I really like.
First of all, all of PS's patterns use 3/8" seams. I like this because it eliminates the step of trimming the seams. It also makes it easier to fit curves and smaller corners. The instructions are very simple, but there is the assumption that you know how to sew. For example, on the blouse it just says to add buttons and buttonholes. They are marked on the pattern, but that's about it.
 The most interesting thing is the way the collar and the front facing are done. The front facing is folded over to the front, and that is what creates the front band. The collar is assembled first, and then the seam allowances on the neck edge are pressed inward. Then, after the blouse shoulders are sewn, the collar is just slipped over the raw edge of the neck and top stitched on. This is the fastest, easiest way to make a collar I have ever done. This pattern has a one piece collar, but you could do the same thing with a two piece collar. Also, I used Peggy's method of turning under the seam allowances at the point and not clipping the corner. You can click on the picture to see more detail of how nicely it turned out. I made the short sleeves for this blouse, but next time I would like to change that to a cap sleeve. I will also (at some point) make the longer sleeve.
I used a size 2 with the D cup. The one thing I always have a problem with in blouses is too much fabric between the bust and the shoulder. When I am standing up, the bust darts are in the right place. I did lower the shoulder seam 1/4 inch front and back, which eliminated a bit of the problem. I feel like the shoulder seam is in the right place, although I may bring it in 1/4 " on my next attempt. I'm wondering if maybe I should have cut a size 1 and just made it bigger at the hips, although it seems to fit fine in the bust.
 I would have to say that this blouse fits better than any other that I have tried with the least amount of adjustment. I love that the pattern pieces are marked by cup size so that I do not have to fiddle with a FBA. I can't wait to make this again and to try some of her other patterns.

Monday, August 01, 2011
The 6PAC
There is a thread over on Stitcher's Guild for the "6PAC" which is a 6 piece Autumn Collection. I love the introduction. Here's the basics:
The point of these sew-alongs is to create the bones of a mix-and-match handmade wardrobe. The pace is relatively slow (two items a month) to allow you also to add the fun items that aren't the bones. The ideal pieces for this collection are BORING pieces that you wear EVERY DAY. These pieces in your wardrobe need to be beautifully fit, beautifully finished, and made with wonderful fabric. In order to work as separates they should be in a very limited colour palette -- I suggest for autumn this is one or two dark neutrals, one light neutral, and one colour. Good neutrals to pick are neutrals echoed in your hair colour; good colours are in your skin and eyes; but probably you have your own favourite colours.You can read more about the 6PAC here if you're interested in joining.
The pieces are maximised for layering:
ONE jacket -- neutral
ONE bottom (skirt or trousers, though for autumn, I like trousers) -- dark neutral if you're pear-shaped, lighter if you carry weight on top
TWO underlayer tops, one ideally in a print combining your colours, one in a contrast neutral
TWO overlayer tops, one coloured, one neutral
and possibly
ONE more bottom -- skirt if you've done trousers, trousers if you've done a skirt, or a dress if you like them
I am also trying to follow the basic plan from Nancy Nix-Rice. #21 on
It is still pretty hot here in the fall, so I'm not making a jacket, but a cardigan and then maybe a lightweight jacket. My base color is going to be dark brown and this is what I'm going with:
Brown Rayon knit - tank and cardigan
Brown RPL - cropped pants
Brown poly crepe - skirt
Camel and Dark brown leaf print microsuede - cropped jacket
one other top - probably another tank or T. I haven't decided on that yet. Possibly a coral colored dupioni blouse.
 The reason I'm going with the camel is that I have a pair of pants that color already and another that will coordinate. I have lots of different knits that will work or blouse fabrics, so the top will be easy. Also, since I had already narrowed my color down to brown, it was easy to do a little shoe shopping while in the Bay Area a couple of weeks ago and landed a great pair of Fidji shoes. I first fell in love with this brand when I saw them at an airport in Seattle. I've never seen this brand in my area and they are made in Portugal. They are kind of pricey, but if they don't hurt my feet, it will be worth it. I'm really loving these shoes (well, I think so, I haven't worn them yet because it's too hot for anything but sandals here right now.) The color is called Pewter, but there is nothing gray about it. They are really kind of a bronze and black mottled together, so they actually look great with tons of colors, including brown and black. I think these will be great for wearing to work.
 Oh, and while I was at it, I had to pick up these as well. Of course, shoes always feel perfectly fine when you're trying them on and walking around in the store. It's after you get them home and wear them for a couple of hours that they kill your feet! I don't think I'll be able to wear these to work, but definitely for church and going out.
The color looks a little off in this picture, but the Nine West are a pinkish taupe color and the Via Spiga pumps are camel.
The 6PAC doesn't start until August, so I'm still sewing some summer things for now...
Today was the first day back to work, and by the time I got home, I was too tired to even sew! I guess for a while, my sewing will be relegated to the weekends.
Oh, some of you commented about my new hair cut - but it's not. It's just up in a bun.
Sunday, July 31, 2011
Boatneck Top

This was super simple to make - only a front and back piece. The armholes and neck edge are just turned under and stitched. I did this on my coverstitch, but I still don't have enough confidence with that to just turn and stitch so I pressed all the edges under first. This took a bit of time since polyester doesn't press well unless you use a clapper or something similar.
I'm finally figuring out to look at clothes that I already have and like to get some measurements from . This is what I did on this one.
To get the correct size, I took my fabric and wrapped it around me to the desired ease. I then measured the fabric edge and this became my finished bust circumference.
To get the hip size, I took a favorite top and measured the width. I also measured the length from the armscye down to make sure it would be long enough. I think I added 4" to this pattern. I also liked the wider hem on my RTW top, so I added enough to make a 2" hem on this top.
All in all, I'm pretty pleased with the result and will probably wear it to work tomorrow. That's right, I go back to work (officially) tomorrow. Kids don't come until Thursday, but our district starts ridiculously early. I still need more summer vacation!!!

Tuesday, July 26, 2011
Pants fitting
If you have not been watching the webcasts by Peggy Sager, you are really missing out. I hadn't been interested because I thought the patterns looked dated, but somehow I stumbled across the pants fitting one and was VERY impressed. She also explains how to get the look you want (style) from the basic pattern once you get the fit right. So don't be fooled by the envelope pictures! You can see past webcasts (and there are a lot - and they're free!) at silhouettepatterns.com. Scroll down and click on the link for webcasts. I am trying to follow her method as I make this muslin.
I then took a pair of my favorite fitting pants and measured the circumference at the thigh (at the crotch), the knee, and the hem. I also measured the crotch to knee and the inseam and wrote all these measurements down. I then compared them to the pattern. This pattern has a very narrow width at the hem, but at the above ankle length, which is how I want to make them, they were the same as my pants. All of the measurements for the size 14 lined up with my pants, so that is the size I will start with. First, cut out the pattern in muslin and mark the grain line, darts, center front and back. Silhouette patterns use 3/8" seam allowances, so I marked this with pen just on the CF. Oh, I usually have to raise the waist on pants because of a low, flat butt, so I added 1" to the top. Sine the pattern is designed for someone 5'8" tall, most people would not have to do that. I am only 5'6, but I added it to be safe. It is a muslin, so I will cut it off if it is not needed.
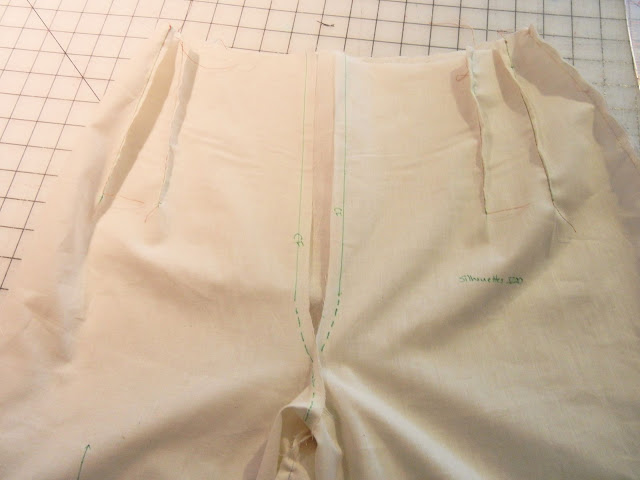 Next, sew the darts in front and back. Then sew the rest of the pants together except for the CF seam. I sewed about 3 inches past the crotch point.
End of session one! (Actually, I had a hair appointment, so this is when I stopped!)
Session Two:
I tried on the pants (or tried to) but they were way too small. First of all, I made the mistake of not measuring the hip measurement on my RTW pants or the Waist! Duh... I should have cut a 16 or 18! But the most foolish thing I did was to not TRACE my pattern first, so now I have not 16 or 18 left on the pattern. There are other pattern pieces with the "W" sizes, but the waist would be way too big on me.
So, the next thing I did was to measure the gap in the front to get the Center Fronts to match. It was 4" This means that I have to add 1" to each front and back piece. I cut the muslin from hem to waist between the darts and the side seams. The reason I did not cut it up the middle is because the darts should be 4-5 inches away from the CF and I did not want to have to reposition the darts should this work. For my muslin, I only did the correction on one leg front and back to see the difference. Well, now the CF comes to my center, but it is still too tight. Might be OK in a heavy stretch twill, but not in any kind of light weight fabric. So now, I'm thinking, "What do I do?" I could add another 1/2" to each piece, or I could cut the W size and try to grade it down. Either way, I think I would lose the integrity of the lines of the pattern. Since this pattern happens to be the "fit" pattern for all of the other pants in the Silhouette line, I wanted to make it right. I contacted Peggy Sager asking what the best way to approach it would be, and she graciously offered to send me another pattern at no charge and suggested to make the 18 and then work from there. I am anxiously awaiting the new pattern and want to really get a pant with a good fit. So far, I really like these, but they are just too tight. I am seriously wanting to get Peggy's complete set of DVDs and will probably do it right after payday. In the meantime, I am going to watch all of her webcasts. I have found them very informative and inspiring.
Saturday, July 16, 2011
I Should Start Listening to Myself - Vogue 8495

For some reason, I have been having a lot of headaches recently. I've always had migraines, but not usually so many in the summer. (Actually, I was hoping that the recent hysterectomy would have rectified that!) Anyway, I have told myself numerous times that I should not sew when I have a headache. It usually ends up in one problem or another.
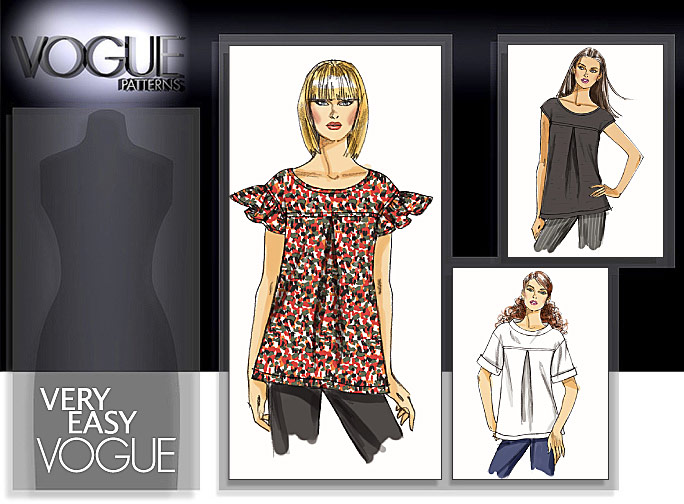
Well, I cut out Vogue 8495 yesterday and I wanted to get it sewn up. I woke up with a headache today, but it didn't seem that horrible, so I went ahead. I had everything cut out to make view C with the collar and sleeves. I laid out my pattern carefully and had all of my border prints the way I wanted them.
This pattern has you do a weird thing with the yoke lining. You sew the front yoke and lining together and then the back yoke and lining together. Then, you join the yokes at the shoulders and slipstitch the inside shoulderseam. I have made sleeveless dresses that were lined with this same method, but have never liked the results. The stitching never seems to stay secure at the shoulder and you don't get a nice smooth curve. But, it had been a long time since I had done this so I decided to give it a go. Well, I got all of this done and the yoke sewn to the bodice, and all of the hand stitching when I realized - I was following the directions for view A (no sleeves or collar) and had enclosed the neck and armholes, so it was too late to put them in!! I must remember not to sew when I have a headache! The top came out OK, but it is a little tight across the front where the yoke meets the bodice. I think the problem is because the armholes are too high. So, tonight I took out the bias binding, undid the yoke and recut the armholes. I only lowered them 1/4 inch, but I think that will be enough. It felt better when I tried it on, but maybe I will wear it tomorrow after church and see how it feels. Oh, yeah, you can probably tell by this picture that I still have the headache.
Friday, July 15, 2011
Uganda part 6 - School in Uganda


I know I've posted about schools in Uganda before, but being a teacher, I am always amazed at the conditions of the schools. We complain about the number of students we have and the condition of our classrooms, but there is no comparison to the schools in the villages or the cities.
The cities have somewhat better school buildings, but it all depends on where you go to school. All schools are "pay" whether you go to private or public. Apparently there are very few public schools and they are in worse shape than the ones I will show you here! This year I did not visit any of the city schools, but I did get to visit the school in Busanna and peek in at the classrooms in Kasana since they were right next door to where we were sewing (in the church) Many of the schools in Uganda are owned by one church or another. There are many Muslim schools, and they offer some tuition-free schools in order to build up their "clientele". There are also a lot of Christian schools and then schools that teach both Muslim and Christian theology (I don't see how that happens)
Teachers are allowed to beat the children. However, you never see any discipline problems and all of the students are quiet and attentive. Even with 50+students in a classroom! It is my understanding that many of the teachers in Uganda are working for free right now and many have not been paid in 2 years! I don't know if this is only in the villages, or in the cities as well. The pastor of the church in Kasana is also a fourth grade teacher, so I am going to try to get some pen-pal letters going with my students as soon as school starts. Most of the schools in Uganda do not have books. Can you believe it? One school I visited a couple of years ago in Kampala had a whole room full of books, but there were no class sets of anything, so they really couldn't be used for instructional purposes. The students have composition books and copy whatever the teacher writes on the board. The teachers do not even have teacher's manuals. School in the city starts at 7am and goes until 5pm. Many of the schools are boarding schools, so even though the parents may live in the same city, the children would live at the school. Students start in "baby class" at age 3 and they have a shorter day - they only go until 1:00. I think the shorter day goes all the way up to second grade. In the villages some of the schools get out earlier, like at 2:00, but it just depends on the age of the students and the village. Many go until 4.
 The students put on an assembly for us. Here they are lining up
 We don't have any of these at my school. When the director saw me taking a picture of the goat, he asked me why. I said, "We don't keep goats at our school" He laughed and said, "These goats do not belong to the school! They belong to a neighbor. We are just keeping them here" (oh, that explains it.)
I am getting ready to start school again. Our teachers go back on August first and the students come on the fourth. I will not have 50 students in my class. I will have desks, books, and teachers manuals. I will get paid. I will have to remember these things when I am going crazy and feeling all of the stress and pressure that our schools have today!
I have more pictures here if you are interested.
Tuesday, July 12, 2011
Uganda part 5 - shopping in Jinja

This is a typical scene on the street of any "city" in Uganda. Shops are very small, very close together, and you might find the weirdest combination of items in any one store. Some stores are definitely specialty shops and might just sell paper, or electronics, or shoes (generally used). The streets are busy and crowded, but Jinja is a bit of a respite from shopping in a big city like Kampala. I liked shopping in the bigger city, but my friend Karen says she'd rather shop in a town where you don't have to take you life in your hands just to cross the street. Actually, that's not an exaggeration. The cars in Kampala drive FAST, about 6" between them - and I mean front to back and side to side! Also, they don't care if they hit you, and many men will yell out to you, whistle, or call you names. Not pretty. Jinja is much more mild in that respect, but again, it is much smaller. That also means there is less selection and things are a bit more expensive. We were fortunate to find this shop owned by an Indian man. He was very nice and when he found out that we were buying fabric for the villages and to sew for children, he was compassionate. He gave us the best price of any other shop we'd been to by far. The "cotton" that we bought there was about 15,000 Ugandan shillings for a 6 meter piece. That means it was a little under $1.00 per yard! The reason I put "cotton" in quotation marks is because they always insist it is cotton. This is a thinner material than the wax-print and I believe it is part polyester. I like it though because the dress I'm wearing in the picture is made of that fabric. It does not wrinkle, but was cool enough to wear. The wax print was a little more expensive, and I actually just prewashed some and have it on my cutting table.
We took our friend Betty with us while shopping - which you must do in Uganda. There are 2 prices for everything. The regular price and the Muzungu (white person) price. They don't try to hide it. It's just a fact, you are Muzungu, you pay more. Also, you MUST bargain your prices. If you don't, they will consider you a fool and really take advantage of you. If a shop owner is unwilling to bargain, they are "rude" and you can tell them so. I'm glad we had Betty with us.
We ended up having to go back to this shop and buy more fabric. We did not have Betty with us, but fortunately for me, the man remembered me and still gave me the same good price on the fabrics. Oh, and I was telling you that there are weird combinations of things in the shops? Well, this shop sold beautiful fabrics and soccer balls!!! Go figure.
In Uganda there are basically 5 types of fabric.
- Sequined and embroidered fabric - there are a lot of Muslim and Indian people in Uganda. These fabrics are typically used for their traditional dress.
- Polyester charmeuse - this fabric is used for the traditional "Gomez" Ugandan dress. This is incredible for me since we all know how hot polyester is. Also, the Gomez uses about 6 meters to make. It is layers upon layers.
- Kitenge fabric. This is the beautiful wax print fabric that is used to make the 2 piece dresses that more of the "modern" girls will wear. I believe this style actually comes from Kenya.
- The "cotton" which I believe is polyester. This is more "affordable" and comes in the same beautiful prints as the kitenge fabric
- The solids and other print fabric that is lighter weight. This is more of a broadcloth type fabric and is mostly used to be tied around the waist over the nicer clothes. Sort of like we would use an apron. This is sold in 4 meter lengths where all of the above fabrics are sold in 6 meter lengths. I bought some of this fabric the first year I went to Uganda, and although I really liked the print, I hated the fabric. It was off grain and never would hang straight. I ended up giving that skirt to the Good Will!
M5586 for me this time

I loved my daughter's top so much, and since the pattern was already on the cutting table, I decided to make one for myself. This version is made out of a rayon crepe. The print is pretty busy, so I used a solid rayon/linen blend for the yoke. I like the contrast.
There were a few things I did differently on this one. I cut the yoke a straight 10 on this one, but left the body back an 8 and the front a 10. I did not have to do a FBA since it is so full in the front, but I did widen the hips out a bit. I did not use the "maternity adjustments" that I did on Grace's top :-) On this version I used bias tape to finish the armholes and
 used the blind stitch function on my machine to do the hem.
Yesterday was my birthday, so my son Nick came down from Fresno and we all went out to our favorite little place for Teppanyaki. We had a great day.
Uh,, you can't tell that these two are brother and sister, can you? I think they're gorgeous, but I AM a little biased!




Saturday, July 09, 2011
Uganda part 4 - the trouble with treadles
 While we were in Uganda, we bought 2 sewing machines. Both of them are treadles. Since there is no electricity in the villages (and even it the cities it is very unreliable - more on that later) treadles are the best bet for sewing of any kind. You see them everywhere. Apparently, they still make new treadle sewing machines in China or someplace and send them to third world countries. The machines (with cabinets) ended up costing us about $100 apiece. There was no choice over make and model - you take whatever they have. The machines we got are singers and very pretty. Unfortunately, it seems they are pieces of you know what.
So, since we missed our shopping day in Kampala (lots of flight problems, delays, and cancellations) we ended up doing our shopping in Jinaja. This actually ended up working out better because we had to take BOTH machines back and get them replaced. Jinja is much closer to where we were than Kampala. We struggled with one of the machines all day the first day of sewing, and discovered that there was a mechanical problem with it. Florence has some experience with machines, so she figured this out. We took that machine back and borrowed another machine from a tailor in the village. (The term tailor is loosely used - in Uganda, anyone who sews is a tailor.)
On the third day, we couldn't get either of the machines to work. We had a sewing machine mechanic come over and we worked on the machines all morning. The one we bought also had a mechanical problem (different than the first one) and had to be returned. The one we borrowed kept jamming.
If you've ever sewn on a treadle machine, here's the problem You have to get the machine going forward. I know this sounds simple, but when you are working that treadle, it can start off going backworkd. So, you spin the fly wheel toward you and start peddling. This makes the machine go forward. An experienced treadler can keep it going forward. I am not experienced. The ladies I work with are more experienced than I am in using this kind of machine, but still considered "learner." When learners are using the treadle, we tend to let our feet slow down or stop when coming to a curve, corner or end of a seam. Then, when we start sewing again, this makes the machine go backward. Of course, then we hit the flywheel to make it go forward, which it does - until it jams. This is hard on the machine and causes problems. I think we spend more time fixing the machines than productively using them. Also, you need to oil treadles frequently while using them. I'm not sure why this is.
The mechanic who came over was named Enos. He was very helpful and seemed to know what he was doing. If I had to spend all that time fixing my machine instead of using it, I don't know that I would really want to sew!
Uganda part 3 - the Villages & a New Plan

The last week of our trip was spent in the village of Kayunga Kasanna. This is a small and beautiful village outside of the city of Kayunga. It is on the Nile River (if you walk far enough into the village, which we did not do this time, but did last year.) It was wonderful to go back and see familiar faces as well as new ones.
During the first week of our trip Karen and I spent a lot of time refining our plan for the villages. A few things came to our attention that we were not aware of. First of all, with this being such a male dominated society (and abusive) there was concern that the sewing machines could be destroyed or sold if put in the women's homes. This brought on a chain of other concerns and considerations, but finally we came up with a plan. My biggest concern was what we had planned and how much time we had. We only had 5 days at the most and we wanted to teach 2 women how to make shorts, button shirts, and dresses. OMG, under the best of circumstances I don't know that I could teach 2 new beginners to make these three garments well in just 4 or 5 half day sessions. I was really stressing out about this. I knew we did not have access to electricity, pressing equipment, good light or reliable machines (another post about that later). In addition, there was the language barrier. (I do not speak Lugandan and very few women speak English. Those that do, don't understand us and we don't understand them.) Nonetheless, we really wanted to make this work, so Karen and I did a lot of brainstorming. Also, our original plan was to do a basic micro-economics business plan, but after talking to some of the women, we realized this would not work either! I did a lot of praying about all of this. Well, thanks to God, we came up with a new plan.
We knew that the women we worked with (we planned on two, but ended up with three) would need a lot of practice time. There would be no way that we would be able to get them up to speed enough to be making uniforms in one week! We went into the city of Jinja and bought a lot of fabric in beautiful colors. We now were planning on training 3 women. (Actually, I was doing this part and Karen was working with 20 other ladies on hand embroidery.) We came up with a "business plan." The women would each need to make at least 4 pair of shorts (elastic waist), 3 shirts and 3 dresses in order to develop their skills and confidence. These practice garments would then go to children in their villages who needed clothes. This was a perfect solution. Their giving back to their own villages would be their "payment" for use of the machines. The machines would be kept at the church (2 in Kasanna and one at the resource center in Busanna.) After the women completed making clothes for the children of the village, they could then use the machines to make garments to sell. The patterns that we used would still work perfectly for school uniforms when used with different fabric. Also, at this point, if the women wanted to buy the sewing machine so that they could take it home, we made an affordable price (1/2 of what we paid) available to them. I worked with 3 women from 3 different villages. The first is Kathy. She lives in the village of Kasanna. I have known her the longest and of the 3 women, she speaks the most English. Last year Kathy took us on a walk through her village and we even took shelter in her home (mud hut) during a rainstorm. She has some basic sewing skills, but is still a beginner.
 The next of the women in Florence. We met her last year and she lives in the village of Busanna. She has intermediate sewing skills and does a lot of sewing already. For example, she knows to understitch a neckline, but didn't know to trim corners or seam allowances. How I wish I could work with these women for a much longer period of time. Florence understands some English, but not as much as Kathy. She rarely speaks in English.
 The newest to our group was Phobe (pronounced "Faybee") She lives in a village called Sababu. I have not been to this village, but hope go go there next year. It is more primitive than Kasanna. They do not have a church building there, so she will have to walk to Kasanna to use the sewing machines. It is about a 2 KM walk. She was very shy and quiet, but had such a beautiful spirit and really wanted to learn. I think she knows a few phrases in English, but doesn't understand much. Also, I think she has had no previous sewing experience. Fortunately, sewing is very visual, so she picked up very quickly. I'm really missing these women right now.
While I worked with Florence, Kathy and Phobe, Karen worked with the other ladies (about 20) on embroidery. We had decided before we came that we would do embroidery since this is something that they could all do, each having their own piece to work on. The women loved this and were proud of their work. They also told us that this is something they could do to make items to sell. They were very excited about it.

The women that did embroidery, also hand sewed a little drawstring bag to keep their supplies in. We also completed 1 pair of shorts, cut out 2 more, 1 dress with two more cut out, and one shirt. Hopefully they can do the rest on their own.
You can see more pictures here and I'll be adding more sometime this week.

 Posts
Posts