Sunday, March 05, 2017

Tobin James Dress

It's raining and drizzly outside, and I have another hour until I need to leave for Sunday School.  I realized I have not written on my blog since before my trip, so it's about time!  I will be catching up with Uganda pictures, but that will be another day.  Today I bring you my Tobin James Dress!

This is the Etra Pattern from Tina Givens.  I don't usually make something in exactly the same colors as the envelope, but this time I was falling in love with that mustard linen.  When I saw the similar color at Joanns several months ago, I had to get it.  I decided to use an eggplant color (actually more of a dark red violet) for the trim.  So in that respect, I guess I did not use EXACTLY the same colors.

TG patterns usually leave a lot to be desired in the drafting department, but this one had no problems.  Well, I say no problems if you don't count the bottom trim.  Since the sides of the dress end at an angle, it's better if you cut the joining part of your strips at an angle as well.  Of course, if you don't, it gives you a different look, which might be your preference.

The one thing I always change in TG patterns is the pocket. I don't like her pocket shape since the top of the pocket seems to flap over.  If you are stitching the pocket to the front fabric as a design feature, then this shape of pocket will work, otherwise, I trim off the top "hump" of the pocket.

When I first saw the picture for this dress, I thought the black part was an underskirt or separate layer.  It is just trim sewn on, so the picture is a bit deceiving.  Also, the picture looks like it has an asymmetrical hem, but in reality, the hem is straight.  There are strings on the inside so that you can draw up one or both sides to get a different look.  Maybe that is what they have done here.

I'm calling this my Tobin James dress because I got this little sun emblem last year when we visited Tobin James Winery.  It is their logo.  When I decided to make this dress, I knew I had to incorporate it somehow.  I love how this design feature turned out.


I really like how comfortable this dress is and the sleeves really do fit well.  I often have trouble with sleeves being either too tight. or too loose at the lower arm.  These fit the way I like.  The neckline was too low and I raised it about an inch or maybe more.  I will raise it even more next time.  This fabric is medium to heavier weight linen, so I think I will use a lighter weight linen next time.  It is a lot of fabric.


On this pattern I cut a small at the shoulders and drew the underarm seam out to a medium.  I made no other fit adjustments.   I did try to add a dart, but I did not leave enough room for the dart leg, so I ended up easing in an extra inch of length in the front.  I'm not sure if it is needed, but next time I will try for the dart.


In addition to raising the neckline, I thought the neckline was too plain, and the gold, even though it is in my color pallet,  looked too blah against my skin. As an afterthought, I added a bias binding inside the neckline.  The inside edge is stitched, but raw.

I used the same finish on the hem strip.


Here is the dress with the ties done up on the sides.


I'm wearing this dress to church today, but when one of our friends came to pick up DH this morning, he commented "nice nightgown."  Hmmm...


Friday, December 23, 2016

Now Shirts

One of my favorite patterns is the Sewing Workshop Now shirt.  I have made a couple in the past, and although I didn't think I would wear them, they ended up being one of my favorite garments.  I wanted to make a couple of lightweight shirts to take to Uganda, and also wanted to teach my friend Sylvia how to make a shirt.  She did GREAT with this pattern.


The first one I made out of light weight Merlot linen from Fabrics Store.  The next one is a sheer crinkled georgette type fabric, probably polyester.  I changed the sleeve length and overall length of the shirts.

One of the things I like about this shirt is the unusual collar construction.  You kind of use the burrito method to put it on, so there is no hand stitching or stitching in the ditch.  Another nice thing is that the entire shirt is constructed with French seams.  This makes it perfect for a ravelly or sheer fabric.  On the sheer shirt, I used baby hems for the bottom and turned up a double hem to the outside on the sleeve.


My Babylock Ellageo was giving us fits with the buttonholes, so I dug out my trusty Pfaff hobby machine.  We could have made the buttonholes on the Aria, but I wanted Sylvia to learn how to make a 4-step buttonhole.  These buttonholes turned out perfectly every time!  (I'll have to snag a picture next time she comes over.)  Now she knows how to make great buttonholes on a four-step machine.


She has a really cool vintage Nelco machine (sz217) and we just got it back from the repair man in Fresno.  Going into his shop is like going into a sewing machine museum.  There is every make of old sewing machine and every type you've ever seen.  He is very knowledgeable about every little detail of sewing machines.  We were just getting her machine out of the case to show him and he knew the model number  before we even showed it to him.  He said the machine is well known for its quality among the sewing repair community.

The next few days will include very little if any sewing.  After that, we will be sewing maniacs getting ready for our trip to Uganda.


Wednesday, November 23, 2016

It's time for SWAP

Every year I want to do the SWAP, and many times I fail to complete it.  (I have actually finished by the deadline once or twice.)  This year I think I have a plan that I can actually complete.  The SWAP officially begins December 26, but between now and January 12, I will be busy sewing for my trip to Uganda.  Then I will be gone until February 5, so my start date will not be until the middle of February.  I will try to get 2 items completed before I leave - and hopefully these items will make it into my suitcase for Uganda!  It's hot and humid there, so cool clothes are definitely what is needed.

On the other hand, it is cold here now and long sleeve tops are what I really want to make.  I'm afraid that will have to wait until I return from Uganda.

So the rules for the SWAP are pretty flexible this year.  You can see them here.  This is the plan that I have come up with that I think will work for me.


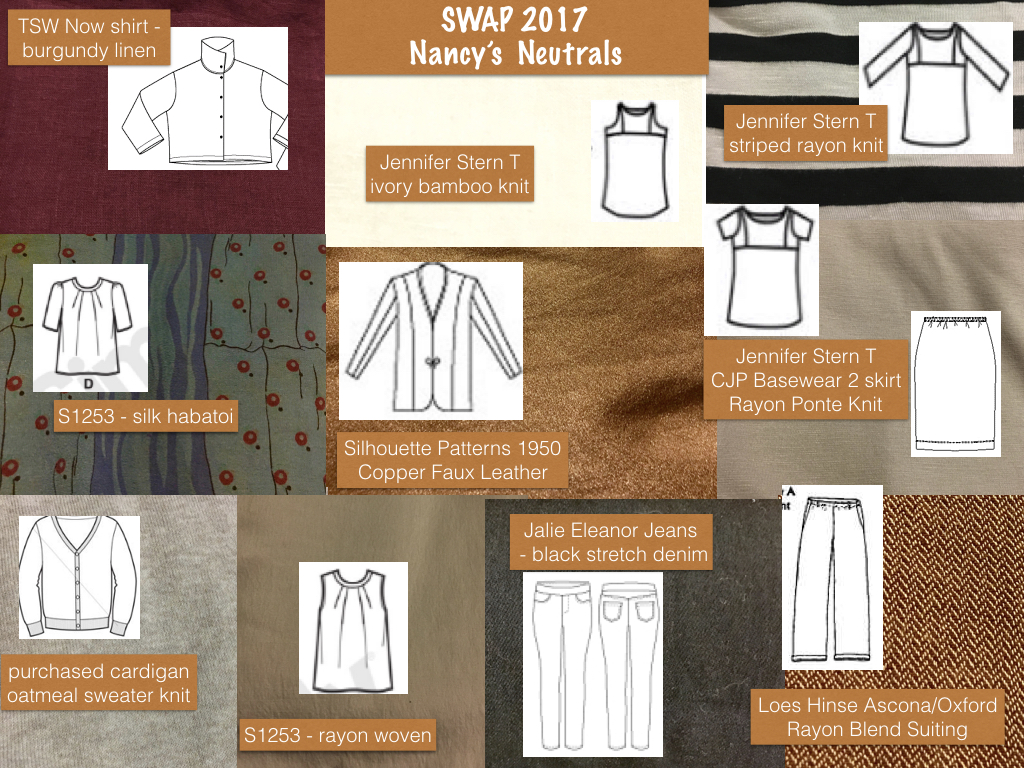
I have 2 "overs" - a purchased cardigan and faux leather jacket
3 bottoms - knit skirt, woven pants, and stretch jeans
6 tops - 2 blouses, a shirt, and 3 tees.  I may change the tee pattern, but I'll do a test one first.

The patterns I'm using are
Silhouette patterns Max's jacket
Simplicity 1253 - for 2 blouses
TSW Now and Zen - linen shirt
Loes Hinse Ascona Pant (and I'm adding the pockets from the Oxford Pant
Jalie Stretch Jeans
and Christine Johnson's Basewear Two  knit skirt.
I've chosen the Jennifer Stern Tee shirt pattern, but since I have never made it, I may substitute something else if I don't like the way it looks.

But for now, it's time to start making the apple and pumpkin pies!
Happy Thanksgiving!!

Sunday, November 20, 2016

Fall creations and more


I haven’t been sewing as much as I’d like to, but I’m getting back in my groove.  I’ve been working on Christmas presents for my family and just finished this afghan for my son.  It was supposed to be his present last year, but oh well!  I do love Tunisian Crochet.  This pattern is from the book, Get Hooked on Tunisian Crochet by Sheryl Thies.  I really love this book.


I have done a little sewing, and made this outfit for the grand daughter.  She has been asking for a gold skirt forever.  Well, she finally got it!  This was her birthday outfit. 


She also got THIS little thing for her birthday (from me of course!)  I LOVE It.  She really can use it and made a little simple felt purse on it (but I forgot to take a picture of it.)  Next I want to teach her to make a skirt.  She is only five, but doing a great job!  I've read lots of good reviews about the durability of this machine, so I couldn't resist.  Plus, since it sits in my sewing room, it's like having a new toy myself!


I have been busy preparing for another trip to Uganda.  This year my friend Sylvia is going with me and we will be going for 3 weeks in January.  The ladies have requested to learn how to make panties and menstrual pads. After combing the internet and pinterest, and making a few different samples, we finally found our “winners.”

The panties will be made from this pattern.  The only thing I don’t like about it is that the crotch lining is too small.  I will add about 1” to the length of the lining.  These panties are easy to make and fit will.  They are the winner in my book.

We sort of came up with our own design for the menstrual pads.  They will come in 2 parts.  The outer piece is the one that will snap around the crotch of the panties.  The “pad” part is actually 2 layers of flannel fabric (7 inch square) sewn together.  This is folded in thirds, giving six layers of absorbency.  


The advantages of this design are
  1. They can use more than one liner if needed for heavier days or night time
  2. The cotton outer fabric is comfortable and pretty
  3. The snap design is clever, but a safety pin can be used if they don’t have access to snaps
  4. The inner layer will dry quickly when washed and unfolded to dry.
We are also blessed that a couple of the teens at our church are willing to do a test run on these for us.  We want to make sure they work well and there are no problems that we didn't foresee.  I'm way beyond the point of being able to test them out myself!

In Uganda, will be working with about 20 ladies at a time who do not speak English.  We will only have a few sewing machines, so much will be done by hand.  This will be a challenge.  Also, the panties will have to be sewn by hand because the treadle machines only have straight stitch and the panties will be in a knit fabric.  Sewing on the elastic really needs to be done with a stretch stitch.


Going to Uganda to work with these ladies is an experience like you can never imagine.  I am so thankful to be able to share it with someone new this year.  It takes us months of preparation to go - shots, fundraising, coming up with workable sewing projects, making prototypes, tracing off patterns, gathering supplies, and preparing bible studies.  There is much communication that must go on with the sending organization as well as making arrangements with the people we will be staying with in Uganda.  This is why we start preparing in October for our trip in January!


Saturday, September 03, 2016

Sequoias and Mix It Top

Yesterday, Andy and I took a trip to Sequoia National Park.  If you have never been there, you need to put it on your bucket list.  I have been to a few National Parks, but I really think Sequoia is the most beautiful.  We had perfect weather and it was a wonderful day.  We only live about 10 minutes from the park entrance, so I think we sometimes take it for granted.  It is so gorgeous and I always wonder why I don't go more often.  Well, one of the reasons I don't go more often is that once you get in the park, there are a lot of winding roads and hairpin turns to get to the big trees.  But, the road is good and well-maintained, so it's not that bad.  I just hate driving, especially on wind-y roads.


The giant Sequoia Trees are the largest (in mass) in the world.  The General Sherman tree, is the largest living thing in the world. I didn't take a picture of it this time, but it has lost 40 feet off the top of it due to lightening.  It also lost a large branch.  The branch is still on the ground and is as big as many trees.  Even with losing all of this, the Gen'l Sherman is still the largest living thing!

 The coastal redwoods are also beautiful and they grow taller than the Sequoias.  However, the Sequoias are very fast growing, live to be thousands of years old, actually thrive with some forest fires and have huge bases.


Here we are standing in front of a fallen tree and you can see the amazing root system. Sometimes the Sequoias just lose their balance and fall over.  They have very shallow root systems.  This particular tree, named the Buttress Tree is about 272 feet long and the base is over 20 feet in diameter!  The tree was estimated at 2300 years old when it toppled over in 1959.

 No, I'm not wearing white socks.  My legs are just that white.  :-(

 And another view from inside of a dead tree looking up to the sky.  You can tell that I just LOVE being in the park.  It's kind of like a magical fairy-land.


We got home late in the afternoon, so I did get some time to finish up a sewing project.  This is the Mix It Top from The Sewing Workshop.  Normally I do not like things up close to my neck, and this is no exception.  Although this top does button, I will be wearing it unbuttoned.  I really do like the Sewing Workshop patterns.  Sometimes they don't look that great on the envelope, but I usually end up really liking the patterns.  The instructions are always well written, and there are usually some interesting applications.  I don't have a picture, but this time it was the way the neckline facing was done.  I like the way it came out and it was easy to do.  


I do like the little button closure in the front, but again, I will not be wearing it like that.  In fact, if I make this again, I will change the neck treatment.  I found a cool vintage button, so that's what I used on this one.  
This top is basically just straight.  There are horizontal darts, but I still did a FBA.  Next, I added vertical darts in the front and back.  I could have taken even bigger darts, but I've found that blouses that are that fitted are difficult to iron, and I like to iron my tops.


I'm really liking the color of this top.  I never used to like orange, but lately I've been into it.  This is a good thing since this shade of orange is right in my color fan.  
Another thing I like about this top is the back.  It has a yoke.  I think I need to lengthen the top of the back because it wants to fall back on me.  This is something that always happens with me and blouses.  I do not have a rounded back, in fact, I usually have problems because my back is erect.  However, I do have a forward thrusting neck, so I think that is what causes my collars to fall back on me.


I've been wearing this top (and the skirt is the Saltmarsh Skirt from the Merchant and Mills Workbook) all afternoon and evening, and it is very comfortable.  I like it a lot more than I thought I would.  This one is just made from quilting cotton.  I love the look of all the poly slinkies that are available, but I just can't wear polyester for more than a couple of hours.  I have some silks in my stash that I've been experimenting on with dying.  I'm sure one of those fabrics will make its way into this pattern!

Wednesday, August 24, 2016

Remake - cropped pants

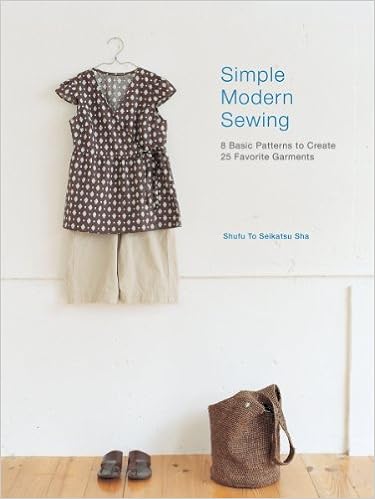
A couple of years ago, I bought the book, Simple Modern Sewing.  I think it was the first Japanese sewing book that I got.  I love the designs, but I especially love the simple, concise directions.  The first (and only so far) thing I made out of this book was a pair of cropped pants.  Well, I've worn those so much that they finally gave out - the fabric did anyway.

Fast forward to this week, my friend Maureen came over and we did a little sewing.  And what did we make?  Cropped pants of course!  The last pair I made were from linen and I loved them.  She made hers from linen, and yes, she is loving them.

This time, I made mine from organic cotton that I happened to find a JoAnns.  I love this fabric and want to go back and see if they have any more.  I think I saw it on their website once.  It is soft and has a nice drape. Besides that, I love the color!

According to my hip measurement, I should have made a large in these.  I actually intended to make a medium this time, but was not paying attention well enough when I was cutting and cut the small again.  The pattern has a LOT of ease.  It calls for 1/2" seams, so I made my side seam and inseams 1/4" since I neglected to cut the right size (can't talk and cut at the same time,)
I'm totally fine with the way they fit.  I wore them all day yesterday and I didn't have to tug at them or pull them up.  I may make another pair in a larger size, just so that I can see how I like them.  I think I want to make these in the long version also.  They are just so comfortable.


The back pocket piece came in the pattern, but next time I think I might make it a bit smaller.  In fact, Maureen and I were talking about doing another pair with inseam pockets instead.  I HAVE to have my pockets you know!


It looks like I may have had the pants twisted in the front when I took these pictures.  It's not fun being your own photographer.  They really don't have a big weird pleat looking thing in the front.

Thursday, August 18, 2016

Merchant and Mills Saltmarsh skirt

A couple of months ago, I started learning about Merchant and Mills.  I had seen several of their patterns on a variety of threads and was especially intrigued by this dress made by Ruth.  That post is what got me started looking at these patterns.  I ordered the 'Workbook" and love the vibe of the whole thing.


The patterns are printed on both sides of the sheets, but they are not overlaid on top of each other and they are easy to read.  Also, the sheets are not so huge that they are unwieldy.  They are about 1/2 the size of a BurdaStyle pattern sheet.  Much easier to use


Here are the patterns that are included.


When I saw the Saltmarsh Skirt, I knew that would be the first thing that I made.  I even had some great linen on hand to do it!  The color of mine is called Blue Bonnet from Fabrics-store.com


According to my measurements (which you have to convert from metric if you are used to US standard) I needed to cut the size 16, which I did.  Next time, I will cut it down to the 14.  There is ample room.  Also, next time I will add 2" to the length.  I have short legs, and even worn below my waist, I could not do the 1.25" hem as suggested.  I just serged the edge, turned it under and stitched to get it as long as possible.  It is the perfect length for me now with flat sandals.  The skirt looks fairly straight in the pictures, but it is actually more of an A-line.


I love the pockets on the sides and I like the way they were done.


This skirt has a separate waistband.  They have you thread the tie through the grommets after the waist band is attached, but I didn't do it like that.  I sewed the front of the waistband and then placed the tie against the fold, pinning it in place so I didn't accidentally stitch through it. Before pinning it, I used a safety pin to bring the ends through the grommets.  My bodkin would not fit.  You could also use buttonholes instead of grommets, but I really like the way they look.  I used the 1/4" grommets.  I really wanted brass, but they only come in silver or gold colors.


The waistband is then turned to the inside and you stitch in the ditch.  I recently bought a new foot for machine called a "fabric-joining foot"  It's designed for stitching (either zigzag or faggoting) two fabrics that are butted up to one another.  The little blade on this foot makes it super easy to stay in that ditch for the stitching.


The pictures I took of this skirt were after wearing it all day, in and out of the car multiple times for errands, in 106 degree heat!  I think it held up better than I did!  And yes, I love those pockets :-)

I love this skirt and actually had a stranger come up to me in the parking lot to tell me how much she liked my outfit.  (This made me feel especially good, because she was a lot younger than me and stylish looking.)  Even  the nurse at my doctor's appointment today was asking me all about it.  We got on a big discussion about linen and I told her that my favorite place to buy linen is at fabrics_store.com.  I definitely think I will have to make another one of these!

(The next time I wear this, I think I will adjust the gathers to be more at the center back and none at the side seams!  That's a pretty wide fanny view. )

Decorative Stitching on a pattern piece.

Good morning!  (Well, at least it is morning for me as I begin this post.)
Yesterday, I forgot to add how I did the stitching on the neckline.  I don't have pictures, but I can lay it out for you.


  • First, I cut out all the pieces except the two neck bindings.
  • I traced the neckbindings on the fabric (I had already cut out the two facing pieces.) and then interfaced the area that would cover the bindings.  I used a water soluble marker to trace them.  I did this because I did not know if the stitching would make the piece get smaller. 
  • Next, I did a couple of samples on smaller pieces of fabric to see how I wanted to get the design to lay out.  i bought a rayon thread that was close to the color of the fabric.  I wanted to bring out the yellow, so it is a little bit more yellow than ivory.  I think the tone on tone look is a little more elegant than contrasting stitching.
  • The fabric still seemed a little wimpy for all that stitching, so I used Solvy water soluble stabilizer on the underside of the fabric.  I used 505 temporary adhesive spray to keep the solvy in place.
  • After I finished all the stitching, I checked the size against the pattern pieces and cut them out.  They did not change in size - but I would always do it this way just in case!
  • I found that the added advantage of leaving the pieces uncut while stitching is that it is much easier to turn and manipulate the fabric under the presser foot.  I messed one up and tried it on a cut out piece and it was a nightmare!
  • Finally, I rinsed out the cut pieces by hand and let them dry before sewing them in.  This is unnecessary, but I don't like the feeling of the stiff stabilizer when I'm working with it.
My new Baby lock has hundreds of stitches on it, so I want to incorporate that into some of my garments.  This was a leaf and vine pattern.  I ran three rows of it with the middle row running the opposite direction.

Wednesday, August 17, 2016

S1253 - Earthy Rich Parchment

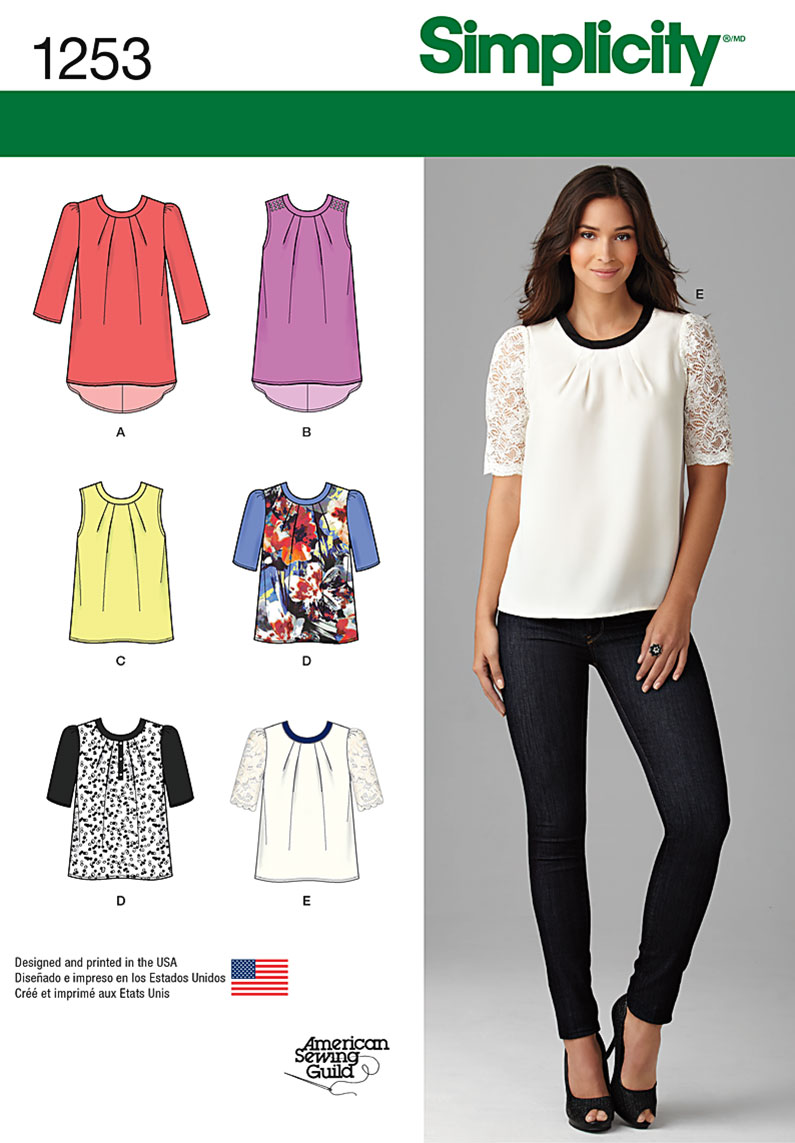
I have had this pattern for a while, thinking I would make view E.  As it turns out, I ended up making view B first.  I was in JoAnns the other day and saw this beautiful "parchment" colored cotton gauze.  I whipped out my color fan, and sure enough, it was the right color for me.  I have a couple of other cotton tops in a similar style that I've been wearing all summer, so I knew this would be the perfect pattern for this top.


I wanted to do something a little extra for the neckline area, so I used the decorative stitching on my machine and some rayon thread to give some texture to the neckline.  I like how it turned out.  I think that was the most time consuming part of the whole top!


The rest went together really easily.  I did make a few alterations.  One time a few years ago I talked with Loes Hinse in her shop in Carmel.  She suggested that for my figure, instead of doing a FBA or adding darts to an undarted top, that I add to the top of the shoulders in the front about 1/2" and to just make sure I have enough circumference across the bust.  So, this is what I did.  I added to the top of the shoulders in the front only and did nothing to the back.  I extended the armscye seam out to the size I needed for my bust.  I usually have to make the shoulders about 2 sizes smaller than my bust size.  This is a pretty forgiving pattern and the fabric is pretty flowy, so it definitely worked for this.  It will be interesting to see how well it works when I make one of the views that has a straight hem.  Another advantage of this adjustment for me is that it lowers the neckline.  I have a forward tilting neck, so I usually try to lower any neckline that is high.  This one sits perfectly on my now.


I also raised the front of this blouse a bit.  It wasn't hitting me in the right place, so I raised the front only.


I love this top, and the first time I wore it, DH and I were going out of town for the day.  On the way to his meeting, I managed to dribble coffee down the front of my top.  Arghh.  I got most of that out, but then we went to teppanyaki for dinner and somehow I got sauce on the front of my top!  No wonder I rarely where light colors!!  Thank goodness for shout and a little laundry detergent.  It all came out in the wash - phew!


The color of this top fits into my new color plan.  I am only supposed to wear my "whites" on one half of the body at a time, so a top in this color is perfect.  As you can see, this is about as light as I should go in the white category.  I am not a high-contrast person, so I would not wear this with a dark skirt or pants.  Something midrange is a little better for me.  The pants I am wearing in these pictures are a little light, but they are all I have right now that work. I'm going to be busy getting a lot of sewing done I hope!


Because of the contrast in the pictures, the top looks almost white.  However, in real life, it is almost exactly the color of the top swatch on the "conservative" page.  It's just a touch more yellow.