
It's finished and I even wore it to church today. I created my own lining pattern, but it's a little snug. Of course, I serged the side seams of the lining, so I can't let it out. I may end up putting in some kind of gusset - just over the butt!
Anyway, I really like this skirt. I like how the tab on the left side covers the top of the zipper. I like the flounce in the back. I like the shape of the body. All in all, I think this will be a keeper. Maybe my new TNT skirt pattern. I think I'd like to make the version with pleats or the flounces on the side.
I put a lot of extra work into this skirt. The fabric was expensive, but worth it I think. I bought it from Fashion Sewing Group. Because of that, I wanted to take extra care in the construction.
I underlined the whole skirt. All of the seams were overcast by machine or hand, and then handstitched to the underlining.
I wanted to do a lapped hand picked zipper, but when I checked my zipper stash, I didn't have one the right size/color. I did have an invisible zip though, and decided to try that by hand. I like the way it turned out, and I don't think it took any longer than doing it by machine. Also, when the bottom of the zipper was making the side of the skirt poke out, it was pretty easy to take out those handstitches and release the bottom where it was attached to the s.a. I like the tabs on the sides of this skirt. They both button with a buttonhole. The left one covers the zipper, so you need to be able to open and close it. I got these buttons in a fabricmart button bundle one time.
 I lined the skirt with ambiance rayon and also used bias strips of the same to bind the raw edges of the hem. I think this was a good idea because this fabric is really loosely woven and would probably ravel all apart.
Here is a view of the flounce in the back.
Sunday, March 30, 2008
Wool Tweed Skirt- part 2
Saturday, March 29, 2008
I'm joining the world of coverstitching

I have been looking into cover stitch machines lately and decided to buy a Janome. I found this deal on Ebay and for $300, I think it will be worth it. I looked at the Babylock, and if we had a great dealer locally, I would have considered it for $800.00. But seeing as how our local dealer doesn't know "jack", I decided to go with the Janome coverpro. I also purchased some extra accessories, but still am getting away with about $450.00. Still far less than the 800 for the BL. Debbie Cook has great information on her site for Cover stitch machines, and there is also a thread on PR. this is the Coverpro 900. The 100 is probably better, with 4 thread,s but the price was right on this one for me. I just talked to Kevin and Ken's Sew and Vack today, and my machine should be here soon.
Thursday, March 27, 2008
S4787 - great skirt pattern

I've been wanting to make this skirt since I bought the pattern last year, but never have. I have a beautiful wool tweed that I purchased from Fashion Sewing Group and am using this pattern for my swap. This really would be quick and easy, but of course, I won't be making it that way.
A few weeks ago, I cut out the body of the skirt. This fabric is really loose in the weave, so I decided to underline all of the pieces with silk organza for stability. I used a loose basting stitch to attach the pieces.

 This fabric is GREAT to work with. I wish I would not have waited until SPRING to make this skirt! Wool is so cool because you can practically mold and shape it into anything you want. This fabric is a little bulky, so I didn't know if I would be able to make the narrow hem on the flounce, but it was amazingly easy. The fabric practically just curved itself around the edge of the flounce. This is folded over double.
 Here is a picture of the flounce sewn onto the back of the skirt. Every seam on this skirt has been overcast, either by hand or machine. I have my serger in the shop, so I tried out one of the overcast stitches on my sewing machine and decided to use it on the seam allowances. Even though this skirt will be lined with Ambiance, the fabric really ravels, and so does silk organza. Hopefully, the overcasting will help that. Some of the smaller seams are overcast by hand. Right now I am in the process of slipstitching all of the seam allowances to the underlining. I did this when I made my bustier, and it really does make your seams stay flatter.
I certainly am having opportunities to practice the hand stitches we learned at PRWeekend West Coast. So far on this I have used hand basting, hand overcasting, fell stitch, catch stitch (for blind hem) and am planning on using a hand picked zipper in the side.
And, OMG, I am totally in LOVE with this thread. I went into the local quilt shop the other day and needed to get some thread to work with this skirt. I had tried gutterman at JoAnns, but they didn't have anything that was the color I wanted. I knew that "Thimbletowne" sold Mettler, but I didn't know that it was cotton. This shop has people that work their that acutally do sew. The lady I talked with does garment construction as well as quilts and told me that she ALWAYS uses cotton thread on any natural fiber. I've never been a big fan of gutterman, but Coats and Clark is too heavy for a lot of things and doesn't work on my machne anyway. I decided to give this thread a try. I decided how much I absolutely love this thread when I had to rip out a seam. I seam I had stitched twice and already trimmed the seam allowance. This thread just pulled away from the fabric so easily I couldn't believe it. I'm also loving it for all of the hand sewing that I'm doing on this. Yes, I think I'm a convert.
Wednesday, March 26, 2008
BWOF 119 Finished

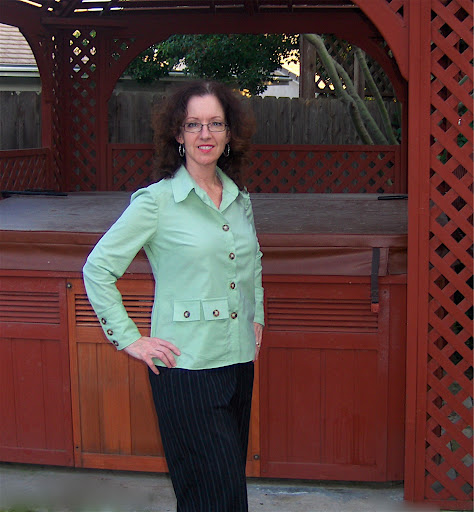
OK Adrienne- here you go! The tutorial is finished and so is my blouse. I must say "Thank you" because I like this one even more than the first one. For some reason, it is just more comfortable. I trimmed the armhole seam allowances to 1/4" on this one and don't think I did on the last one. Also, this fabric is more fluid and softer. I'm glad I made it.
Next project will probably be the skirt for the Timmel Swap and then the cardigan. Then I will be finished with that!
And BTW, the honeymoon is OVER!
Yes, those are little teeth marks in the upper right hand corner. My perfectly good ipod is now perfectly useless. Arghhh!!! OK, well, I guess I can't stay mad forever.
Tuesday, March 25, 2008
This one's for Adrienne
Last month I made the tie front blouse from the Feb BWOF. At the time, I also purchased some green chiffon-like fabric to make the same blouse. I did make a short review of the collar, but only part of it. Adrienne asked for some help on making the blouse. I figured that as long as I was going to get out the issue and re read the directions, I might as well make blouse #2. I am posting a picture tutorial as well. I am not very far yet, but hope to finish this evening.
 Last night I was trying to find this green fabric and realized I had not written down which box I put it in. As I started looking through my boxes, I thought, "THis is ridiculous! I have TOO MUCH FABRIC" Now, I wouldn't mind having too much fabric if I had a dedicated area to store it all. I actually like all of my fabric (well, ok, there were a couple of things that made me wonder...) Anyway, I decided to cull through the stash and get rid of at least one box. It took me most of last evening and part of this morning, but I am taking over 62 yards to the goodwill on my next trip over to that area. This is what 62 yards of stash looks like. It sounds like it would fill more than 2 large Victoria's Secret bags, wouldn't you think?
Anyway, I still have over 17 boxes like these left! I better get A LOT of sewing done pretty soon!
Saturday, March 22, 2008
New Look 6515

I finally got a little sewing done and finished NL 6515. THis is a rayon crepe that I bought at F&S fabrics in Los Angeles, the last day of PR weekend. I tried making this shirt last year but it did not come out right. This one is much better.
The first thing I had a problem with was this band piece. It is supposed to be straight. I had been very careful to keep the grain straight on this fabric, but it was really hard to keep straight and shifted around a lot. This piece is a perfect example of what happens when you cut something on the fold and the grain is not straight. 
I barely had enough fabric left to cut another one, so I tore the fabric to get the grain right and trued it with the grid on my cutting board. 
I usually use a rotary cutter and mat, but my "cutting room" was unavailable to me this week since my dad was staying with us. I had forgotten how hard it is to cut things out with scissors! Anyway, here you can see the before and after.
At PR Weekend we took a hand stitches class from Susan Khalji. One of the things she taught us was the hand picked zipper. Now Sherry, who was sitting at my table, mentioned that she uses hand picked zippers for everything, but that she prefers the lapped application, sewing the first side down by machine. Since this blouse calls for a lapped zipper in the side seam, I decided to give it a try. I'm really happy with the way it turned out, although you can't tell much from this picture. The irony of the whole thing is that I can get the blouse on just fine without opening the zipper, so I didn't need to even put on in!
Another thing I did differently was to use silk organza bias strips rather than pre-packaged seam binding to bind the armholes. I thought the s.b. would be too heavy for this rayon crepe. I cut the strips 1-3/4 inches wide, but should have gone with a minimum of 2" due to the 5/8" seam allowances.
I also did a "baby hem" on the bottom of the blouse. First I stitched 1/4" from the cut edge and used that as a guide to press up the hem, with the stitching just barely turned to the inside. Then I used an edgestitching foot to stitch really close to the edge. Next, I trimmed the excess off close to the stitching. You turn that under one more time and edge stitch again. This gives a really nice, narrow hem.
What else did I do today? Well, I decided to go to the Babylock store and check out the cover stitch machine. First of all, let me say that the local Babylock dealer is about the only thing that would KEEP me from buying a BabyLock. I went in there the other day to ask about the coverstitch machine and he had no idea what I was talking about. I tried to explain to him what a cover stitch was, and he kept showing me other stitches on the regular sewing machine that were nothing like it. He told me that he didn't think that BL even sold such a machine, and then I saw one on his shelf and pointed it out to him. He said "Come back on Saturday when Linda is here." OK, so I went back today, but learned little other than the price, which was $899.00! I think I'll just continue to hem things the way I always have.
I also went to the Bernina store, which happens to be the local quilt shop. I think I may sign up to take a class there. They have a lot of great classes (all quilting) but I'm always open to learn new skills. They also have people who actually do sew working there and know what they're talking about.
OH, and I have a new sewing buddy - although his biggest contribution to my sewing so far has been to climb up on my table behind the ironing board and tear up some pattern pieces. But, most of the time, he is happy to just sit next to me while I am sewing. His name is Dobbie and we got him from the SPCA this week. We were lucky to find such a mellow dog and he really is a sweetheart.
Monday, March 17, 2008
PR weekend

This weekend was PR Weekend and it was so much fun! Of course, the best part for me was meeting all of my online buddies (well, not all, but many) and making new friends. I'm not usually that good at meeting new people, but this was so fun. I think having the Susan Khalji workshop first thing was a great way to start. We all sat around at tables and did hand sewing and got to get up and walk around and chat and see what others were doing. Friday night we kind of split into two different groups and went out to dinner. Cindy had started a white blouse sew-along on PR, (which turned into a sew a blouse, period) so we all wore our blouses out that night.When we got back, S.K. did a trunk show and several of the girls got to model the clothes. That was fun and we were all tired by the end of that day.
  Saturday was shopping all day and it was a blast. We all found some great deals. Or first stop was Michael Levines (Pictured here.) Although they were not a discount store, they had a great selection. My favorite store was a little tiny place called Fabrics & Fabrics. It was owned by an elderly gentleman who was as sweet as he could be. It was floor to ceiling fabric stacked on rolls and there was hardly room to walk. He had a great selection of silks and other fabrics as well. I had decided that I was going to mostly buy linings, so this is where I spent the most money. Other fun stores included Mikes, where I got some silk charmeuse for $5.00 a yard and Michael Levine's Loft, where they sell by the pound. Cidell and I grabbed denim and I got enough for two pairs of jeans for $10.00. After lunch we hit B Blacks, and they had some fabulous wools and silks, and although not cheap, were of fabulous quality. They also had zippers for 35cents and I picked up two jeans zippers for 65 cents each. By this time, we were mostly all dragging and caught a bus back to the hotel.
 Saturday night dinner we went to a mexican dinner and had a great time before returning for our "ugly fabric" fashion show.
Since we had all had a drink or two, this was a hilarious event for all of us. 
Sunday morning many met for breakfast, but there was a small group of us that opted for walking over to Starbucks instead and then we hit F&S fabrics before I finally hit the road to come home. Cindy was my room mate and she was great. We had a lot of fun and Sunday morning she helped me get all my measurements according to Kenneth King's Moulage CD. I downloaded Eric Clapton's autobiography before I went this weekend, so had a great story to listen to in the car as well. All in all, it was a great weekend.
Wednesday, March 12, 2008
Just in time for PR weekend
Well, laundry, packing, and a few other things were on my to do list tongiht, but I just HAD to finish this blouse. I want to be able to wear it at PR weekend. The only way I could make the front of the blouse look right was to add trim. I an lucky that I was able to find the type of trim I was looking for - and this was the only one they had at JoAnns that would really work. It wasn't the original look I was going for, but I am pleased enough with the result. 
I love the shell buttons.


Monday, March 10, 2008
Just Watch Me
I am determined to fix this. I don't know how yet, but I think I have an idea. After being disappointed by the fact that this great fabric wrinkled like CRAZY after being handled so much, and that the embroidery thread broke about a gazillion times, Doing and redoing the placket, and ton's of hand sewing - I WILL MAKE THIS A WEARABLE GARMENT.
Sorry - I'm getting carried away here...
A little disappointed
I've wanted to make the "poets blouse" from BWOF 1/08 ever since I saw the picture. I worked on it all day yesterday. I added some interesting details, like a special buttonhole and embroidery on the yoke.  I had a bear of a time getting the yoke to fit the bodice correctly and ended up sewing it on by hand and the machine stitching it. This looked pretty good - no puckers. Then there was the front placket. I probably would not have known what to do had I not made one before. Well, it turned out crooked, so I had to do it over. Then I realized I had left over right and thought, "It's not worth doing over again" until I realized that the top edge did not line up, so I did do it over again. I still have a little pucker at the bottom of the placket, but this is because I did not remember to mark it carefully and had made a mistake in the cutting of the pattern. After I got everything assembled and tried it on, I realized that my yokes do not line up. I am so frustrated about this because I know the problem was when I was trying to fit the yoke to the bodice. One side kept hanging over more than the other side. I should have taken out the pleats and adjusted it, but I decided to just cut off the end of the yoke piece instead. This was a mistake because it changed the curve on the bottom of the yoke and that is why the two edges don't line up.
Lesson Learned: When to pieces don't line up, don't try to force them too. Take time to figure out WHY they are not lining up. It wasn't until this morning that I realized that the reason my yokes didn't line up with the bodice is probably because of the pleating. Also, there were not enough notches for lining things up on the yoke piece. I will add these the next time I make this. Yes, I think there will be a next time.
I still have to make the buttonholes on the front, and will post pix when finished.
Friday, March 07, 2008
PR weekend
Only one week to PR weekend, and I'm getting excited! I have next Friday off work, so I'll be driving to LA in the morning. I think it will take about 4 hours - so I think I'll download a good audio book. I'm really anxious to meet so many of my "online friends>" I think that will be the best part of the weekend. I really don't NEED any fabric, but I'm sure I will HAVE to buy some!
Well, I'm posting this because I need accountability! Andy and I just joined back to Weight Watchers. I am a "lifetime" member, meaning that I met my goal and stuck to it - but it has recently "unstuck" so I'm going back. I only want to lose 10-15 pounds, but it's just not happening on my own. So, here we go...
Tuesday, March 04, 2008
Yay - it's finished!
I spent several hours yesterday after work (actually, about 4-1/2 hours) working on my blouse and finished all except the pocket. That alone took me about an hour today. And, as it is, I wish I would have made the flaps smaller. Also, in order to wear this blouse with a belt, as is shown on the model, you would have to have it be several inches longer or the belt will cut the pocket across the middle.
I'm not thrilled with the blouse, but I have learned a lot through the process. As you can see in the picture, it pulls a little when I move my arms. I find this on a lot of my blouses and think I need more room in the front of the armhole. It really isn't that it is too high, just that it seems to be too snug in the front of the arm. I've already gone back in and altered my pattern to take 1" off the side seams on each side at the hip. I added that in and I don't like the way it makes the blouse stick out at the bottom. I would really like this better if I were to take out those flatfelled seams on the sides and take them in. This fabric is hard to "unstitch" so I doubt I will do it. Now that I have worked this hard on this pattern, I would like to make it again with a few more tweaks. I like the long cuffs and I think they are slenderizing on the arms, but they are a bear to button. Fortunately, I can easily get my hands in and out by only unbuttoning the bottom button, so the others will stay buttoned.
Monday, March 03, 2008
Well Worth It

I didn't really want to go to Three Rivers yesterday. Not that I don't enjoy seeing my dad. It's just that it's a 45 minute drive, plus the visit time, and I really wanted to do some sewing. But I couldn't stop saying how beautiful and clear (clear is something we don't see often here in the valley) it was. Everything looked almost surreal. I just had to stop on the side of the road and take this picture. I took this picture with my phone, so it's not as beautiful as real life, but still... (click on the picture to get a better view.) The wildflowers are out - it's beginning to look like SPRING - yay!!!
Sunday, March 02, 2008
Basic blouse progress
It's been slow-going, but I feel like I really made progress this weekend. I'm really liking this blouse. The fabric is an oxford cloth and it is really soft, but has some body to it. It kind of reminds me of chambray shirts. This project has involved a lot of firsts for me. First of all, there are the flat-felled seams. The one on the sleeve was difficult because you had to sew all the way down the "tube" of the sleeve. It still turned out pretty good I think.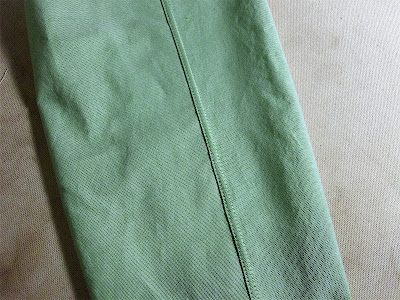
Another first was binding the sleeve-bodice seam with silk organza. This really gives a nice finish to the sleeve seam. I sewed this on by hand.

I don't recall ever making a long sleeved shirt with cuffs, so I'm sure that the sleeve placket was a first too. I liked this method (continuous) but BWOF gave a good tip of sewing a mitered seam at the top. This little quarter inch of sewing makes a big difference in the way the sleeve vent looks.
I also changed the back of the yoke. On the muslin, I did not line/face the yoke, so it was much easier to make the point. Also, I did not use flat felled seams on the muslin. Using this type of seam made it almost impossible to make the point in the yoke. I tried and ripped out about 3 times and then finally changed it to a curve. I'm not exactly thrilled with how it turned out, but it's liveable. I will have to redraft the pattern to reflect this curve and then it should come out a little better - at least I hope it will.
All I really have left to do is the pocket, hem, and buttons & buttonholes. I think the pocket may take a little work, but the rest will be easy. Almost there!
Saturday, March 01, 2008
New Wonder Drug

Conversation with daughter today:
DD: What are you looking for, Mom?
me: I'm looking for my beeswax.
DD: What do you need it for?
Me: It helps you sew better.
DD: So, you eat it?
. . . . . . . .
I'm off to go take my daily dose now so that I can really get going on my sewing.
(mind you, my daughter is 20)


