Saturday, December 29, 2012

Now #2


Today I whipped up (uh, I'm slow, it took me most of the day) another Now Shirt.  This time I narrowed the front and made the adjustments I mentioned in my last post.  I added 3" in length and shortened the sleeves by 1"
Here I'm wearing the collar unbuttoned, which is how I will probably wear it most of the time.


I love the finished seams on this top.  Even the armhole seams are finished with French seams.  I don't know how possible this would be to do with a regular set in sleeve, but this has a really shallow sleeve cap, which does make it possible.


I also like the way the collar is completely finished on the inside (with no hand sewing!)


I think the fit on this one is much better and I really like it.    You can see in the picture below that the arms are pretty full, but not too floppy.  I am not used to such a high neckline though, so I know I will probably never button the top button.  I wear turtle necks and use scarves all the time, but for some reason, I just don't find a button up collar flattering on me unless it is unbuttoned!


A word about quilting cottons.  You do not have to avoid them like the plague.  I have found that there are certain brands that are usually of better drape and hand than others.  Two that I have used successfully are Moda and Benartex.  This one happens to be Benartex and has a super silky hand and nice drape.  It is lightweight, almost like a lawn, but not as sheer.  I really like it.  This fabric is dark red, orange and purple.  I wanted to use purple buttons, but tried 4 or 5 different colors of purple thread to make the buttonholes, and none of them looked right.  I even made a trip to the fabric store to buy there "right" purple, but then when I did the sample buttonhole, I was not happy with it.  I ended up doing the buttonholes in red, but still used the purple buttons.


Friday, December 28, 2012

TSW Now Shirt

I've always wanted to be a fan of TSW patterns, but have always shied away from them due to the boxy shapes and loose-fitted designs.  I've always felt like fitted silhouettes are more flattering.  But sometimes a girl just wants something comfortable that still looks good!!  I've noticed lately that I have a shortage of long sleeved shirts in my closet. A while ago I bought the Sewing Workshop's Now and Zen shirt pattern from someone  on PR.  I don't even remember who I  bought it from, but unfortunately, the pattern had a FBA done to it (incorrectly) and with 2" added (I only need 1.5" added in length)  This is easy enough to correct, but the worst part is that there was tape put on BOTH sides of the pattern, so it is impossible to take it off or iron over it.  I guess I learned my lesson about purchasing used patterns!  Anyway, I traced the pattern and compensated for the added length and corrected it for the amount I needed.  According to the pattern measurements on the envelope, I needed an XS in the shoulders and a S at the bustline.  I still decided to compare these pattern measurements against a shirt that fits me well, but there was no way for me to really tell since this pattern has a totally different shoulder and sleeve line.  I decided just to make a muslin.  For some reason, I could not find my regular muslin material, but found this old piece of quilting cotton that I knew I was never going to use for anything except perhaps pajamas - and there wasn't really enough for that.  Just 2 yards. I decided to use this for a muslin for the Now shirt.

First I just cut out the basic bodice front and back and basted them together.  I had guestimated where to put a dart and it landed in the right place!  Even the slope of the shoulders was right for me.  I still felt like the top was a bit baggy on me, and did some tweaking by pinning out some of the extra fullness.  I didn't want to do too much, since this is not a fitted shape and meant to be somewhat loose.  I ended up taking a vertical tuck of about 1/4" folded (total 1/2") on each side, which will take an inch off the width in the front.  I did the same in the back, so this will lessen the total circumference by 2"  I think there will still be plenty of room after this.

I also wanted to see how the sleeve would fit, so since I was doing all of this, I went ahead and just made the shirt!  Surprisingly enough, I really like it.  NOw, this is not the fabric I would make as a first choice to make this shirt, but it's actually not as bad as I thought.  Since it is winter, I will be always be wearing a jacket or cardigan with it, so that will also tone down the splash of colors!

I actually really like this pattern and will make it again.  I did buy some other cotton to make this out of that has a lot of orange and purple in it.  I would also like to make it out of flannel or corduroy, and maybe also out of linen.  I wore it tonight to the movies and it is really comfortable, but I feel better dressed that if I were just wearing a T shirt.

This is actually about 3/4" longer than the pattern.
Next time I will add a couple of inches.


Now shirt with open collar


Collar piece completely encloses seams,
 but is done with open ends.


The partner piece in this pattern is the "Zen" shirt.  I haven't checked out the collar construction yet, but the difference I see is that the Zen is about 5 inches longer and has a back pleat.  The collar on the Now shirt is interesting in its construction and I really like it.  It looks good both buttoned and unbuttoned.  I plan to cut out another of these tomorrow.
TSW Now Shirt back view

Tuesday, December 04, 2012

SWAP 2013

It's time for the SWAP over at Stitcher's Guild to begin.  Well, actually, it begins December 26, but you can have one item made ahead of time (actually 2 depending on how you bend the rules)  I'm sure I won't have anything done ahead of time, but I do think I finally have a plan.  I have the black clovers already cut out (ahem... they've been cut out for months) and the fabric for everything I need from my stash.  I also have a dress cut out that I could include, but we'll see how this plan goes.  I really want to finish my swap this year, since I haven't been too successful in completing ANY plans for the last few years.  I really like my plan this year and know I will wear all of the garments.  Well, I'm not sure about the Sassy Librarian blouse or the Silhouettes tie front blouse yet, so I'll save them for more near the end and see what I feel like when I get to that point!


The idea of the swap this year is to have 2 separate capsules with one linking piece that could be worn with either capsule.  Actually, I think all of my pieces work together, so that won't be too much of an issue for me.  The jacket is the linking piece.  The pattern is for an unlined jacket, but since the fabric is fairly light weight, I will either line or underline it.

I'm home sick today, so I spent some time finally making up my story board for this.  I wish I had more energy and could actually cut or sew something, but that's not happening today.

As for the LBD, I put the invisible zipper in the other night, but I must have pulled on the fabric because it is kind of rippling on the second side.  I'm in the process of ripping that out and doing it over.  I hate ripping out, but ripping out on black is the worst!  The wool I'm using is a little "spongy" so that makes the stitches sink in and look like part of the weave of the fabric.  I guess I need to sit outside in the daylight to do this!

Wednesday, November 28, 2012

Let the LBD begin

I don't know why it is, but the well-formed curved seam is just a thing of beauty to me. :-)
The darts are sewn in the lining and the dress.  This took me a couple of hours tonight!  Not only are the darts a pain to pin, they are also a pain to press.  The sewing wasn't bad.  But all of those curved seams require notching - which takes twice as long as clipping.  And you have to do that too!  I also pinked the seam allowances since both the lining and the dress fabric would fray.  Now, the hardest part is done.  Next I will put in the invisible zipper and then assemble the rest of the dress.

I was hoping to finish in time to meet the deadline for the Little Black Dress contest over on PR, but that's not going to happen.  Tomorrow I have a staff meeting after work and then an appointment with the trainer at the gym.  Then I will be frosting and decorating cupcakes for the school fundraiser.  Friday night is the school carnival, DH's birthday, and the deadline.  So, other things win out, but I wasn't entering to win.  It gave me the motivation I needed to make the dress, so I'm still going to get it done this weekend I hope.  We are going to a Christmas party the following weekend, so I plan to wear it to that. Hmmmm  I think I'll have to buy some new shoes!

I had almost forgotten, but it is about that time to start the SWAP over at Stitcher's Guild.  I hope to actually complete the darn thing this year!!  I have so many things I want to make, and the rules are pretty flexible this year, and you basically are making 2 mini-capsules with one connecting piece.  I'm going to try to make up a story board this weekend and get it posted.  My tentative plan is using patterns from

  • Colette - clover pants
  • Hot Patterns - jeans
  • Loes Hinse - cap sleeve top
  • Gertie - Portrait blouse
  • The Sewing Workshop - Mimosa Pants
  • Silhouette Patterns - Anns top and Sharon's blouse 


These are the TSW Mimosa pants on the left.


There are still a few tops I haven't decided on, and I have a couple of ideas for the "cross-over" piece. I'm either going to do a black and white boucle jacket from Either the Louise Cutting Acute Angle (bottom) or The Sewing Workshop's Now and Zen jacket (right).


If I find a fabric that I really like, I'd love to do this Vogue Sandra Betzina Coat.


Tuesday, November 27, 2012

the LPD will be a LBD!

Yes, my little pink dress is going to have a twin sister - the LBD!  The fabric and lining are cut, and tonight I marked and pinned all the darts.  Especially since my alterations, the darts on this dress are not that easy to line up.  Imagine an elongated figure 8 with a curve!  Well, not quite a figure eight, but you get the idea.  Now, who knew that silk lining would be so hard to mark?  I used fine pins to mark the darts, gently pulled off the tissue, then marked them with a chalk wheel.  Well, that chalk just does not stick to the silk very well and I could hardly see the markings to pin them.  Of course, my poor eyesight and bad lighting in the dining room don't help much either!  Since there are only 3 days left in the LBD contest at PR, I'm pretty sure I won't finish in time, but I will finish, and I will have a LBD!
     I think I'm mostly excited about it because I wore the LPD to work today and got lots of compliments on it.  The dress was comfortable to wear too.  It was colder than I expected today, so I never did take off the jacket either.
     Tomorrow after work I hope to sew my dress, but I also have to go shopping and put together a basket for our "Harvest Carnival" at school.  It is our annual fundraiser, normally in the spring, changed to the fall this year, and on DH's birthday Friday.   :-(  I was looking forward to the school event until I realized it was the same day as Andy's birthday.  sigh

Saturday, November 24, 2012

Ahhh... much better!

It's amazing how just 1/2" can make such a difference.  I'm so happy that I lowered the neckline on this.    It is only 1/2" lower at the CF tapering to nothing at the shoulder, but it feels much better and I think it looks better too.  I'll be wearing it tomorrow, so that will be the true test.  (Funny you never notice how something like your necklace being caught in your dress until after you are finished taking pictures!)


Thank you all for your great input and suggestions on the LPD!  I’ve decided that I am going to go ahead and make the black version with a few adjustments.

I will do:
sway back adjustment
fold out extra fullness above the bust
shorten the dress by one inch
lower the neckline.

After lowering the neckline on this pink dress, I already like it so much more.  It just feels and looks better.  Now I am anxious to make it up in the black wool.


This morning I made the little jacket that goes with this.  I like it, but probably would not make it again.  I always have problems with double breasted anything hanging right.  This does have an inside button at the top, but still it doesn’t hang like I would like it to.  It is cute and comfortable though, so I know I will wear it with the dress.  I know that some days at work I never take my jacket off because it is just a little too cold for me.  This will be perfect for that sort of thing.  You can see on the dress form (it's inside out) that it has nice wide facings in the front.  I like that.


Even though this jacket is full and not fitted, I knew I would still need to do a FBA.  I have made the mistake of not doing it on things like this before, and the biggest problem is that they ride up in the front.  I did a combination of pivot and slide adjustments to widen at the bust and lengthen the front.  I could not do a normal FBA since there are no darts in this.  I'm please with how that part of it came out.


I was thinking about doing Hong Kong finish on the jacket seams since this is an unlined jacket.  But then, the directions suggested turning under and stitching the seams.  I did that and I like it.  I wish I would have done something similar with the armhole seams, but since they were double stitched and pressed toward sleeve, I just pinked them.  Normally on an unlined jacket I like to bind the armhole seams, and I kinda wish I would have on this one.  Oh well, no one will be looking at my armhole seams I hope!  The jacket went together quickly and easily - my kind of jacket!


I’m wearing this little ensemble to church tomorrow, so we’ll see how I like it after that.  I’m liking it a lot right now.


Back view.  The pictures didn't come out too well, but you can get a general idea of the silhouette.  I think the jacket would be a bit more flattering if it were a little shorter.
Thanks again for all of you who shared your input.  It was very helpful!

Friday, November 23, 2012

the PINK LBD

Here is the "test" for the LBD - but it's in pink!  In my last post I mentioned that I have some issues with this dress.  You can see that there is excess wrinkling above the bust.  I pinched out the princess seams and took them in, but this did not alleviate the problem and now I have wrinkling at the seams!  (I think that's because I tried to fix that without taking out the princess seams before I resewed them.  Oh, well.  I think what I need to do is to fold out about 1/2" horizontally on the center front pattern piece.  That may correct the problem.  Also, I think this is what is causing the neckline to ride up so high.


You can see in the back view that I also have some wrinkling above the waist.  I don't know why I didn't think to do a sway back adjustment on this before I cut it out.  If I make it again, I will definitely correct that.


So, here is my question.  I'm not sure if this is a flattering style on me.  I thought the shoulders would appear wider and be a better balance for my hips.  I like the fit of the dress everywhere except from the bust to the neck in the front.  I have some beautiful black wool and silk lining that is just waiting to be made into a LBD!!  Now, do I:

  • make this again with the above mentioned changes?
  • lower or change the neckline?
  • Hem length:  whether I use this pattern or another, should it be a couple of inches longer, shorter, or the length it is?  I've seen some longer looking dresses (think 40s) that look pretty hot, but then I'm also wondering if it would be more flattering shorter.
Would love to hear some input since I'm getting none at home - hehehe (daughter doesn't like anything I make and DH is blind - he tells me everything looks great - or to wear nothing at all!!)

So what do you think?  Go with this?  Another pattern?  What changes?


Thanks for your help :-)

Thursday, November 22, 2012

HappyThanksgiving

This year I am thankful for so many things - but right now, I'm thankful that I'm not cooking Thanksgiving dinner!  Since my kids are going to their dad's house for Thanksgiving, we accepted an offer to go to my brother's future in-laws for dinner.  I'm baking pies, and since I just spilled half of the pumpkin filling on the bottom of my oven, I decided it was time for a break!!  It seems that my cooking is not going any better than my sewing lately.  Hmmm - may be that I'm not putting enough time into either one!!

I finished this Vogue dress, but am not happy with the results.  I was so excited about this dress too.  l made it from this linen/rayon blend and adjusted the fit before I lined it.  I thought it would be fine, but I'm still not happy with the way the upper chest fits.  I took in the princess seam to adjust for the extra fullness, but now I have a wrinkly seam.  The seam was perfect before, but there was too much fullness  in the upper chest area.  I think I need to lower the bust point, but am not sure how on this pattern.  I redrew the princess line, so I hope that does it.  I always use Sandra Betzina's FBA for princess seams, which I really like a lot.  Now if I could just get my bust line back up where it was in my 20s, I'd be in good shape!   SB FBA

OK, so the bust issue aside, I think the dress fits pretty well other than that.  I originally was making this to 'test" the pattern to make a black wool LBD.  I think I need to slope the shoulder a little more and lower the neckline.  I think the neckline looks higher on me than it does in the drawing.  Unfortunately, I cut up the pattern, which I never do, so I'm going to have to do some guessing on pattern lines.  I have enough fabric left over to make the jacket, so I'd like to do that.  Even though I've already lined the dress and under stitched the neckline, I may still lower it and the armholes a bit.  Pictures soon to come.

Sunday, October 07, 2012

The Stylish Dress Book - dress E

Stylish Dress?  Not so much on me...
This is Dress E from Yoshiko Tsukiori’s Stylish Dress Book - Wear With Freedom book. It has pleats in the front, a gathered back above the waist, short sleeves, faced neckline.
I think it looks great on the model.

Unfortunately, it did not have the same effect on a 50 something curvy body.  I seemed to be swimming in it!  My daughter made the suggestion to pull it in more in the back.  Since I didn't want to cut the dress and put in a zipper (which is what I should have done) I just added some ties to the sides to help pull in some of the fullness.  This made a huge difference - but maybe not enough.  The jury is still out on this one...
I really am enjoying making things out of these books.  Unfortunately, most of the styles are loose and shapeless like this.  I just don't think they are the best match for a curvy body.  Still, there is something about them that I really like.


The instructions in these books are easy to follow, but there are assumptions that you have basic sewing skills. I love the way the directions are laid out in the Japanese sewing books, but the directions are very basic. For example, you need to know how to do a set in sleeve, but there are illustrations..

I used a good quality quilting cotton for this dress, and although it doesn't fall like lawn would, I still think it works. You can't see it in the pictures, but there are little birds on this fabric that I really like.

 I did do a full bust adjustment, but should have added a bit more in circumference at the front. I would also narrow the back if I were to make it again.
I also lengthened the pattern by several inches to make it dress length. As I noted before, I added little ties to the sides to corral in some of the fullness in the back. If I were to make it again, I would take out a few inches of that fullness. It just makes you look big all over.

 I think I may make this again, just because it was so easy and there is something about it that I really like, even though my daughter thinks it is horrible.

 I really am liking sewing with the Japanese sewing books. However, all of the styles are fairly shapeless and are designed for women with small busts. I don’t know why I am drawn to this style when I know it is not very flattering for most body types!

Sunday, September 30, 2012

I'm Sewing Japanese, Oh Yes I Think So


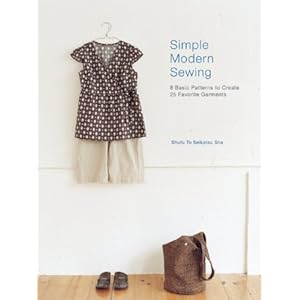
The other day I received a few books I ordered from Amazon.  One was for school, but the other two? Sewing of course!  The first is this:  Simple Modern Sewing


This book has a variety of tops, skirts, pants, and dresses.  It has 8 basic patterns, but the variations add up to 25 different garments.  Actually there are more.  For example, the blouse you see on the cover is shown as it is from cotton, a sleeveless version from wool gauze, and a longer, dress version with long sleeves from denim.  You could use any of the sleeves on any of the lengths, and that would give you 3 more options!
I decided to make the crop pants.  I had some perfect "aluminum" colored linen from Fabrics-store.com.  I love their linen and it's very reasonably priced.  This is 5.3 oz.  I just checked the website, and they don't have this color right now.  They change their colors often, but some are always available.
These are simple elastic waist pants, but I really like the belt, which I almost decided not to make.  I think the belt loops are a little detail that ups the RTW factor. Also, for some reason, I really like the shape of the legs.  The pants use 3/4" elastic.  The only 3/4" that I had was knit elastic, so it may be a bit soft and stretchy for these pants.  Next time I will probably use non-roll unless I am using a lighter weight fabric.  There is also a pocket on the back.
Speaking of the back, I must have a Japanese butt because these pants were made straight from the envelope and I didn't make any alterations to the crotch!  The only alteration I did make was to taper in a little from the hip to the waist.  The size small has a 40 inch hip and the same at the waist.  My hips are 38, so I tapered the waist in to 38 so that I could get them over my hips, but eliminate a bit of the bulk at the waist.
Overall, I'm really happy with these pants.  They were quick and easy to make.  Now that I know that they fit, it will be quicker to make additional pairs.

The book is a Japanese Sewing book and has all of the patterns included.  They are printed on sheets sort of like Burdastyle with many overlapping.  I have traced plenty of Burda patterns, but this one was really a challenge for some reason.  There were pants and a dress printed on one sheet, but I could not figure out where the pants line was.  I think the main reason for my confusion was that the side seam was different for the cropped pants compared to the long pants. It took me a while to figure this out.  It is also helpful to know that on these pattern sheets, one pattern will have the top at the opposite end of the other patterns.  Once I figured these things out, it made it a lot easier.


I really like several of the patterns in this book.  Usually my style is more fitted type garments, but I think I just want some easy comfortable style garments as well.

I also bought another book called Stylish Dress Book: Wear With Freedom.  This is by a different author, but the garments have the same flavor.  This book has only dresses and tops.  Most of the patterns in the book are made with Liberty of London prints.  LoL is beautiful fabric, but usually out of my budget.  I am a huge fan of Lawn though, and love to sew with it and wear it.  Fabric.com and Fabricmart fabrics usually both have a variety of lawn to choose from.  Fabric.com also sells Liberty of London Tana Lawn.


There are quite a few things in this book that I would like to make.  I think you really have to be careful with these loose styles that you have a fabric that drapes well.  That is why I really like cotton lawn.  It is much finer than quilting cotton, has a smoother hand, and usually doesn't need much ironing.  I have found that there are some cottons available at quilting stores that do have really good drape.  The one I've found that I like most is Moda.  It has a silky hand and tends to look better in clothes than other quilting cottons.

All I really want to do today is do more sewing, but we have a lot of things on our "list" today, so I'm doubting that I will get to.  Maybe I'll at least get to trace another pattern!

Sunday, September 23, 2012

Loes Hinse revisited

I haven't made much from Loes Hinse lately - well, truth be told, I haven't made much lately, period!  My job is really interfering with my sewing time!!  Anyway, my "job" is precisely why I need to be sewing!  I don't have anything to wear!!  We are having an interminable summer here.  Of course, this would be the year that our air conditioner died over a month ago and we chose NOT to spend $6,000 to replace it - OUCH!  Well, we finally broke down and bought two window units and are using those to hold us over until next summer.  At least we can sleep now - and my sewing room is cool since it is right off the master bedroom - yay!


I bought this rayon blend linen-look fabric several years ago, so I really don't even know what it is, but I'm sure it is mostly rayon just by the feel, drape, and shiny threads in the selvedges.  It's fairly heavy, but very drapey.  I originally bought it to make a skirt and top, but only bought 2 yards (what was I thinking?)  Well, I must have been thinking of this, because I had exactly what I needed.  Well, actually, I was a pinch short, so I pieced the flounce, but that worked out perfectly.


This is the Loes Hinse cap sleeve top.  There is this version, and then one with a lower neck.  I have made the lower neck version, but don't have any pictures of that one yet.  I paired it with the swing skirt in view B.  Both of these garments are super quick to make and easy.  The top has the neck and armhole edges just serged and turned under and stitched.  The skirt has an elastic waist (which I made too big and now have to go back and re-do it.) and the flounce is also serged, turned under, and stitched.  If you don't have a serger, you can get the same result by zigzagging and stitching.

I'm pleased with how this turned out and it is a nice neutral look that can change up with accessories. (Just like I have accessorized with this most perfectly darling grandchild!)  I definitely see more of these coming to my closet soon!