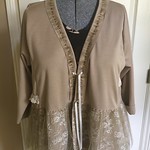
The Gypsy Jacket is finished, and I do have a lot to say about it :-)
This is only the second Tina Givens pattern I have actually made, although I own several now. Her website is like eye candy for me and I love seeing the details (on the ones you can see) on the clothes. To really get a good idea of how the garments are worn and accessorized, you want to visit her designer website, and the Facebook page. That said, you are not going to get any of these directions in her patterns. In fact, the patterns do not even have the same names as the ones she sells. However, as many have said on the SG thread, there are a lot of “design opportunities” in her patterns. Let me add that there are also a lot of fit and pattern making opportunities. Hmmmm…..

Fit - basically, there is no fit in TG patterns. I will have to say that by using her measurement guidelines, I fit into a small and it fits me in the shoulders. Now, on this pattern, the shoulders go straight across. No one has shoulders that go straight across, so I had to draw in the slope of the shoulders. Also , these patterns must be drafted for an A cup, so if you want any shaping at all, you will need to do a FBA. I did NOT on this pattern because I knew it was so loose fitting. However, if I want to make it again, I will so that it does not pull up in the front. Even though this fits in the shoulders, that’s where this ends. I could wear this if I were 9 months pregnant. Both the front and the back are way-oversized. I would have to say that TG patterns are not well-drafted in the least, but I do like her aesthetic.
Sleeves: There is no notch for the top of the sleeve and there is quite a bit to be eased in. The shape of the sleeve head is a little odd and caused more curvature in the front and back and less at the top. I will probably redraw this if I make it again.
Pattern: These patterns come with minimal and sometimes missing instructions. For example, there are two bands in the front. The pattern says to cut 2 on the bias, but does not tell you how wide or how long to cut them. You have to read the pattern to see where they are going, measure the back facing piece and length of the front piece and go from there. There was a problem with this pattern, and I understand that this is typical on her patterns. The side front and side back pieces are off by more 3/4 to 1 inch. The curved part does not line up at all with the concave curve on the CB and CF pieces. This is something you would have to measure yourself and see how much you need to adjust. I added 3/4 to both CF and CB, and could have gone a bit more. Another problem was that the shoulder seams are cut straight across, perpendicular to the CB line. I added some slope, but I should have done more.
 Instructions: as I said earlier, they leave a lot out. Also, things are out of order. For example, they have you measure and prepare the ruffle before you have even sewn the side seams. Then you set that aside and sew it on later. There are hand-drawn diagrams, and sometimes these are helpful, and sometimes confusing. A lot is left up to your own interpretation.
Fabric: This pattern calls for a woven such as linen. I used a double knit I had in my stash instead. This also meant that I did not have to cut strips on the bias, but needed to allow enough length to cut them on the width of the fabric. Instead of cutting 1” strips of self fabric for the ties, I used ribbon. The ruffle calls for a layer of main fabric and a layer of gauze. I used lace and tulle instead of the gauze.
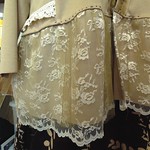
The ruffle. Be aware if you make this pattern that one 8” cut the width of the fabric will not be enough. I made the small, and one width did not give me any more than an “ease” allowance, Not a ruffle at all. This is good in this fabric since the over layers of ruffle I made are ruffle enough (You cut 2 widths of each of those). Even though I chose a taupe colored lace, it looked like a bright ivory against this fabric. That is why I decided to layer it with an dark gold tulle. This is the first time I have worked with tulle. Well, I looked like I had a tutu on when I first finished that ruffle! Not the look I was going for. The first thing I did to combat this was to hand stitch the seam allowance to the upper part of the bodice. This helped a lot. Next, I pressed the ruffle. Be VERY CAREFUL when pressing tulle. You need to use a press cloth and low heat. Even doing this, I did melt a hole into a little piece of the tulle ruffle. After pressing, I put a couple of clappers on top of the fabric to let it cool completely before removing.
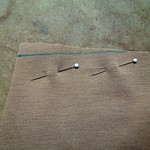
 Details: I added some extra details. I added some vintage lace to the side front pieces at different heights.
 There is hand ruffled tulle with topstitching around the neckline. I used Coats and Clark button and craft thread doubled and an embroidery needle to do all of the hand stitching. When I did the hand stitching around the bottom of the bodice, I had to use pliers to pull the needle through all of the layers.
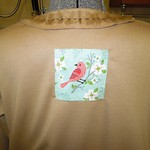
My little bird is sitting prettily on a cherry blossom branch in the back.
As noted before, I used ribbon instead of self-fabric ties.
I wanted this to be a comfy but cute jacket, and I think it is. I’m not really sure of my choice to use the tulle as I am afraid that it will be too delicate. If it should rip, I’m not sure how I would repair it as it will be beyond my patience point to take apart the whole skirt on this thing and do it over.
I would like to try this again in linen, but I would make several changes to improve the fit. Even when something is not "fitted" it still needs to fit and not hang terribly. Even though the fit is not great on this jacket, I think I will still wear it. I wore it to church today and got lots of compliments. In fact, one lady (who I don't even know) saw me walk by the kitchen and said "Wow! You belong in a magazine" Yes, that made my day :-)
 This week I've been working on finishing up my entry for the Endless Combinations contest at PR and getting ready for PR weekend. I finished the last thing yesterday, which was the Seaside Sue top from Stylearc. I'm really happy with this top and how it turned out. Of course, I love wearing rayon jersey and I was desparately needing a couple of black tops in my closet. So, now I've got one me-made solid black top!