I am very concerned right now. lately I have gotten a few notifications that people have added me as a "favorite" in Picassa. I have been very pleased with Picasa web albums thus far and have done all of my online storage of photos here. Recently they have added a feature called favorites and people who add you as a favorite are your "fans" This, I thought, was fine until I noticed that I have 56 favorite - most of whom I have no idea who they are. I see some familiar faces and internet friends there, which is what I expected. But many of these fans have never posted on my blog nor my web album. They do not have any public pictures of their own. Many of these are from foreign countries. The worst part it, I have NO WAY of blocking these FANS from viewing my photos or being notified anytime I post new photos in a public gallery! So, for now, I am locking all of my public galleries. Since I cannot select who can view or not view my photos, I am very uncomfortable about having any of my photos available. I already had some albums unlisted (locked) (like the lingerie photos) but not most. So, by having an unlisted album, you can view any photo I post on my blog or give a link to, but "browsers" cannot look at my photos. I have known all along that any "public" album can be viewed by anyone and this seems good. Lets say I want to see if anyone has a picture of Simplicity 2300, I can just search for that and all pictures of it would come up. I have no problem with this. But WHY would all of these people want to have updates of when I post photos (I'm no stellar photographer) and how did they run across my albums in the first place??
So, if you are a "fan" with Picassa and have never posted on my blog, please leave a note and just let me know who you are. I'm understanding that many users are upset about the not being able to block, so hopefully Google will change that soon. When they do, I certainly do not want to block any of my internet friends and sewing enthusiasts, but I do want to block any stalkers!! (some of the"fans" who do have public galleries are not the kind of pictures I want to be viewing!)
Sunday, June 28, 2009
Are you a "FAN"?
Wednesday, June 24, 2009
Less is More
Yes, I decided to take in the side seams on this dress, about an inch each with a little more at the waist. I also added the pockets. You can't tell much from the picture, but the fit is much better now and I'm much happier with it.
Tuesday, June 23, 2009
Every day Dress
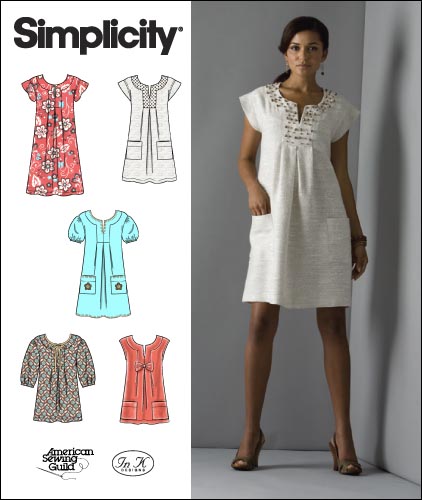
I used Simplicity 2702. I thought this was cute and wanted a simple, easy to wear, easy to make, cool dress for summer. Well, I think I probably got the easy to wear and cool for summer, but somehwere along the line, this dress lost the cute factor.
 |
| From Summer 09 |
Maybe I needed to add the pockets. Maybe I should have stayed with one fabric and done the beading, Maybe I just need a different body type! There are probably some things I could do to make this look better, but its good enough for now. I wanted a dress that I could wear around the house and look decent if I need to go to the store or something. This will work. Unfortunately, the linen is light weight, and I think I will have to wear a slip with it.
Although I don't particularly like the look of the dropped shoulder on me, I do like the way these sleeves are constructed. This is the underarm:

On the inside, the sleeve seams are enclosed with bias tape and top stitched from the right side.
 |
| From Summer 09 |
I don't know why, but I have yet to master this type of neckline. The outside corner thing always ends up with a pucker for me. I understand HOW to do it, and WHAT I should do, I just can't seem to execute it. I may have to make this stupid thing again just so I can conquer that neck band!
 |
| From Summer 09 |
 |
| From Summer 09 |
Sunday, June 21, 2009
Amazing choir (Perpetuum Jazzile) uses there hands to stimulate storm
At first you may think your volume is not working, but keep watching
Saturday, June 20, 2009
The Great White Shirt sew along - Want to play?

I've started a "Great White Shirt " sew along at PR. Are you interested in joining us?
I am going to be using McCalls 5433, but you can use whatever you like! I have a few other things I want to finish first, but I am gearing up to get another shirt with great fit and want to compare this pattern to the BWOF pattern from April that I have been using.
Some thoughts about fabric:
There are lots of great fabrics you can use for white shirts, but when you actually go to find something, they seem to be in short supply! Let's explore some options.
First of all, my white shirts are my everyday go-tos. So, I need fabrics that can handle my everyday abuse! Comfort and ease of care are also number one considerations for me.
Silk: I love silk. But, I am hard on my everyday clothes, so I save silk for more "special" occasions. I will not be considering silk for this shirt, but some of you may want to look at silk twill, dupioni, or medium weight silk. There are other options as well, but I'm not discussing them here.
Cotton: hands down, one of my favorite. BUT, there are lots of types of cotton to consider and not all broadcloths are the same! TRIAL and ERROR are your friends here. You won't really know what you like, until you try it.
- Broadcloth - I bought some 100% cotton broadcloth from fabric.com last year and absolutely loved it. It was easy to sew, requires minimal ironing, and is super comfortable to wear. I made a shirt out of poly/cotton broadcloth last year and hated it. It puckered and it was impossible to get some of the seam lines to lie smoothly. I made some shorts out of the exact same fabric in another color, and they are my favorite pair! Poly Cotton broadcloth is cheap and washes well and requires no ironing. It is cool and comfortable. It is more difficult to sew than 100% cotton
- Shirting - comes in many different weaves and weights. I have had very good luck with shirtings. Add some lycra and you get some stretch, which helps with fit, but also creates more wrinkles.
- Batiste - soft, comfortable, thin and almost sheer. You may have to wear a camisole under this fabric. Also, because of its sheerness, your seam allowances will show through, so they better be straight and even!
- lawn - just about the same as batiste, although sometimes a little heavier. Some books say that the two are the same, but batiste is usually solid and the lawn is usually printed.
- voile - sheer cotton fabric - you would probably need to underline. Not really stable enough for a "shirt" in my opinion
- gauzy fabrics - come in all weights from sheer to heavy. These can give an interesting look, but are not for the beginner. They stretch out of shape easily.
- seersucker - easy to sew, comfortable to wear
- quilting cotton - probably the most choice of solid color fabric if your only options are JoAnns or Hancocks. Feel the fabric and see if you like the hand. Some of them wrinkle terribly, others do not. Some have a smooth finish, others are rough.
- Bleached muslin - can work, but it really wrinkles unless it is very high quality muslin.
- Swiss cotton - if you are lucky enough to get your hands on some of this, it is beautiful to wear, comfortable, and easy to sew. It is also pricy.
Rayon: Rayon has beautiful drape and is cool to wear. Think of those nice rayon men's tropical print shirts. Rayon is more difficult to work with than cotton or linen.
Polyester: There are some beautiful polyester silky type fabrics and also poly broadcloths and just about any weave of fabric you can find it polyester. It is easy to take care of and requires no ironing. I like it for sleeveless only because it make me perspire and has to be washed every time I wear it.
For cooler months I would also consider flannel and tropical weight wool.
I may have forgotten some things, but my next shirt will be made of either linen or cotton (both of which I have in stash!)
Q & A
I'm certainly no expert on bra-making, since I am just beginning to explore this avenue. But, I will answer some questions based on my limited knowledge and experience. Cidell asked about tricot and the percent of stretch. The two bras that I made both used tricot and I think the beige may have had a little more stretch than the white. I have read some articles that say you want NO stretch or very LIMITED stretch in the cups. However, I also have some RTW bras that have all stretch cups. I have also seen bras with NO stretch in the cups. I think a little stretch is good for forming around the breast, but too much stretch would probably weaken any support. I think a lot of it is just a matter of trial and error. Also, a lot would depend on the pattern and cup construction. If you start studying bra patterns, you will see that some have vertical cup seams, some have horizontal, and most have some kind of diagonal. There are also 3 piece cups divided in all different places. Many of my RTW bras have seamless cups, but I think the fabric must be molded somehow in order to have this.
JoAnne asked about powernet. Powernet is a very strong fabric that also comes in varying "strengths" I don't know anything about it, but just buy what is available. I think you need at least a medium weight for the sides. Most bra patterns use powernet for the sides. Think of a lightweight girdle fabric - that is powernet. A very strong girdle (think your grandmother's) would be like a heavyweight powernet. It usually only comes in white, black and beige. I have seen it in other colors on mostly european sites - they seem to have the lead in availability of lingerie fabrics and laces over the states. Some women like to line the cups of the bra with powernet, and in my last bra I did underline the lower cup with the powernet just to try it out. It does give a little more support and limits the breast from filling out on the side of the cup. I know that some women use interfacing or fusible fleece in the lower cup, so I will probably try one of these options next.
I would suggest closely examining some of your RTW bras and looking at the following things before you begin
- What kind of fabrics are used in different parts of the bra
- How are the straps constructed? Where are the rings and slides, front or back? Are they made of fabric or elastic?
- Is there visible elastic anywhere such as where the straps attach to the bra itself?
- Look at the side/ back strap. What fabric is it made of? Is it more than one layer? How many hooks are there?
- Cup construction - how many seams are there? Are the cups made of more than one fabric? Are they lined or padded? Is there a band under the cups or a partial band?
- Look at the bridge (the little piece of fabric between the cups) what is the shape of it and how far apart are the wires at the top and the bottom? How far up (vertical measurement) does it go?
- Overall construction and appearance - do you like a lacy bra, solid color, or print? Wide or narrow straps? Wide or narrow back band? Smooth or textured fabric? Full cup or demi? Underwire or not?
Cidell mentioned that Fabricmart has a bra strap bundle right now and that might be fun to have IF you like to have your bra straps showing with your garments. You could put something like a bathingsuit fastener or the kind of fasteners for bras with removeable straps and change the color of your straps to match your tops. I like the idea of making my straps because I can make them whatever width I want and can match the fabric of my bra. They're really easy to make and its nice to have the same color as the bra.
And here's some information I wrote about support on PR:
A word (or two) about support: You may be wondering about the support on a hand-made bra. First of all, the majority of the support in a bra should come from the band. Many women are wearing the wrong size bra! If you have ever been fitted by a professional, chances are that your size changed to be a size or two smaller in the band and a size or two larger in the cup! Here's an interesting site (although in Polish) that shows the difference the right fitting bra can make.
Click Here
That being said, I have found this bra to be as supportive as any other bra I own, and I pay a lot of money for good bras. One thing that really makes this bra supportive is the fact that it uses powernet for the sidebands and back. Because of this, even the first bra I made, which has the cups made out of tricot only, is pretty supportive. The rest of the support comes from the wires and cups (It should not come from the straps.) Using the wrong size wires can totally change the shape of the breast. When you buy wires, you can buy by length and width. Fortunately, wires are cheap (about $1.00/pair) so you can try a few different sizes if you're not sure. They usually are sold by the bra size (34D for example) The important thing to remember when making your bra is to make the size according to the sizing information with your pattern - NOT your regular RTW size. Kwik Sew bras can be ordered from PR and their sizing information is at Sew Sassy
size finder for Kwik Sew
I am learing a lot from the Bra Sew Along that Sigrid started a while back, and some things I have read that people do to increase support include the following
-Make the cups and sides from lycra (lcyra can cover the powernet as I did with the lace, or be used alone, although it is not as "strong" as the powernet)
-Interface the lower cups
-Make the cups from a non-stretch or very low-stretch fabric
-line the lower cup (as I did on this one) with powernet.
I have many RTW bras that have a small piece of boning placed vertically on the side just behind the cup. This adds support and I thought I would do that with this pattern if it needed it, but I haven't found that to be necessary. I have worn the first bra 4 or 5 times now and am very happy with it.
Thursday, June 18, 2009
Hot Latte
If you have already read my post on the lingerie sew along, this is exactly the same thing.I am very excited to have completed my second bra! I thought I would show some of the details on how it's done.
Well, since we have tropical punch, key lime pie, and who knows what else, I thought I'd jump on that naming bandwagon and this is my "Hot Latte with extra of foam." This is another KS3300, only this time I made view A.
I used a different style wire this time and it totally changes the shape of the cup. I'll have to compare the two and see which I like better. I definitely liked not having to cut the wire though! View A has a few things that you do differently, and then there were a few things I did differently on my own. First of all, I knew I wanted to cover the sides with stretch lace, so I cut the lace, planing to leave a scalloped edge on the bottom. I did as was suggested earlier and cut one lace piece, then laid that on top of the lace to get the exact mirror image (I can't remember who posted that tip, but it's a great one!) Then I basted the lace at the top, but not the bottom. When I attached the elastic to the bottom edge, I folded the lace up out of the way and stitched on the lace. Then I put the lace back down in place when I turned the elastic up to the inside and then used the 3 step zig zag through the powernet, elastic and lace all at once.
 I also lined the bottom of the cups with powernet for more support. Liana suggested this and I must say I like the difference. Actually, I underlined them with the powernet because I thought the tricot would be more comfortable against the skin, so I have 3 layers on the bottom cup. As I was doing this, I realized that I neglected to topstitch the seam connecting the upper and lower cups on my first bra. It's not a problem on that one, but would be on this one I think because of the firmness of the powernet.
 The KS pattern has you run a strip of tri-folded sheer tricot along the edge of the upper cups for stability. I bought this in light pink. When it is a single layer, like under the bridge, you can't even see it at all. Folded like this, you can tell that it is pink, but from the front, you really can't see it.
 Since the only elastic I have is white, I didn't like the way it showed at the top of the cups where it attaches to the ring. I cut a little piece of lace and covered this. This sounds so simple, but I probably spent a half an hour trying to figure out what part of the lace I wanted to cut, what shape, placement, etc. I tell ya, I can turn anything into a project!
Also, the white elastic did not look good in the back (There is a 3" piece of elastic between the back of the bra and the strap. I covered this with tricot by just wrapping it around the elastic and then zigzagging both edges.
 There is a little wrinkling in the side on this one, and I'm wondering if it has something to do with the difference in stretch between the stretch lace and the powernet. The other thing it could be is the different shaped wire that I used. It's minimal, so I'm not going to let it keep me from wearing the bra!
This one is a little tighter across the band, but I'm thinking it will relax a little as I wear it. All in all, I like the fit. In the picture it looks like there is a crease in the left cup. I think it must be something strange with the lighting, because it doesn't seem to be that way when I put it on. I haven't worn it yet, so we'll see!
Wednesday, June 17, 2009
The Ghost Blouse

I finished this today, and it took me way longer than it should have. Here is what the "ghost" did"
1. I know I cut the front of this blouse out correctly. When I went back to work on it the next day, the entire top (about 12") of the fronts was missing on both sides! I fixed this by adding a yoke to the fronts.
2. The iron dropped on the floor again.
3. Numerous pieces were cut wrong side out. I fixed one of these pieces by embroidering over the left front yoke.
4. My machine started sewing in circles (OK, it was a bent needle - but I've never seen that happen before.)
5. My collar pieces all lined up perfectly last time and I had nothing but trouble with them this time.
6. Since I had redrawn my pattern pieces after I made changes last time, I decided to tissue fit the pattern again. It seemed way too tight in the hips, so I added 2" all together. After I made the blouse, I realized I did not need to add any at all.
All in all, I really like this blouse. the fabric is really nice and I'm loving the buttons and the button detail. I had to do a lot of "fixes" on this one, but I'm glad I did. I could have "gotten by" without fixing a lot of the little things - maybe no one else would have ever known, but I would have, and that kind of stuff drives me crazy sometimes.
Anyway, I'm keeping this short and sweet - I'm anxious to get back to sewing my next bra! I received another order from SewSassy and also had ordered some lace on ebay. I'll post pictures later.


Tuesday, June 16, 2009
Lists

It's funny that Marji would post about lists last night, because I have been checking a couple of lists I have made. First of all, lets see how I'm doing on my New Year's Resolutions
* 1. Make things that I love -
Here is a link to the things I have completed so far this year. Out of the 16 things that I have made, there are 9 that I love and wear all the time (OK, I'm counting my new pencil skirt here, even though I haven't worn it yet.)
* 2. Pants! Well, I'm working on this. I have made 3 pair of pants, but haven't got one that I love yet - but I'm still working on it.
* 3. The great white shirt - I think I found it! The BWOF gold blouse that I made last month is one of my favorites. I have it cut out and half made in white fabric, sleeveless this time, and am loving it already.
* 4. More out than in (fabric) - OK, I'm definitely doing better than last year, but still am 11.5 yards over. The good news is that I have sewn 25 yards from stash (anything purchased 2008 or earlier) this year
* 5. BWOF - 7+ - So far this year, including the blouse I am working on now, I have made 6 things from BWOF, so I'm doing well on this one.
* 6. make & use TNTs- the BWOF blouse is becoming a TNT, the paisley skirt is from a TNT (this is the 4th time I've made that), the LH New York Dress is a TNT, and my Kwik Sew bra pattern is going to be a TNT. I've just ordered some fabric to make another one (or two or three) of these! I really want to get a TNT pants pattern though.
* 7. Make a vintage pattern- Nope, haven't done this yet, but I see one coming very soon.
Now for my summer dreams. Even though summer is just starting, I am trying to put that list into action. What I have done is made a bra and started a sleeveless blouse. My skirt was a little birdwalk that I had to take, but I'm back on track now!
I'm not going to say what I'm going to make next, because as sure as name it, I will change my mind.
And also, let me say I am naming the blouse I am working on now "The Ghost Blouse" Just too many weird things have happened with this blouse, and since I don't believe I'm losing my mind, I'm blaming it on a ghost!
Saturday, June 13, 2009
Paisley skirt

I finished the skirt. I spent a lot of time trying to figure out how to line the vent. I did something that worked, but it's not exactly right. I tried to follow the directions in the Easy Guide to Linings by Connie Long, and although it was very helpful, I just couldn't figure out exactly what to do at the end, so I just did my own thing. I'm not that pleased with it, but it's functional and will work well enough.
I hand stitched the lining to the vent and also to the zipper tape. The skirt is a little tight, so hopefully I'll lose a few pounds this summer and it will fit the way it is supposed to! It's not unwearable, just a little uncomfortable. Of course, my x-sister-in-law used to always tell me that she would wear too-tight clothes to remind her not to over eat!
Anyway, back to the skirt. And speaking of "back" I must say that I am pleased at the overall look of the matching of the design for the CB seam. It took me awhile to figure out how to do this, but it does look pretty good. You can see a better picture of it if you click on the composite at the top of the page and scroll over to the back view. If you match the pattern at CB, there is no way you are going to be able to match them at both side seams. In fact, you really can't match a design like this on curved seams because the curves distort the line up of the print. So, I didn't bother to even try to match it at the sides, and it looks OK.
Next up? Hopefully a white blouse to go with the skirt!
More Pix here.
Friday, June 12, 2009
Lapped Zipper - perfect everytime

Well, I hate to say "every"time, because, sure enough, the next time I do this I will have to rip it out! BUT, this is definitely my favorite zipper application. And for me, it comes out great every time and is much easier than invisible or centered. I have tried several different methods for doing the lapped zipper, but my favorite method is the little direction sheet that comes inside the Coats and Clark zippers. If you've shied away from lapped zippers, try this method and you will be hooked. In order to get a straight stitching line, I used 3/4" scotch tape and drew a line right down the center of the tape with a pen. I then put this line on the seam line and stitched right next to it. This worked better for me than using 1/2" tape, since sometimes the 1/2" doesn't catch the full seam allowance in the edge. Also, I always use a longer zipper than it calls for and then cut off the top after I sew on the waist band or facing. Did you hear me? I said "AFTER!" Do not cut it off before, or you might do something stupid like try on those pants or that skirt and forget that the top is cut off and then you'll pull that zipper tab right off the zipper. Not that I know anyone who has ever done that. Twice.

I suppose I could have matched the print better, but I figure this is good enough. I really wanted to find a larger print, but there were none to be found locally. I still think this will be a cute skirt.
Monday, June 08, 2009
A new bra!

I can't believe it, but I actually made a bra. I have wanted to do this for over a year, but really thought I would have to read several bra making manuals and try several bras before I could get one to fit right. HA! I used the Kwik Sew 3300 pattern and used the size chart on the Sew Sassy website (see link in my side bar) to determine my size. According to their chart, I would need a 33D, so I had to go up to a 34D. There really is no way to make a "muslin" so I ordered fabric from Sew Sassy (uh, about a year ago) and this is what I used. The result? It fits perfectly! I can't believe it. NOTHING ever fits perfectly on me with no alterations. I am elated.
I am going to wear the bra this evening and see how comfortable it is. I can tell you right now though, it is more comfortable than my Victoria Secret bras. The best bras I have ever found for fit on me are Fantasie brand, but nowhere around here sells those. And, they're not cheap.
Now that I know this pattern fits, I'm on the lookout for some great lace and lingerie fabrics (Cidell, are you still going to NY?) Elingeria has great things, but their shipping to the U.S. is uber-expensive. If I order enough fabric to make 3 bras, I'd be paying $40 in shipping! That's not going to work for me.
Hmmm. Birgitte - you may have to scope out some LA stores that sell lingerie fabric for me. I feel a road trip coming on!
Saturday, June 06, 2009
White skirt finally finished

Well, I thought this skirt would take one afternoon to sew - not close to 2 weeks! Anyway, it's finally finished. I like the way it looks, but I'm not necessarily thrilled with the way it looks on. I think I just have to get used to it. It's kind of a lot of skirt. I'm really pleased with the piping and the button flap though. I also really like the inseam pockets, which I made out of the same poly lining that I lined the skirt with. The pattern didn't call for lining, but I figured after all the work I put into it, I might as well line it. The pattern also called for a centered zipper application in the back and I don't think I've done a centered zipper in a garment in about 20 years. And after I did this one, I know why! I really think a lapped application looks so much nicer, and for me, it is much easier to get straight. I guess that's something I will need to practice a bit more, but I probably won't since I like the look of the lapped better anyway.
Here are some pix. You can see more here if you arrow through the files. I'm just glad to be done with it LOL!

Next, I will probably start on the first bra for the lingerie sew-along. After that, I will be making a top - I'm not making ANY pants or bottoms until I lose some weight - nothing I have now is fitting :-(
I also got a couple of great knits from Gorgeous Fabrics today, but my camera battery is on the charger, so I will have to show you later. I did get this beautiful nail color today - Revlon's Gold Get 'Em. I tried to take a picture with my computer camera, I'm not sure the color came out right, but it's pretty close.
Thursday, June 04, 2009
Last Day
Just a quick note. Today is the LAST DAY of school! Yay! Actually, I will be sad to see this class go since I have no idea what I will get next year. And, since there are some changes next year that will definitely affect all of us, I'm not all that excited for it to start. Hopefully, my attitude will change over the summer. Tomorrow is a workday for teachers, but after that I plan on getting some SEWING done!
First up - I'm working on this pattern, in the simpler (no lace) version - only because those were the fabrics I was able to get and this one will be sort of a "test/muslin"
I'd really like to make some new jeans, but last night I could not even get my own jeans on! I'm going to be doing some serious weight management over the next few weeks. It makes me feel so discouraged because I don't even want to sew anything that is fitted because unless it is only fitted in the shoulders, I will have to make a size bigger! Maybe this will be a good time to reorganize my sewing room!


