I had a great idea that I was going to re-do my blog. I've seen so many cool blog backgrounds out there and wanted to really update the look of my blog. I found some great websites with lots of blog templates. Evening after evening I have worked on this. Not only have I not found a template that I am totally happy with, I have lost a lot of my information. My entire blog roll for example! Well, good thing I have it on bloglines, and I was intending on updating it on my blog - but not totally recreating it. Yes, I did save my blog before I made all the changes, but where does it save to? How do you bring back some of the information? I have not been in the mood now to spend even more hours looking up how to do all of this. After all, do I want to spend what little free time I have fooling around with my blog or sewing? Again, what was I thinking?
I'm not a big football fan, so I'm really glad we did not get invited to a superbowl party. I have no problem with Andy (or anyone else for that matter) spending the day watching football, I just don't want to have to do it. If we get invited to a party, it is rude to say "I'm not coming; I'd rather stay home and do something else." Also, Andy likes to listen to the game on the radio since they KNOW you can't see what's going on on the radio, so the commentators give a better description of the game. So, I'm hoping that I can do some sewing tomorrow while Andy is listening to the game.
Carolyn posted on her blog about how she is doing toward her resolutions and asked how we are all doing. Well, when I looked on the side bar of my blog to check my resolutions, I realized that that was one of the things that I lost from my blog. Fortuntately, I just looked back at my first post of the year, and there it was. It is now back in the sidebar where it belongs.
So, how am I doing? Well, so far this year I have made 2 pair of pants and am almost finished with my blouse. My first resolution is to make only things that I love. I haven't worn the first pair of pants yet, and the second pair I have worn twice. The fit is OK, but not exactly what I'm looking for yet. So, I'd have to say I'm not loving these yet. But, resolution #2 is to get a great pair of pants, and I'm definitely working on this goal with several muslins and two finished pair of pants. Each one gets closer to what I'm looking for.
Resolution #3 is to get a great white shirt, and that is exactly what I am working on now.
#5 is to sew more BWOF than last year, and the blouse is a BWOF.
#6, more TNTs. Both pair of pants were from the same pattern and I'm planning on making several versions of this white blouse I am working on now.
#4 is more out than in. When I finish my blouse, I will have put out on 6 yards. The only fabric that has come in is what Birgitte and I got in LA, so that's 5 and 1/2.
#7 - to make a vintage pattern. I don't plan on doing that until spring.
So, yes! I would have to say I am getting a great start on my sewing goals.
Oh, and for those of you who have not seen yet, I got my hair cut short. I'm liking it.
Saturday, January 31, 2009
What Was I Thinking?
Thursday, January 29, 2009
Under Construction
Sorry - You will probably see my blog being mixed up and a mess over the next couple of days as I update my blog.
Wednesday, January 28, 2009
Tuesday, January 27, 2009
Neck Bias Binding.
The bias binding was a little tricky to sew, and on my muslin, it did not come out at all. You make a bias strip the length of the neckline and fold it in half lengthwise. The band and collar are sewn together onto the neckline, and the bias band is sewn into that same seam. The bias band is then folded over the seam allowance and stitched down. On my muslin, I didn't have enough width on the bias strip to cover the seam allowance. This time, I trimmed the seam allowance to 1/4" before attaching the bias strip. Now I had more than enough width. I only wanted to stitch about 1/4 inch away from the seam edge, so the bias strip looks like it is stitched right down the middle. It is on the inside, and the edge is folded, so I'm not worrying about tacking that down any further. It lies flat and is a finished edge, and all the raw edges of the seam allowances are enclosed. It gives a smooth finish on the outside as well.
Awards

I'm very flattered to be nominated for The Kreativ Blog award by Diana and Charlene. Also, a month or so ago I was nominated for a couple of awards from Birgitta, which I never posted on my blog. It's always nice to be recognized and don't we all love it? I mean, if we never got any comments, would we blog as much or as detailed as we do? I'm so appreciative that all of you take the time to read my blog. Also, I really appreciate all of you who share your skills, talents, tips, tricks, and more on your blogs. I have learned so much and improved my own skills tremendously from what I have learned from all of you.


BWOF blouse progress

Today after work I got to do a little sewing. I sewed the front bands, collar and made the sleeves. The collar is unusual but beautifully pieced together. The bands and collar are sewn to the neck edge and finished with a bias strip.

I finished one sleeve, but still need to finishe the other one. The hem is just turned up and zigzagged. I used an overcast stitch instead of a zigzag. There is also a casing for the elastic, which is made of self fabric and stitched on.

All I have left to do now is add the elastic to the other sleeve and set both of them in. Next, I'll make the buttonholes, sew on the buttons, and be finished - yay!
Sunday, January 25, 2009
Today I cut into the good fabric. Sometimes that's a scary thing. Even though you've made a muslin, you still "hope" everything is going to be OK. But, we can't hold off on the good fabric forever, and if we ever want to wear it, we must cut into it! I wanted to show you a close up of this fabric. In the photos it just looks plain white, but if you click on the picture below, you will be able to see that it has a pretty diamond design woven into it. This fabric also has a wonderful hand and has been really nice to sew on.
 |
| From Blouse 108/9 BWOF2-07 |
Today I got all of the darts made, trimmed, and pressed, finished the shoulder and side seams and did the hem. Next will be the front bands, collar and sleeves. I wanted to show you the collar pieces because they are different than the usual collar and stand. The stand on this fits inside the curve of the collar, so in the front of the collar, there appears to be no stand, but the stand is there to support the back of the collar and keep it close to the neck. I like it, but like with all stands, it's a little tricky to get sewn and lie flat. I probably won't have a chance to work on it for a couple of days.
 |
| From Blouse 108/9 BWOF2-07 |
Saturday, January 24, 2009
Working with a block

Here is a picture of my block. When I first put the pieces side by side, I thought something was wrong. First of all, the armhole on the back looked too long. Also, the back seemed way to big for the front. But, when you pin the darts and put it together, it all matches. This means I DEFINITELY have a forward shoulder! I don't really see it myself when I look in the mirror, but the block doesn't lie. In fact, when I look at this block, I think I must be the sister of the hunchback of Notre Dame.
 I wanted to make sure that everything fit. Here is the muslin:
Tuesday, January 20, 2009
A few updates
First of all, thanks for all of your comments and condolences on my pants. The fabric was very inexpensive, so I guess I should have known better. I have never had a problem with Fabric.com fabric before, so that is why I went ahead and used it, - oh well, lesson learned. Fabric.com was very obliging, and credited my account with the cost of the fabric (which was minimal) The cost of my time, I will chalk up to learning experience.
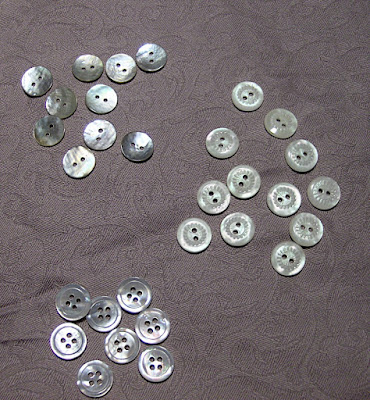
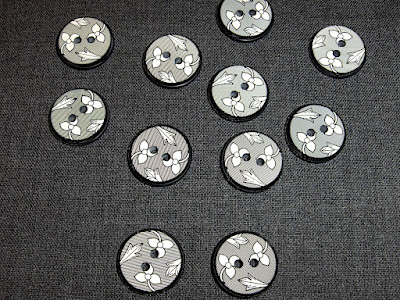
International Silks and Woolens is not actually in the garment district, but on Beverly Blvd. It is a great store with a huge range of fabrics at EVERY price point. Some of the fabrics were hundreds of dollars a yard, and some were less than $10. So, it just depends on what you are looking for. Fortuntely for me, Birgitta knows EXACTLY what she is looking for, so there was no getting overwhelmed or making poor purchases. We sat down ahead of time and pulled out some swatches from my fabric binder and planned out some fabrics for blouses, a jacket, dress, skirt, and pants. I'm excited to start sewing on my plan.
Here's a sneak peak of what will be coming out of the Winningham sewing studio in weeks to come:
 |
| From LA Fabric Shopping |
 |
| From LA Fabric Shopping |
 |
| From LA Fabric Shopping |
 |
| From LA Fabric Shopping |
 |
| From LA Fabric Shopping |
Monday, January 19, 2009
"...'til the sun comes up on the Santa Monica Boulevard."
Yes, the sun was coming up on the Santa Monica Blvd and all of LA this weekend! Andy and I went down to LA on Saturday and it was 36 degrees at our house when we left. It was 80 degrees by the time we got to LA. It was sunny and beautiful all weekend.
We had such a great time. If you read the blog, Bubble Gum For Breakfast, you know that Birgitte and her husband have been putting together a show called "Baby it's You" Well, Birgitte most generously invited us down to see the show! We, met up Saturday and had a wonderful lunch and then Birgitte and I went Fabric shopping later that afternoon. I had taken my fabric binder down there and we looked at that first to decide what to look for. She helped me put together some different fabrics to make some outfits and then we were on a mission to find some great soft-white fabrics. We went to International Silk and Woolens. I had never been to this store before, but they have a fabulous selection of fabrics. We picked up some beautiful Swiss cottons and some absolutely gorgeous buttons as well (pictures later). If you have never checked out Birgitte's blog, you really should. She is a fabulous seamstress and a wealth of knowledge.
Saturday night we saw the show, and it was fabulous. We really enjoyed it. If you are in the LA area, you really should check it out - but hurry, I think it's only on for one more weekend. It's at the Coast Theater.
On Sunday, I went over to Birgitta's house and we did a couple of things. She does a lot of her own drafting and is getting more and more into couture. I was blessed enough to have her drape a block for me. If you remember, one of my new years goals is to get a great white shirt. Now, with this block, I should be able to do that! so... THANK YOU BIRGITTE!!!
The other thing we worked on was that she showed me the method that Kathleen Fasinella suggests for lining. What's different about this method is that the hem and the facing meet in a seam and the lining is completely enclosed in the corner, rather than hanging over the hem as is suggested in most methods you read about. I am anxious to do this, but need to do a little practice on some scraps first.
Well, I'm off to pre-wash my new fabric. More pictures next post..
Thursday, January 15, 2009
Very Disappointed
Tuesday I wore my new pants. They were comfortable all day. They looked good. They even looked good at the end of the day. UNTIL I TOOK THEM OFF. I did notice that there was a little pilling on the fabric after I washed it (It is 100% polyester - it should be washable) After reconfirming the fabric content on the fabric.com website, I did notice that it said "Dry Clean Only" Since I did notice the slight pilling after the prewash, I decided that I would dry clean the finished pants. Well, when I took these pants off, I could not believe how terribly pilled they were!! This is the picture of the crotch area. I probably won't be able to wear these more than a few times before I will have to discard them. I'm glad I did not go ahead and make a jacket or skirt out of the rest of the fabric as planned, since I bought 4 or 5 yards of this. I have purchased from Fabric.com many times before and always been happy with the quality of the fabric. This time I am not.
Saturday, January 10, 2009
McCalls 5239 - second pair
I'm much happier with this pair of pants. They fit better and the underlining really makes them comfortable. I did make the legs a little wider on these and I like it better. I'm glad I got the fit right on these, and now I can use this pattern to help me adjust other pants patterns.
 |
| From Pants 2009 |
I'm not so sure I like the shape of the crotch curve on this pattern because I still think it's a little tight across the widest part of my butt.
 |
| From Pants 2009 |
I did go to the gym today, and so if I keep that up, maybe all my pants will fit better! These pants have a CB zipper, and I really prefer a side zipper or fly front, just because it is easier to get on and off.
There were a couple of questions about the glue and fold method I used. I used Sobo glue, which is permanent glue, so you must be sure that it is in an area that will either be cut off or will not show. I have used regular craft glue before and it worked well too. I've heard that Elmers washable school glue is great because it washes out, but I haven't tried it. I've even read of people using regular glue sticks to do this. I haven't had much success with glue sticks since you have to rub them on the fabric and that sometimes distorts the grain, but I know that even Patti Palmer recommends them.
I used Sheermist Batiste for the underlining, which is a poly/cotton blend. I find that even the little bit of cotton that is in this makes it very breathable and comfortable. I have underlined pants with silk organza, and although I like the way it works, it was too scratchy for me. I would have to find an organza that was softer than the one I used for those pants. Regular lining can work for underlining too, but it should have a pretty firm weave and not distort easily. I would not use ambiance for an underlining. Even though it makes a beautiful lining, I wouldn't use it for 2 reasons. One, it wrinkles easily, and two, the fabric shifts too much and I don't think it would work well to stabilize the fashion fabric.

Although underlining does not looks as beautiful as lining, it gives a good finish and is very comfortable to wear.
Underlining also helps prevent wrinkles and helps the fashion fabric wear better. Underlining works great with sheer or white fabrics because the seam allowances won't show through like they do with lining. I would not use underlining if I were using a scratchy wool because the seam allowances would still be touching my skin. I would line those. Mainly I chose to underline these pants rather than line them for two reasons. One, I wanted to stablize the fashion fabric, and two, it's a little faster than lining since the two fabrics are sewn as one.

 Posts
Posts