
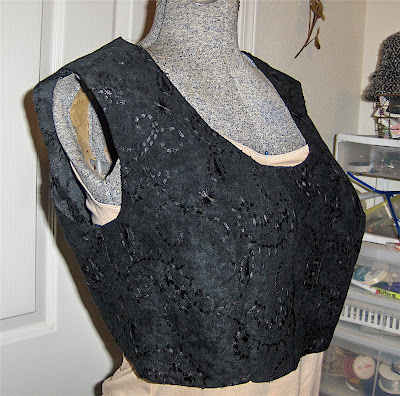
I finally did it. It's finished, and I don't even know if I like it. For one thing, this neckline is low and wide, which really limits the tops you can wear with it. It doesn't look right with a shirt or even anything with a collar. Maybe mine is too tight. And that's another problem. It seems a bit snug across the back. I made a 38 and did FBA and even sewed smaller side seams and widened the sleeves, but it still seems a little tight if I reach forward. The fabric is really warm, which maybe wasn't the best choice since the jacket is so open - more of a blouse than a jacket really. Maybe I need to just hang it in my closet for a while and try it again later.
 Here are some pictures of the inside lining. I like how they have you sew the peplum to the bodice and the lining to the upper lining all in one step. It really turns out nicely.
This pattern was rated a 2.5 dot on the Burda difficulty scale, but I would say it is no less than a 3. The pleating was very time consuming and required a bit of adjusting. Sewing on the sleeve bands and belt had to be done mostly by hand, and the belt itself was a little challenging if you've never made one before. I really did have fun with the eyelets, and now that I've had to buy the tool, I will be on the lookout for more ways I can incorporate these in my sewing. I used to do a lot of scrapbooking, and I loved using eyelets on the pages and in cards. I'm also trying to decide if this jacket would look better with a couple of big buttons in the front. I did make covered snaps, because even though I was able to get black snaps, I felt they would really look ugly and stand out if the jacket were unbuttoned. I didn't have any black organza, so I used chiffon instead. It was really quite easy to do. I found a washer that was aprox. 2 times the diameter of my snaps, so I traced around that and cut out a circle of chiffon. I then took tiny running stitches around the edge - just like making a yo-yo. I then put the snap inside the circle face down, and pulled the stitches up so that the fabric encircled the snap. I took a couple of stitches on the backside to pull it all together and keep it snug. I really like how it makes the snaps blend into the fabric. I only did this on the bottom half of the snaps. I thought 2 layers of fabric might make it difficult for the snaps to stay shut, and also, the top snaps are on the underside of the garment, so I don't think they will show.
Well, my daughter went crazy with the camera, so here are a few more pix.


Saturday, October 27, 2007
BWOF 10-07-121 Finished!
Tuesday, October 23, 2007
I've Decided to SWAP
Most of you know about the Timmel Swap. Basically, SWAP means Sewing With A Plan. This years contest consists of 11 garments:
1 jacket
4 bottoms
6 tops.
All items must be able to be worn with all other items. The kicker is that at least 3 different items must be made from one "wardrobe" type pattern. Also, there must be a qualifying purchase from Timmel. There are some variations and you can read about them in the rules if you are interested.  I've been going back and forth on this, since I already have another "plan" in Gray, black, and Burgundy, mostly with BWOF patterns. I have more than 11 garments in that plan, but it just won't work with the wardrobe pattern. But I also have some secondary plans: one with olive and black, one with brown and tan, and one with navy. What a wonderful wardrobe I would have if all I had to do was sew every day!! Anyway, I decided to tweak my olive and black plan to fit the contest rules. I'm going to use New Look pattern 6795 for the wardrobe pattern
This meant I had to buy some black knit for the pants and skirt. I also bought some green herringbone knit from Timmel fabric.
Here is my plan - subject to change, of course!
And, I also have it so that almost all of the BWOF patterns will work with my gray wardrobe that I will hopefully still do!
Sunday, October 21, 2007
BWOF 10-07-121 Lining
Bless my son, who offered to drive Grandpa back up to Three Rivers this afternoon. This gave me a little over an hour to sew. Yay! I also did a little last night and Grandpa kept me company by my sewing machine until he fell asleep in the chair and dropped his glass of water :-) Of course, I remember him doing the same thing when I was growing up!
Anyway, I finished the bodice lining and attached it to the bodice.
Obviously, we need some more pressing here! Also, I have not yet released the basting stitches from the back pleat.

I kept struggling with the sleeves last night trying to figure out how I was going to sew them from the inside, but it finally made sense to me after I picked it back up this afternoon.I had to push the lining through the sleeve and turn back the cuff. I then had to go at it from under the arm, pulling the sleeve and lining apart so that just the lining edge and the lower sleeve seam. OK, well that sounds very confusing, so maybe this blurry picture will help clear things up LOL!
I also made a little loop for my belt. It is not attached yet. I cut a piece of fabric 4" long and about 1.5" wide. I serged one long end and folded it in thirds so that the serged layer was on top. I then put this little strip on top of a larger piece of stablizer so that I could run it through my machine. I used a decorative stitch and sewed right down the middle. I stitched the two ends together by hand, and once I get the belt exactly where I want it, and know where the end of the belt will lie, I will slip stitch it to the back of the belt.
It's time to start working on the peplum, but unfortunately, other obligations are calling me.
Friday, October 19, 2007
BWOF 10-07-121 Sleeves

Thank goodness I finally got a little time today to sew! I got ONE sleeve done - at this rate, I'll be finished by Christmas! I didn't exactly follow the order in BWOF because .. well, because I'm just like that! Anyway, this is what I did.
After sewing the two sleeve pieces together, I laid out the lower sleeve. I decided to press in the pleats BEFORE hemming it since I had marked my pleats with snips.  Then, after folding, pressing, and basting the top of the pleats, I sewed seam binding to the hem edge. I'm not sure whether they were saying to use a 1-1/2" hem on the sleeves as well as the peplum but I only used 5/8". I also know that the seam binding will give a flatter hem than turning it under, and this fabric is a little thick for the pleats even just from folding up the hem. Before I pressed up the hem, I basted 5/8" from the raw edge of the fabric so that I could turn it under at the exact right length. Then I hemmed it by hand and repressed the pleats.
  Next, I pinned the lower sleeve to the upper sleeve, and I realized that I did not make the lower sleeve larger when I widened the upper sleeve! SO... I had to unbaste some of those pleats and reposition and press them to make the lower sleeve fit! I basted this piece to the sleeve with a 1/2" seam allowance, checked it, got rid of a pucker, and the sewed the seam 5/8" from the edge. I pressed this seam and then pressed it UP toward the upper sleeve.
 Setting in the sleeve wasn't too difficult, except that the notch for the back sleeve didn't match up with the seam. Everything else did though, so I went ahead and basted it in, tried it on, and then stitched it. I trimmed the sa close to the first row of stitching so as not to have to do a lot of clipping.The sleeve fits and I think it looks good. I need to go out and buy some shoulder pads now. Maybe I'll finish the other sleeve this weekend.
 My vacation is over and I didn't really get anything done that I thought I wanted to do. My 85 year old father is really having a difficult time right now, so I've spent most of my time helping him. He is the sweetest man on earth and everybody loves him.
It's so hard to see your parents getting old.
Thursday, October 18, 2007
I Have a New Toy!

I have been wanting an iphone ever since they came out, but we did not have ATT as our carrier. Well, the day has come! We've switched to ATT (which actually gives us more service coverage han we had before) and now I have a new toy! So, even though it will take me a few days to get everything set up right, I can take the cell phone, ipod, and palm pilot out of my purse and have just ONE thing to carry around. And of course, it is made by Apple.
Wednesday, October 17, 2007
BWOF 10-07-121
Finally, finally, finally, got the muslin to fit. Here is the first set of alterations I did. Where I messed up though was I should have increased the width before increasing the length. So, once I made a muslin with these pieces, I still went back and added 1/2 inch to the side seam of the front only and sewed the princess seam with a 3/8 inch seam. It looks to big on the dress form, but hopefully after I put in the lining and wear it over clothes, it will be just right. 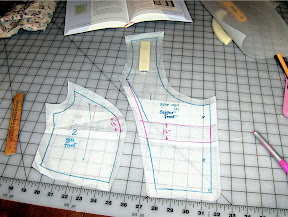
I hate making muslins, but I spent a lot of time on this one because I really want this jacket to be comfortable. I found that the sleeves are a little snug, so I slit the sleeve down the middle and widened it by 1/2" This made the dart quite large and I wasn't sure if that would look right, so I made a horizonatal slit from side seam to side seam, but left the seam line "hinged". I slid the cap down toward the sleeve until the dart ended up in the original position. I sure hope this works because I did NOT make a muslin of this alteration. I may end up with a sleeveless jacket!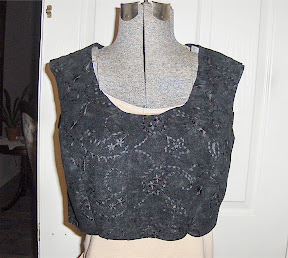
 This fabric has a lot more give than the fabric I used for the muslin, so that has made it easier to sew. Princess seams are always a pain, but it really helps if you staystitch the concave curve and clip it before you sew. then, after the seam is sewn, I notch the covex curve to make pressing easier and the seam lie flatter. This fabric reminds me of some moleskin I used last year to make a jacket. I wear the death out of this thing, even though there are some things wrong with it. That jacket is just right for a cool (but not cold) day, so I decided not to underline this one - probably because I just didn't want to do it, but the other reason sounds so much nicer!
 I also went to the Goodwill and picked up a couple of belts for $1.00 each. I looked at the fabric store for belt buckles and didn't see anything I thought would even work, so I decided to find a belt and take the buckle off. My buckle is nothing spectacular, but it's just about right for this jacket. I know some people were asking about how to buckle the belt since it is sewn onto the jacket. Actually, it's only sewn on as far as the princess seam, and everything in front of that is free. I need to go buy some eyelets, which means I will probably have to buy a tool, as well. I do have one eyelet tool, but it is for extra large eyelets. I used it on this purse for one of my daughter's friends last year.
I'm not sure what has happened, but it appears that poor Myrtle has had a mishap. I suppose she needs to see a chiropractor, because she is all bent out of shape! This is a very old dress from that I bought on ebay (back in the day when I liked PayPal) If you have ever tried to adjust one of these kind of dress forms, you know it is almost an exercise in futility. I originally spent numerous hours just getting the measurements right, but I've never gotten the posture exactly right. But this??? She must have had a fall that no one is willing to tell me about. Yes, I do have a sway back, but my butt does not stick out 6" behind my shoulders!!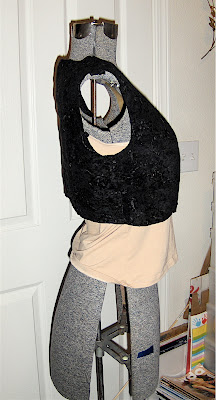
PAYPAL issue is still unresolved. After I spoke with the last agent, and faxed in yet another document, I received another email the next day asking for more documentation - tracking numbers, which I have already sent- TWICE
ARGHHHHHHHHHHHHHHHHHH
I really wanted to avoid going to an attorney, but this is just way out of hand.
Monday, October 15, 2007
Warning! Warning! Warning!
You always here about these stories and think, "oh, I'm sure they did something to make this happen"
Well. let me tell you that PAYPAL, which I have loved and used without a second thought, has caused me an undue amount of grief and is costing me over $1,000.
About a month ago, my son decided to sell some iphones over seas. He sold a few phones and there was no problem. Then someone wanted to buy about $3,000 worth of phones. My son decided not to sell the phones and returned the buyer's money. My son was using my paypal account since there was a problem with his
That should have been the first red flag to me. They keep telling him that his social security number isn't right, even though I personally faxed a copy of the SScard to them twice.
Paypal has now locked my account and there is over $1,000 in the account.They have requested tons of information from me (drivers licence, utility bills, tracking information, sales receipts, proof of phone number etc) and the more I provide them, the more emails I get saying that they need more information. I started doing some research online, only to find that I am not alone. Apparently this is happening to thousands of people and it looks like I will never see this money. There has already been one class action suit against Paypal that has been settled.
Saying that "Paypal Sucks" barely touches the surface
I'm giving them one last chance to resolve this as I spoke to yet another agent this evening. I will let you know what happens...
Thursday, October 11, 2007
Sweat Suit Alternative Completed!

A big THANKS again to Cidell for sharing her BWOF 8/2002 with me. I have completed the three piece "suit" 
The pants were super easy. Just an elastic waist and four seams. I used my serger for everything except the hems and casing. I did take two inches off the top to lower the waistband, and I took in the sides a bit at the waist so as not to have so many gathers. These are super comfy and the knit is called "ponte de roma" which is a poly rayon blend. It is super soft but has enough body to hold it's shape.
 The tunic was also very easy. I found the best way to do the fold under on the slit was to press a 5/8" seam and then fold the edges under to meet the fold. I pressed this and put the clapper on top to make it hold it's shape. A little secret - there were a couple of places where it looked like it wouldn't stay turned under and I didn't want to pin it, so I used a couple of pieces of "steam a seam lite" to tack them down. I cut a 38 on the top on this and tapered out to a 42 at the hips. I probably should have gone with a 36 and FBA because it is still a little big in the shoulders. That's OK though,because after all, this IS comfort wear.
 The wrap was a pain to cut out because the pieces were so big. I didn't have enough fabric the first time, so I thought I would just cut it with short sleeves since the tunic has long sleeves. Then I ended up cutting one of the pieces on the wrong side, so I had to buy more fabric anyway. As it is, I didn't cut the ties long enough (the pattern calls for 25", but you really need about 35") so I ended up having to use a button instead of tying it. I don't really like this option, because it is still a little snug around the waist. Also, I should have cut a smaller size in the wrap as well. I may take off the ties (good thing I sewed them on by hand) and just put a button on each side of the wrap. And speaking of buttons, my machine is really picky with button holes. I think I tore out the button hole about 5 times until I was ripping out fabric threads instead of buttonhole threads! I decided to use the "stretch" button hole on my machine, and that seemed to work much better.
I have to say that I will be getting a lot of use out of these pieces. I will have to make a couple more pairs of these pants for lounging around and maybe make some long sleeve t type tops to go with.
NEXT UP?????????
 DVM Cindy emailed me and asked me if I wanted to do a sew along on this jacket from BWOF 10/07. How could I resist? I have so much stash, I thought surely I could find something perfect in there. But no, everything was not quite right. Well, I DID have a 50%off coupon from JoAnns, so I found this great embroidered suedecloth that I plan to use for the jacket
The fabric says "do not dry clean" and "do not press" OK, That means I will need to use a poly lining since I can not be ironed or dry cleaned. Fortunately, I have about a yard of black lining in my stash and it's just about what I need for the jacket. It looks like a few others on BurdaEnglish and Pattern Review are going to join in to the sew along. Anybody interested???
Sunday, October 07, 2007
Project Organization

I store all of my fabric stash in boxes. I had several different size boxes and some plastic tubs. Well, I'm tired of my sewing area always looking like a total mess. I saw a couple of great tips on Pattern review, and thought I'd combine them to try and get my stash a little better organized. Because I keep everything in a binder, I have no trouble finding what I want. But even still, I hate digging through a box to try to find a certain fabric. Also, sometimes seeing the whold fabric gives you a better idea than just a little swatch. They do sell fabric organizers, but they are pretty expensive. Here's my method
First, I went to the local comic book store and bought a bunch of "regular size" backer boards. They cost 9 cents each. I bought 30, went back and bought 50 more. I need to go back and get some more because I want to do this with all of my scraps too. I also went to Office Depot and bought a pack of 10 bankers boxes for about $15.00. I was using copy paper boxes (free) but the bankers boxes are really sturdier, plus the handles make them easier to lift.
Then, I unfolded my fabric and refolded it. Fabric is folded in half length wise, and if it is over 2 yards, I fold it again cross wise. I then fold the 44" fabric in half again lengthwise so that it is now about 11"-12" wide. anything wider than that is folded into thirds I put the backer board on top of the folded fabric and then start folding it around the board - sort of like a bolt in the fabric store. I have seen this done and all the fabric displayed on book shelves. This looks beautiful, but my house is not that dust-free (ahem...) so I prefer to keep it in boxes. Also, this protects it from sunlight - and cat hair!
 Once the fabric is folded, I put the box on end and start stacking the fabric rolls. When the box is full, I turn it right side up. Now all my fabric is easy to see at a glance and I can actually fit more into a box than I had before.
Thursday, October 04, 2007
Sweat suit alternative
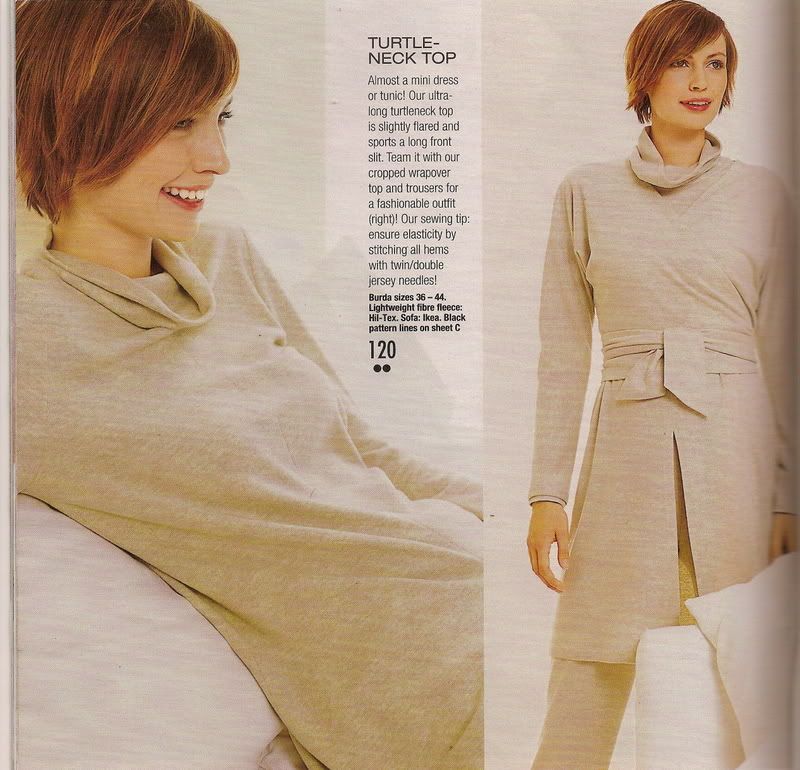
I had been on a quest for a "sweat suit alternative" when I ran across this picture from BWOF 08/2002 on Cidell's blog. I was intrigued. Then, when I saw her finished pieces, I knew I really wanted to have it. I was so excited when she sent me a copy of the magazine in the mail so I could trace it off! I finally finished cutting it out this evening. I didn't buy enough fabric to begin with (I bought it before I had the magazine) but thought I could squeeze it all on. The wrap pieces are cut all as one, so they take up a lot of room. I tried to make it all fit by making the wrap short sleeves, but even that wasn't going to work. I checked at JoAnns, and they didn't have any more fabric, so I knew I had to squeeze it on. Well, after squeezing and turning off grain, and piecing one of the backs, I finally got it all to fit. Then, after I cut it out, I realized I had not turned over one of the pieces, so one of the fronts would be on the wrong side of the fabric!
I am making this out of a beautiful coffee-colored poly rayon ponte de roma knit so I thought I'd give it one more try to find more. I was disappointed to find that there was no more there, but I kept looking to see if I could find something else that would work. Lo and behold, I found the fabric and it had been misplaced in another section! I bought 2 yards and took it home. Our Jo Ann's has two kinds of ponte knits. One is called basic ponte and it is made of polyester. It looks nice, drapes nicely, but isn't that soft. They also have a couple of bolts of ponte de roma, which is a rayon/poly blend and it is much softer. I'm so glad I was able to find more of this fabric. Hopefully I'll have some time this weekend to sew. I did manage to make a quickie baby blanket to wrap a shower gift this evening.


