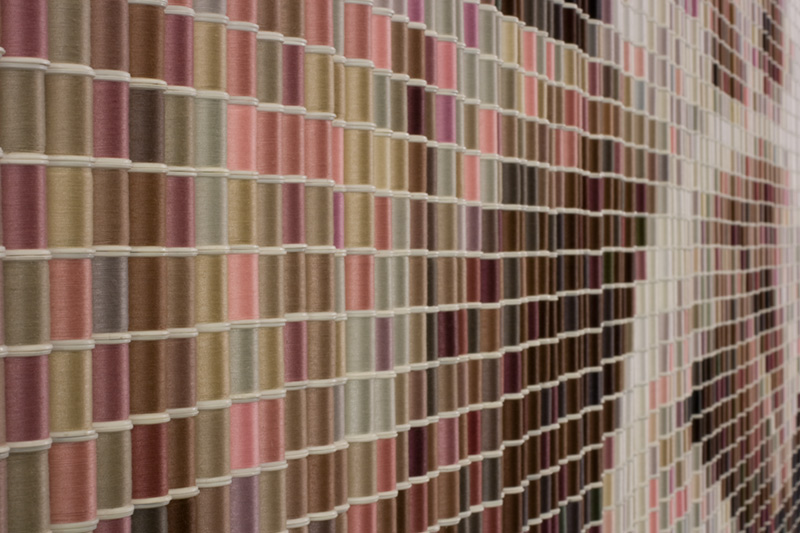
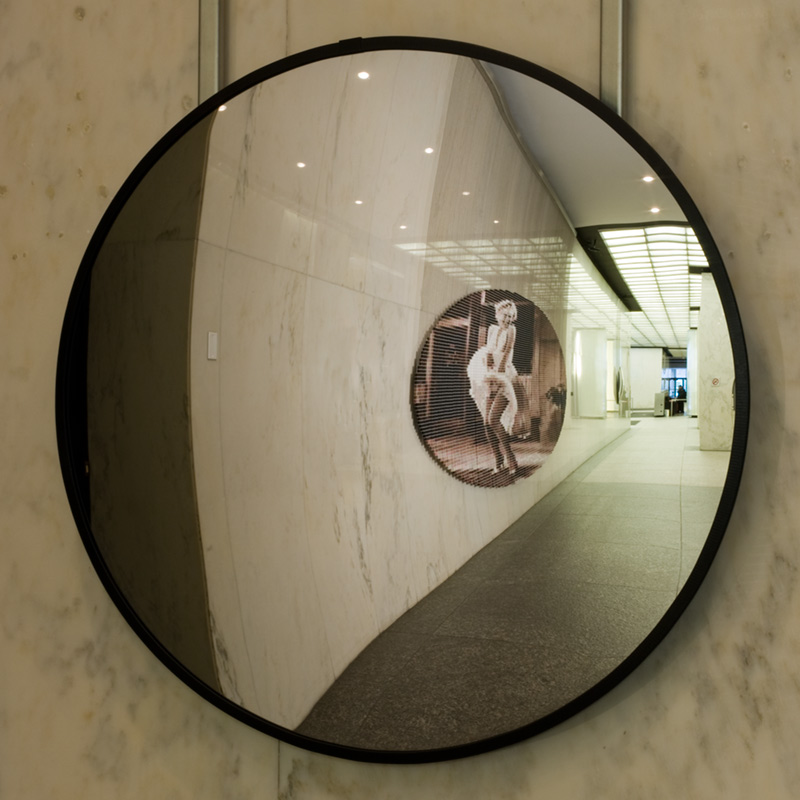
If you have never heard of Devorah Sperber, you must check out her web page, and when you do, you will never forget her works of art. She makes fabulous "paintings" out of spools of thread. Many of the works are done upside down with a convex mirror in front to view the picture upright. You can see a gallery view of her work here. The images at the left are from her web page.
 Well, my latest endeavors have not been nearly as ambitious, but I have done a little sewing. I made the Adri dress, Vogue 2976, out of a rayon challis. I started with an 8 and tapered to a 14 at the hip. I added vertical darts in the front and back. It is a little snug across the upper chest, but I think part of that is that I needed to cut a deeper armhole, because there seems to be enough ease under the armscye and in the bust. I've made the top before, and cut a 10 and it was too wide in the shoulders. I am going to make this again in a pink and brown rayon crinkle fabric and try cutting the armholes a little deeper in the front. Also, I used prepurchased bias tape, which I'm not a fan of, and maybe it was too stiff and that may be part of the problem. I may have to make my own bias tape for this one. I will have enough fabric left to make a short sleeve blouse as well.. After that, I'm going for brown shorts and a brown light weight jacket.
Friday, May 30, 2008
Spool Art
Tuesday, May 27, 2008
There's Nothing Quite Like Dog Sugar

My dad's new home is just 2 miles from my house. I am so glad that I am off work right now, because I go and see him everyday. He has his good days and bad days, but more good than bad. There is nothing he enjoys more, than spending time with the dog. I think he enjoys that more than spending time with us - I haven't gotten that kind of smile out of him! Of course, I don't lick his face, either.
My dad is very proud of his "new home" and is (most of the time) very happy. He doesn't seem to be in any pain. Although hospice is for those who are dying, it is all about the living. And my dad is living well right now. Praise God.
Maureen brought Annie over yesterday for the final fitting on her dress. It fits her perfectly and there is NO gapping in the zipper. I do not think I will have to do it over. Today I will do the handstitching around the zipper binding and sew on the hook and eye. I think my migraine is finally gone (or at least almost) so I can get some hand sewing done. Last night I decided to trace the tissue for this Adri dress. We are leaving for Hawaii in less than one month and I'm going to be gone one of the weeks before then. I need clothes that are light weight, fast to make, and pack well. This dress will fit the bill and I am going to make two of them. One out of a rayon crinkle, and the other from a rayon challis. Well, the description said challis, but it does have some kind of a shine to it that I have never seen in a challis before. So, I'm not sure what the fabric is, but it seems to work like a challis and will be great for Hawaii. The first problem I encountered with this dress is that the instructions are missing out of the envelope! I made the top last year, but did not follow the directions because I lined it. I remember that there was something unique in the instructions, but I can't remember what it is! The dress will be simple enough to make without the instructions, but there is a large circle marking near the hip and I'm not sure what that is for. I made a muslin and decided to add vertical darts to the front and back to add a little more shape to the dress. The best part is, it just pulls over your head. No zippers.
I have some paperwork I must do today, but I hope I can squeeze in some sewing and cutting time.
Monday, May 26, 2008
Vogue 8499
I put them on and I'm wearing them right now. Super comfortable weekend pants. Very "California style". I used a poly rayon "linen" fabric from JoAnns that I do love. It has the drape and breathability of rayon, the look of linen, and the added strength and wrinkle resistance of polyester. I have made a few things out of this fabric and really like it. It does ravel, though, so you have to make sure to serge or finish all seam edges in some way. Wash and wear, though. My kind of fabric for everyday wear.
Well, the pants don't make me look thinner, that's for sure, but because they are so big, they just look like they're supposed to look big, so I don't really think they make me look that fat either. Now, if I were to wear a big, blousey top, that might be another story. Oh, yeah, and don't I look stunning in this picture? This is what I look like when I've had a migraine for 3 days. This is the before shot. Still waiting to get to the "after."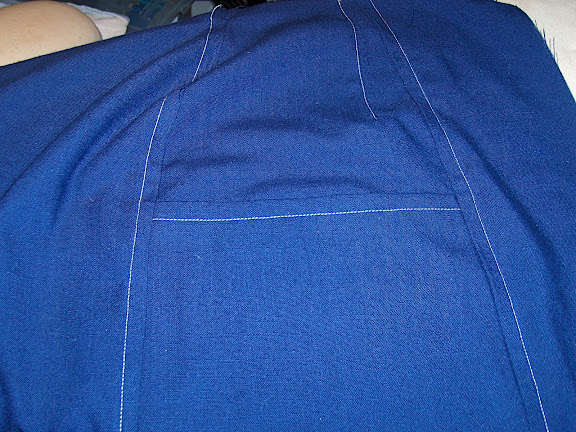 I have a review at PR here. One thing I forgot to note was how I did the seams. First I stitched them, pressed them closed, serged the sas together, pressed the sa to one side, and topstitched. The pattern calls for topstitching 1/2 inch away. I kept missing part of the seam allowance so put a little steam a seam in the parts that got missed. Then I realized that the steam a seam would act like a bit of interfacing and would keep the seams straighter and prevent some puckering. On the rest of the seams, I put a line of steam a seam down the length of the seam next to the stitching before I pressed down the sas. I really like how that worked and would definitely recommend doing it.
 If you've never worked with an edgestitch foot - DO IT. It makes top stitching SO much easier. I'd say it cuts the time in half. The guide portion of the foot runs along the seam line or edge of fabric and keeps everything nice and straight. Much easier!
Here we're both posing for the back view!
Sunday, May 25, 2008
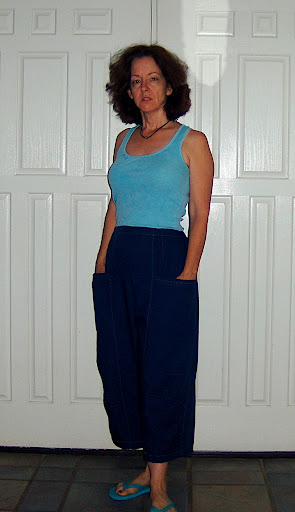
Why I don't like Vogue.

I'm not sure what attracted me to this pattern in the first place. Maybe it was the picture in the catalogue, maybe it was the article in the latest Vogue Patterns Magazine, or maybe it was just foolishness. I think I thought the pants look kind of "beachy." I do like the top stitching and the design lines. I do like the elastic in the back waist. I do think they will be comfortable. I am sure they will make me look short and fat. Well, whatever, this is what I did today. I made these pants (the cropped ones.) I used a navy rayon/poly "linen" from Jo Anns. I tissue fit the pattern last night, and let me tell you, I could gain about 30 pounds and these would still fit! There is ample leg room. Like, two of us could fit in there. So, if you decide to make this pattern, buy it by your waist size, not hip! My waist is 29" That's between a 14 and 16 on the vogue chart. They say if you're between sizes to go up. I went down. I probably could have got by with a 12. I have found that many Vogue patterns have more ease than I like. Granted, this is a loose fitting garment.
So, why did I pick a Vogue pattern? I know that of the big 4, Vogue is supposedly "it". Personally, I don't really like Vogue patterns too much. If I can find the style by another company, I'll usually get that first. Here are some reasons why Vogue is not one of my favorites.
- they use the cheapest, thinnest, tissue paper and lousy ink. On several patterns that I've purchased, the ink was so light that I could barely read it. Also, because they use such thin paper, their folding machines practically pleat the pattern pieces.
- Ease. There is always too much ease.
- Pattern sizing. I need an 8-10 on the top and 14-16 on the bottom. Their patterns never come with that combination. Fortunately, since they run big, I can sometimes get by with the 12 bottom and just adjust it to fit.
- The pattern I used today had no finished measurements on it. I will say this is not typical for Vogue, but not atypical either. It's kind of hit or miss.
- Bust point and hip points are often not printed on the pattern pieces.
- Construction method. Todays pattern was a perfect example.
- These pants have 8 vertical seams that need to be stitched, pressed, and topstiched. I also added the step of serging the raw edges together because of raveling. They have you stitch, press, and topstitch each seam before going on to the next. Why it took me 4 seams to figure this out, is beyond me. Since you are using in a contrasting thread, each time you topstitch you must change thread. I also changed feet because I like to use my edgestitching foot for top stitching. This was taking FOREVER, Finally, I realized I needed to stitch (almost) all of my seams, serge them and then do all of the topstitching at once. This saved a lot of time.
- Another thing is prepressing hems, casings, and facings. Why don't they have you do this before you construct the garment? It is so much easier to do this pressing ahead of time rather than trying to press up the hem on a narrow leg opening. Now, I won't fault just Vogue for this one - all of the big 4 pattern companies seem to do the same thing.
- Price - why in the world do they charge more than $25.00 for some of their patterns? (especially since they use such chintzy tissue paper!!) OK, I'm dating myself here, but I used to always sew with Simplicity patterns. They were 45 cents. So were McCalls, and Buttericks were 60 cents. Vogue was "way out of line" - they were $2.00.
I am almost finished with Annie's dress. I had a migraine for 2 days, so didn't get much hand sewing done. I'm still trying to decide whether to replace the zipper or not. I did a hand picked slot style zipper, but I'm not sure it will be strong enough. I only used a single thread instead of double. This dress will be very snug across the rib cage, and I don't want the zipper to gap open. So, should I take it out and redo it with a little more overlap, change it to a lapped application, or do it by machine?
Tomorrow I will take pictures of my "clown pants" I think they are funny looking, but they really are comfortable. for the beach maybe.
Saturday, May 24, 2008
Annie's Dres - Part 2

Annie came over the other night for her second fitting (first time with real dress) and the fit looks perfect. All I had left at that point, as far as construction goes, was the zipper and CB seam. In my last post I talked about the binder foot.
Well, it really made a difference on this dress.
This fabric ravels terribly, as you can see.
Here is the before and after on the bodice/skirt seam:

I had an idea of how I wanted to do the zipper seam allowances, but I wasn't sure how I would coordinate it with the seam finish on the lower skirt. I did sort of a flip and stitch method on the skirt, so it is like lining and underlining at the same time, but with only two layers of fabric rather than 3. It was much faster and easier than underlining. Here's how I did it.
- lay skirt front and skirt side right sides together. Skirt side is on top.
- Lay skirt side lining face up on top of stack
- Lay skirt front lining face down on top of stack.
- Stitch seam. Press open and flip to enclose seam allowances
- Now, lay skirt front and side 2 right sides together
- Lay skirt side 2 lining on top of skirt front lining right sides together
- Stitch all 4 layers together. press open and flip to enclose seam allowances
I used seam binding to bind the raw edges up to where the zipper will be installed. I knew I wanted to use seam binding full width to enclose the zipper tape and raw edges. I wasn't sure how I was going to get that to coordinate with the seam underneath.
 I was looking through my book, High Fashion Sewing Secrets, and found a similar technique using ribbon. This is how it turned out. I will still handstitch the edges to the lining since the sas will ravel underneath if I don't
So, today I am hoping to finish all of the handsewing and then I will be finished!
We are going to Hawaii at the end of June, and I'd really like to get started on making some clothes for the trip. It will be hot, and most of my summer clothes from last year do not fit (yay!) Darn, I guess I'll have to get some new ones. I'm sew terrible - I was going to make a dress, skirt, and shirt from some rayon challis print that I have in my stash for the trip (and I still may), but yesterday I had to go to Fresno to see my son. Now a trip to Fresno necessitates a trip to Hankcocks! One of the (many) things that Hancocks carries, that JoAnn's does not, is rayon prints and solids. This is the perfect travel fabric for a trip to somehwere hot. It is cool, lightweight, and needs minimal ironing. I found a nice pink and brown print in a rayon crinkle fabric that I would like to make a tank dress and long skirt out of. I have some brown broadcloth already that I will make a pair of shorts and overblouse/jacket out of. The other rayon print that I have is black, blue, and brown, so the brown will go with all of that. I still have to look at JoAnns for a pink knit for a top or else order from Sewing Studio. I have plenty of other things that will coordinate with black and brown - now I need to "sew like the wind!"
Another foot to play with.
 I have always liked the look of seams that are bound with seam binding, but have never been able to duplicate the look. My seam binding always slides off the edge, is crooked, or doesn't encase the entire edge. I really needed to figure out a way to finish the raw edges of this dress, and I didn't want to do a hong kong finish because of bulk and time. A "seam binding foot" did come with my machine, so I knew it was time to get to practicing. There is a thread on PR about sewing samples, and this kind of reminded me to get out this foot and try it.
The foot is kind of a monstrous looking thing, and I really didn't know where to begin. The instruction sheet that came with it was not very helpful other than showing how to adjust the screws. I finally figured out that I needed to fold the seam binding over the raw edge and then push it through the slot on the side of the foot. You need to be sure and trim your selvages to the desired width first. With the fabric in the foot, you need to slide it forward and back until the seam binding settles in the little channels in the foot. Lower the presser foot and take a couple of stitches.
With the needle down, adjust the set screw on the side so that the width of the opening is just enough for the fabric and binding to fit through. This will help the binding fold over the edge of the fabric. You will need to guide it with your fingers, but it works really well and gives nice clean finish!
It only took about 3 practices to get a great looking seam finish! It will be much easier to try on a simple cotton, but use whatever fabric you are going to be working with to practice.
Wednesday, May 21, 2008
Annie's Dress part 1

I've finished the bodice now and am waiting to find out whether she wants rhinestone buttons on the front or not. I can sew them in at the end, but if I sew them in now, the backs will be covered by the strip that wraps around the CF. Last week Annie came over and we fitted her muslin. Everything will fit well after taking in a little in the side seams. The problem is that the gathering is causing "pooching" in the front. I think I will change that over to pleats
This fabric is like a poly charmeuse. It ravels terribly, and shows every press mark. Once the garment is finished, I don't think there will be a problem, but when I'm pressing seam allowances, the edge lines show through on the front. Therefore, I am using a seam stick (I made this out of a closet rod and covered it with white muslin) to press open the seams. This really works well.
I've been thinking a lot about what to do about that zipper and have decided to bind the edges. I am going to "stitch and flip" the skirt, so that when I hem it up, I can stitch to the underlining and the stitches won't show on the front of the fabric. This will leave one raw edge all the way down the back (before hemming it) so I will bind it with a hong kong finish. At least, that is the plan. Now that I have the bodice finished, the rest should go fairly quickly and easily. I will probably baste the skirt to the bodice before I sew it and have her try it on to make sure everything lies the way I want it to. I never have occasion to wear a dress like this, so it is fun to make one for someone else (who obviously has a much more exciting social life than I do, even if she is only in 8th grade!) Of course, that is the blessing of youth, is it not?
Monday, May 19, 2008
22 Zippers...

... a measuring tape, 12" ruler, 10 yards of black elastic, and 800 yards of twill tape! Yes, that is what I received in the mail today from one of my favorite mail order resources, ZipperStop. I have seen zippers cheaper elsewhere, but Zipperstop's service is great and their selection is fantastic. Besides, at 75 cents each for metal 7" zippers, it's hard to beat.
OK, I got a little crazy with the twill tape, but it is something I use all the time. and less than nine bucks for 800 yards equals out to about 1.1 cents per yard! I use this anywhere you would use stay tape. Shoulders, jacket lapel roll lines, waistbands, crotch curves, and anywhere else you want to prevent stretch. I would have liked to have gotten 1/2 white and 1/2 black, but I thought it would be easier to actually have it on the spool rather than in a bag (you can buy it by the yard as well.) I ordered all of this on Friday, and received it today (Monday)! And, on another note, Marji has started a new blog for a winter coat sew along. Now, I have a great winter coat that I made, and I only get to wear it a few weeks out of the year. It is super warm, and super heavy. I think I would like to make a couple of coats that I have been planning for a while. (Hmmm - I was just looking back in my blog archives to find pictures of my coat, and realize that all of my posts from Sept-Dec 2006 are missing!)
First, I am going to use my FSG coat pattern and make a car-length coat with the hood from one of the 1945 jacket add-on patterns. I have some twill fabric that I bought from Nancy Erickson that is plain tan on one side, and blue plaid on the other. I will make it unlined and have the plaid side on the inside.
Also, last year I bought some beautiful black fabric to make an evening coat, which I still have not made. I think I will try to get that done as well.
A Few Little Treasures

One day last week, my brother and I decided that we needed to start cleaning out my dad's house. Fortunately for us, over the past 5 years, he has been getting rid of most of his stuff. This makes our job a heck of a lot easier. Anyway, although most of my mom's sewing stuff is long gone, I did find a couple of interesting things in a drawer.

First of all, this undermarker is something you don't see anymore. It is a plastic device made in two pieces. The carbon paper slips between the base and the frame. This goes under the fabric and you mark the top of the fabric with a pencil or sharp chalk. I didn't try it, but it looks like my mom probably used it more than once. Another treasure is all of these safety pins. They are heavier and thicker than today's pins. Also, I only have small ones, and there is a variety of sizes here. And check out that tomato pin cushion. It is actually a needle sharpener. It has something like sand inside of it, and it made of a satin like fabric. And... have you ever seen a little spool of thread like that? Maybe it came out of some kind of travel kit.
 I haven't had much time for sewing, but I did manage to make one more CJ basewear 2 top. I had fabric left over from Maureen's top already out, and since I hadn't put away the pattern yet, I figured I might as well cut it out and sew it up. This time I left off the turtleneck and just turned under the seam allowance and stitched it with my coverpro. Now, for those of you out there without a serger or coverstitch machine, these tops are still super simple to make. For seams, you can either use a slight zigzag or use a slightly longer stitch and stretch as you sew. For hemming, I always pressed the edge then used a narrow zigzag to stitch it.
 Knits don't ravel, so there's no worry there, and the zigzag gives you plenty of stretch. You could make this top, cutting and all, in close to an hour. The thing that takes me the longest is turning under and pressing all the edges!
Wednesday, May 14, 2008
Another Metropolitan Bag
The Indygo Junction Metropolitan Bag strikes again! I love the first one that I made, so here's another - just a little different.
This is a copy of my review from PR. I'm just too tired to create anything original right now.
Pattern Description: Handbag with either short or long handles. This time I made the long handles
One of the women I sing with at church was admiring my original bag and wanted me to make one for her. I knew she was learning to sew, so I told her that I would help her make one for herself. I had been wanting to make another one, so this was a good excuses to get started on it.
Were the instructions easy to follow? Yes the instructions are easy to follow. Executing them is not as easy. Actually, everything about this is easy, except when you are sewing 9 layers of fabric plus interfacing together!
What did you particularly like or dislike about the pattern? I made this pattern a few months ago when I thought I was going to do the wardrobe contest. I did the handbag first, and it ended up being my favorite bag!
Fabric Used: Some great cotton prints that I got from the quilt shop in the town where I work.
Pattern Alterations or any design changes you made: Lots! First of all, I cut this bag a little larger than my first version. Actually, the original size is perfect for holding all of my stuff, but I thought I would like the look of a little larger bag, since "big bags" seem to be "in" everywhere.
Next, the pattern calls for muslin for the interfacing. I used fusible fleece instead. This gives the bag a lot more "heft" and I like the look of it. I does make it more difficult to manipulate when sewing, though.
What I love about this bag the most is the pockets! Oh, wait, there ARE NO pockets in the pattern. You have to add them on your own. You can see more detail on the pockets in my last review, but I also did a tutorial on my blog.
blog tutorial
Would you sew it again? Would you recommend it to others? I have already made this twice, and may make it again.
Conclusion: This is a great bag and I love the magnetic snap. But I MUST have pockets in my bag. One for cell phone, one for cards, one for keys, and one for "personal items" that zips. I think this pattern is OOP, but if you can find it, it is a great purse pattern (but, remember to add the pockets)!


Tuesday, May 13, 2008
Project Runway Fails to Impress

OK, the style may be Project Runway, but I seriously doubt that the garment construction would hold up to their scrutiny. I have finished the muslin for Annies dress, and decided to line the bodice per their instructions on the muslin to get a better idea of construction and fit. I want to line the entire thing, so I'm glad I did this to figure out a better way. First of all, the dress is easy and goes together quickly. Unfortunately, "quick" sacrifices appearance. If you look at the back of this dress, you can see that they have you line the upper bodice, then attach the lower bodice and lining, and then sew the center front seam. After that, the skirt is attached and the zipper installed. I don't know why they don't have you line the skirt, but why would you want to wear a slip if you're already lining the bodice? The big 4 seems to do this frequently.
The problem here is two fold. Now we have a raw edge where the skirt attaches the bodice. They suggest binding the seam, but that would be more bulky and time consuming than adding a skirt lining. Minor detail. The big problem is the zipper. by lining the bodice and attaching it to the skirt before adding the zipper, the upper end of the zipper is left with raw edges everywhere. Not only is the zipper completely exposed, the upper edge of the tape (mine is extended because it is a muslin) will be left raw and the seam allowances where the zipper is attached will also be left exposed. This looks sloppy and unacceptable in my opinion.
Now, of course, I have to figure out a way to correct this. Because of the way the bodice front is constructed, it almost has to be lined separately to eliminate bulk where the gathering is. I think the best option will be to follow their method, but to leave about 2" on each side of the zipper with the lining unsewn. After the zipper is attached, I will hand sew the lining to the garment and to the zipper. If anyone knows a better way to do this, please let me know!
On the other hand,  I AM impressed once again with Christine Jonson's Basewear Two pattern. I made this sleeveless turtle for myself earlier this year out of a rayon jersey. Now I have made one for my friend Maureen. This is made from a cotton interlock that I got from Sewing Studio. This fabric was a joy to work with. First of all, it came in a tube, so there is much more usable fabric this way and less waste. Also, it just lies nicely and was easy to work with. It has great stretch and recovery.
CJ has a great guide in her patterns where you compare measurements and stretch of the fabric and ease to get the right fit. Here's a good example.
Maureen is tall - I am not
Maureen has broad shoulders, I have narrow
Maureen needs SBA and I need FBA.
We ordered fabric for her measurements. After getting the fabric, calculating the stretch and doing the guide in the pattern, I found that Maureen will wear the same size as me! I had her try mine on to see if I needed to tweak it, and it fit her perfectly! So, today, I completed her top. This is a super fast pattern, and I didn't even use my regular sewing machine. I love my serger. Even though it is old (about 18 years I think) and has no bells or whistles (no differential, one foot) it does just about everything I need. It made this top come together in a matter of minutes.
First, I serged the shoulders, adding stay tape.
Then, the side seams. Next, you sew the end seam of the turtle rectangle. Mark the turtle in 4 equal parts and serge to neckline.
I pressed under 5/8" at armholes and 1.25" at hem. I used my coverstitch machine to finish it. 
One of the things you must be careful of with the coverstitch machine is to press accurately. You are stitching from the right side of the fabric, so you are going by measurement here in order to cover the raw edge underneath. In this case, I missed a couple of inches. Of course, this is the beauty of steam a seam tape. It will fix that right up. (Sorry, Maureen)
I do have a hem guide for my coverstitch, but am finding it awkward to use. Maybe some of you know some tips for that. Right now, I am using the seam guide that goes through the back of the foot, sort of like a quilters guide. Until I master the other attachment, I will be using this.
Maureen hasn't seen the top yet (Unless she's reading this,) but I love it, and I have enough fabric left over to make one for myself!
Saturday, May 10, 2008
A dress for Annie

The daughter of my good friend Maureen is graduating from 8th grade this year. Of course, they have bought the dress. Of course, said daughter no longer loves the dress. Hmmm... reminds me of my own daughter. Now that's another long story - Maureen's dd and my own are like two peas in a pod, just different ages. Anyway, I offered to make a dress for Annie. We went fabric and pattern shopping at JoAnn's this weekend and this is what she picked out. I am making the sleeveless version in a dark pink poly charmeuse with a silver lining. I worked on the muslin this afternoon and will probably finish that tomorrow.
I am also working on finishing my kitty cat purse while I teach another friend (actually, a daughter of a friend) to make one.
And, I bought some twill to make a pair of shorts, so I hope I get some sewing done in the next couple of days.
I've been going by to see my dad every day and it is wonderful that he is only 2 miles from my house now instead of 45. He loves the care facility that he is staying at and so do all of us. It is like a nice big home and everything is tastefully done and the people who work there are all very friendly and conscientious. They also have excellent food, which Dad is all over. I take the little Dobster over to visit dad several times a week and he loves that. He has always been an animal lover. Things are settling down a little bit now, but I still have a lot of legal and financial things to get taken care of.
Oh, and Paula tagged me with a literary meme.
Here's the deal:
1. Pick up the nearest book.
2. Open to page 123
3. Find the fifth sentence.
4. Post the next three sentences.
5. Tag five people, and acknowledge who tagged you.
OK, the nearest book to me is Ending Your Day Right by Joyce Meyer.
You are downcast because you are looking at your problems, and this only makes you feel worse. Sometimes you are tempted to say, "Oh, what's the use?" and just give up. But God is waiting for you to lift up your eyes and look to Him for helpHmmm... a good thing for me to keep in mind right now. I'll still have to think about 5 people. It seems that most of the bloggers I know have already been tagged.
Friday, May 09, 2008
A New Dress
NewLook 6731
I haven't been doing much sewing lately, so I wanted to do something quick and easy. I had this knit in my stash and decided to make a longer version of view A to make it a dress rather than a tunic. As I told a friend the other day, my legs aren't exactly "tights worthy." This would have been quick and easy, but I always find jersey to be such a pain to work with. It takes forever to lay it out because it is almost impossible to get the grain straight. But, boy, if you don't, you're in for trouble. This time I decided to cut the fabric into smaller pieces to make it easier to work with. First of all, I decided how much length I would need for the front and back, and cut a piece that long. Then, since the fabric needed two folds, I cut the fabric down the middle so I only had a 30"wide piece to work with rather than a 60" piece with two fold. this did make it a lot easier, but then, of course, the selvedge problem reared it's ugly head. This is not the first time that I've prewashed jersey and had the selvedge shrink; therefore, wrinkling the edge of the fabric. So, I cut of the selvedge (for some reason, it only did this on one selvedge and not the other.) This pattern was easy since there was only front, back, sleeve, and neckband.
I added width in the front for FBA, but then ended up taking out an inch on each side seam. I started with a 10 and tapered to a 12 at the hips, but I could have easily cut an 8 and been fine. This pattern had a lot of ease for a knit, even though they recommend jersey. It's really fitted more for a matte jersey, which has less stretch. I also added 6" to the longest length, but ended up cutting off one inch, so I really only added 5" and I took a 1" hem. I also shortened the sleeves a couple of inches. I had one little problem when I was serging on the sleeve. Even though I had basted it on first, the fabric folded underneath the seam and I ended up cutting a piece of the sleeve about 3/4" long. I did not have enough fabric left over to cut a new sleeve, so I made a little patch. Fortunately, this is a busy print and it will go unnoticed. I cut a piece of the print similar to the place I was patching, which kind of was a football shape. I put little pieces of steam a seam around the hole and then fused the other fabric to it. It looks great and you can't even tell it's there. The sleeves were kind of loose, so when I took in the side seam, I raised the armscye by 1" and took the sleeve in 1/2" all the way down.
AND.. I finally got to use my coverstitch machine and did the sleeve and bottom hems with it. I want to make the sleeveless top version of this next.


