Saturday, August 04, 2012

Bombshell progress - outer bodice

I have finally completed the outer bodice on this dress.  One of the recommended materials for supporting the bra cups is needle punch.  Gertie also says you can use cotton batting, and that in fact, it may be better because it is more breathable.  Well, I had some "Warm and Natural" on hand, so that is what I used.  Unfortunately, this batting tended to stretch rather than shrink even after multiple steaming and pressing sessions.  I think it will still be OK, but I now wish I would have used some fusible fleece or at least interfacing on the cup pieces.  The cups are a little lumpy and not as smooth as I would like them to be.  Other than that, I think it looks pretty good so far.  (That's not saying that it's going to fit or stay on the way I want it to.)  I watched the next session of the video lessons today, and the next part will be the skirt.  I really wanted to get that cut out today, but I really over did it on my feet the last few days.  I had surgery on both feet on June 28, but they just aren't ready for standing up all day yet.  Today I've spent most of my day with my feet UP.

I haven't decided whether to put a strap on this dress or not, but I saw in the video that one of the dresses had a removable strap, so I may go with something like that.

Thursday, August 02, 2012

6 PAC

6PAC = Six Piece Autumn Collection

Although I am still working on my bombshell dress, I took some time out to plan for the 6PAC over at   Stitcher's Guild.  The idea is to build a very basic (read b-o-r-i-n-g) wardrobe consisting of

  • jacket in a dark neutral
  • bottom in a dark neutral
  • top in the same dark neutral
  • jacket in color #2
  • top in color #2
  • top in print of color #1 & color #2
(The color isn't quite right in this picture, but it's kind of a light beige.  Darker than natural linen, but not quite tan.)
Well, already I'm not following the "rules" because my "dark neutral" is not dark and it is a plaid.  However, it reads as a solid from any distance at all.  My first main fabric is a beautiful light weight Italian wool that I got on sale at Michael's Fabrics.  I was so happy with the fabrics that I ordered there that I placed another order today for some navy cotton poplin and another yard and a half of the wool.  (OK, so now the navy is my dark neutral and my plaid is the color #2)  I plan to make a skirt and pants from that same wool, even though they are not included in my plan.  It is still hot here, so I will probably be wearing the cotton separates much sooner than the wool.  

The jacket is the Silhouette's 4 button jacket, but I'm going to make it at high hip level.  I saw Peggy wearing one like that in one of her webcasts and I really liked it.  I've had the pattern for a long time but never made it before.

I also have never made anything from Cutting Line Designs, so I decided I wanted to try something.  I ordered the Acute Angle jacket, so I'm looking forward to trying that.  I will be making that in the navy cotton poplin.  I haven't seen the fabric yet, so I'm hoping I like it or I will have to figure out something else.


All of the other patterns are new to me too, so I'll be trying some new things here.  The last few times I've tried to Sew With A Plan, I have not completed my plan!  I will need some encouragement (and accountability) to complete it this time.  Especially now since it is the beginning of school.  My first official day back is tomorrow!  I can hardly believe it is time for another school year to begin.  I'm praying that I am actually able to have a life outside of school this year.  I will be at a different school this year with an administrator I have never worked with before, but I really  like her and the new staff. I'm looking forward to a good year.

Saturday, July 21, 2012

Bombshell - Underlining

Today I worked on the underlining, but I did not finish.  I still need to cut the upper bust cups and do those.  I thought for sure I had done them, but I can't find them anywhere, so maybe I didn't.  I'm going to keep looking before I cut them out again though!

After you pin the under lining pieces to the fashion fabric, you rough cut around the edges and then baste the pieces together on the seam lines.  I tried to make sure that the X where there is an intersection of seams would show on the right side.  I really do like using the silk thread for doing this.  You can't see the thread very well on the muslin side because of the color I chose, but it shows up well enough on the print side.  On the photo below, the first side is pinned and the next one is partially basted.  The picture at the bottom shows the right side of the fabric with the basting.


I am just using a cotton print for this dress.  A few years ago I took the bustier class at PR from Kenneth King.  We used fashion fabric, underlined with unwashed denim, had an interlining of flannel, and then lined with cotton.  On this, I am using cotton for the fashion fabric, muslin for the underlining, and probably cotton broadcloth for the lining.  I'm just using the recommended fabrics for this one, so I'm hoping it will have enough structure.  On the bustier, I used rigeline boning, but for this one, spiral steel boning is recommended.  Now that my muslin is finished, I know what sizes of boning to order, so I will be ordering that this weekend.

Bombshell - another muslin??


Well, if I’m going to put this much work into something, it better FIT right!  I’m still not sure that it will, but I think I have now made 2 more muslins on this thing.  After my last post, I still was not happy with the fit yet.  I decided to take my muslin pieces and see which size they most closely matched and go from there.
I ended up using the largest size cups on the pattern which was a 44.  Then, I had to figure out how to make those cups fit into the size 36 bodice.  I don’t know if I did it the “right” way, but I hope that what I did works.  I lowered the cup curve on the bodice and also added some to the cup.  I tried this on, and was still not happy.  The center front would not go in close to my body.  Not sure what to do at this point, and not having a fitting partner, I had to get creative.  I kept looking at the bra I was wearing and thought, “OK, this bra touches my body in the center, why doesn’t this muslin?” I decided to take a molded cup bra that has only been worn a couple of times and fits me perfectly and use that for my “model”.  I used the two bottom cup pieces from the pattern and pinned them onto the bra.  I then smoothed the upper piece along the top, pinning as I went.  I used a pencil to mark where I needed the top and bottom to meet so that there would be no pleating or puckering.  I’m hoping this will work!!  I really won’t know until all the layers of the dress and boning are put together.  The only unfortunate thing is that I think I may have lost some of the design lines to the cups that have the little corners.  Oh well, it will be worth it if it fits correctly.  That was Thursday.
Here is a picture of the muslin being shaped over the bra.

These are the changes that I made to the cups after marking them and taking them off of the bra.

Last night I traced all of those pieces with the changes onto muslin again.  This time the pieces will be used as the underlining.  I did prewash the muslin because it does shrink.  If I’m doing a lot of pressing, I do not want the underlining to shrink.  Because of all the layers (fashion fabric, underlining, lining) and boning in this dress, I think I will make sure to only dry clean this one.  I have only used ridgelene boning in the past, but plan on ordering spiral steel boning for this one.
This morning (Friday) I pinned all of the muslin pieces onto the fashion fabric.  I cut around these pieces and started basting the two layers together, following the seamlines.  All of this basting will be removed later, so I used silk thread for the basting.  Because of the print of the dress, I tried 3 different colors of thread before I found one that showed up well.  I finally ended up using an off-white.  I wasn’t going to use this at first because it won’t show up on the muslin.  Well, that doesn’t matter because I can see the tracing on that side!
Tomorrow I would like to finish the hand basting and start putting it together.  The basting is actually going pretty fast and is easy to do while I’m sitting in the family room watching DVR of Project Runway season 10!  Thank goodness for DVR, I hadn’t realized that the new season had already started.

Tuesday, July 17, 2012

Bombshell part 3 - Getting the muslin right


muslin 2
I am so excited!  I think I actually have the fit of this bodice now!
When I got up this morning, I decided that what I needed to do was to lower the bust curve, but I wasn’t sure how.  I  looked at the pattern pieces and how they were graded up to the next size.  My lower bodice is cut in a size 36.  I decided to start with altering to a size 40 cup.  The first thing I did was trace the lines for the two lower bodice pieces top edges onto tracing paper.  I then traced those lines onto the muslin so that I could make sure that the cup would line up with the new curve that I drew.  I then traced the size 40 cups and left a generous seam allowance all around (good thing!) I sewed in one, and could see that it was still too small.  You can see the blue line where I redrew the bust curve.

Next, I added to the height by adding to the horizontal seam line across the front of each cup.  

This seemed like it would work, but I need to try it on.  My dress form is not exactly my shape, so I wanted to try this thing on my real body to make sure.  
At this point, I sewed the back pieces together and added a long zipper so I could get it on and off easily.    After trying this thing on about a dozen times, I kept making little alterations.  


My final alterations were to  do this:
(only the right cup has the final alterations on this muslin)

  • Keep the size 36 lower bodice
  • add 1/2 inch to the top of the lower cups and the bottom of the upper cup for a total increase of 1”
  • Used a marking pen to add to the sides and center front of the cups.  A total of about one to one and a half inches.
  • I also added to the lower portion of the cups which also changed the shape of the cups.  I sewed these changes in by hand and marked them with a marker after they were sewn.  (Unfortunately, I did not use permanent marker, so you can see where the ink spread when I turned my iron upside down to press a curve and water spilled out!)
  • I also took a small dart in the outer part of the upper cup.  I was having a little gapping there.
  • I pinned out almost an inch in the back that I all remove by making a sway back alteration to the back pieces.
  • I may also have to take a little out of the side back seams, but I will be able to do that after all the layers are put together.


Now the trick will be to take this apart and make all the changes onto the new pieces.  These cup pieces are so messed up and only the right one is the correct one.  I think I will need to trace a new set of cups based on all of my changes.

Monday, July 16, 2012

Bombshell part 2 - muslin

This evening I decided to try to put my muslin together.  With anything this fitted, it is always a challenge.  I never really know what size to start with, so I decided on a 36 for the bodice and 38 for the skirt.  I knew I would need to do a FBA.  It is frustrating and discouraging when I have to keep lowering the bust point!!  Age and gravity are not always my friends ;-/

The nice thing about putting the dress together this way is that there is no worry about seam allowances since you are only working with seam lines.  The thread tracing helps you feel where those are and how they should match up.  This is very helpful on the bodice.  It is a little tricky to fit it all together, so after pinning and seeing that it wasn't' lining up right, I decided to hand baste it.  This worked perfectly and everything lined up this way.  Well, it all lined up, but that doesn't mean it will fit!  I could tell after assembling just one cup that it would be too small.  I knew I would have to do a FBA, but now I'm worried about the lower bodice.  I think the circumference will be fine.  It is the depth and location of the cups that need to be altered.


At first I thought I would need to shorten the waist and raise the center front.  I think the line for the cup is wide enough.   But, now that I think about it, I need to lower the curve of the cups.  this may be a little tricky, so I'm waiting until tomorrow to tackle this.  I think I will need daylight and a few cups of coffee to dive into this.

Bombshell - getting started


Several months ago, I signed up for the Bombshell Dress class at Craftsy.com.  I watched the majority of the videos, read all the information, downloaded the pattern, but didn’t do anything further.  Now that I have a little time, I’ve decided to make the dress.  First, let me say, that even if you never make the dress, the class is worth it just for the wealth of information.  Gretchen Hirsch has a great teaching style and the class is fun to watch.  
The Pattern;  The course uses this pattern from Burdastyle. Actually, I like Gretchen's versions much better.  The dress on the model at Burda doesn't even fit her correctly in the bust.  The pattern comes as part of the class, so you do not have to buy it separately.  I printed off this pattern months ago, but have not looked at it since.  Unfortunately, I did not realize until I had the whole thing taped together that the printing is off by about 1/8”!!  I thought about re-printing the pattern and   putting it all together, but it does take some time to do this.  Since I’m going to be making a muslin anyway, I think it won’t be that big of an issue.  You can follow me on this adventure here on my blog.
First of all, I always seem to have a bit of trouble with downloadable patterns.  They never seem to line up completely perfectly.  At first I thought it might have been because the scale of this one is off a bit, but I had the same problem when I downloaded the Sewing Workshop e-shrug, and that one was right on scale.
Anyway, I did get the pattern put together and cut apart.  You do not cut the pattern to your size because the whole thing is going to be traced onto muslin.


I am also signed up for the Susan Khalji couture dress class (which I also have not started making) and both classes use a lot of the same techniques.  I believe that Gretchen did study under Susan at some point, so that may be why.  Again, both classes are wonderful and well worth the time!  The classes at Craftsy go on sale quite often, so make sure you get on their newsletter if you haven’t done it already.  Anyway, I can’t remember which class recommended the site Richard the Thread  but I believe it is the only place you can get really large sheets of tracing paper.  You have to buy 3 of one color at a time, but it is great stuff.  I used it for the first time today.  It is really dark, and probably won’t wash out, but for using on the muslin it is perfect.


After I traced all of the pattern pieces for the bodice onto muslin, I then “thread traced” them with the sewing machine.  Since I used red tracing paper, I did the stitching in blue so it would be easier to see.  This is as far as I got earlier today since DD and I decided to start re-watching all of the Lost series starting with season one episode one.  They’re starting tonight on TV, but we are watching them with netflix.


I have done some other sewing lately.  I made a dress out of the NL 6104 pattern, but I’m not that thrilled with it.  I’ll wear it at home, but probably not anywhere else.  It feels kind of frumpy to me.  


I also made a cute skirt for my daughter and then one for myself.  I don’t have a picture of mine yet, but will post it later when I get a picture.
So, have any of you signed up for any of the Craftsy classes?  If so, what projects have you completed?  I’d love to see how the rest of you are doing with them.

Sunday, July 08, 2012

New Look 6104 - anything but boring

I picked up this pattern because I love wearing woven sleeveless tops in the summer.  I had, in fact, ordered several 1 yard lengths of mid-weight linen from www.fabric-store.com just to make something like this.  This pattern kind of seems a bit "ho-hum" at first glance, but I really like the lines of it, the button front detail, the tucks and different front treatments.

Well, about a week ago I made a pair of shorts and then discovered that I had NO tops that would go with them.  I saw this pattern in my little box of "to-do soon" patterns and grabbed the piece of linen in the color called "chardonnay"


This top took me a little longer than I thought, but I really enjoyed making the front tucks and the other details that took a little longer on this top.  The smallest size this pattern comes in is a 10, but I really need an 8 or smaller across the shoulders. (Before you start thinking, "Oh, she's so tiny"  let me remind you that I am doing a FBA and grading out to a 14 in the hip.  I just have tiny shoulders apparently.)  I am really happy with the fit on this, so I immediately started thinking about making it again.


As you can see at the left, I also changed the button placement on this one.  Wow - I'm really stepping out of the box now (LOL)  Also, I turned the bias binding completely in to the inside instead of wrapping it around the top.  Not because I was being creative, but because I didn't read the directions very well!  Because of this wider binding, I used two rows of topstitching around the neck and armholes.


 I decided to look at some reviews on PR and got inspired by one review in particular.  Look at what this clever girl did with this pattern!!  This is from a review by ACBrown28.  She has some interesting details about this pattern on her blog (and she's a funny writer too!)


Anyway, I was very inspired by her versions and went on to version 2.


For this version I used a piece of cotton I had picked up last year from Beverly's. They mostly sell quilting cotton, but this piece is a bit lighter weight and has a nicer hand and drape. I bought it to make something for my daughter, but she hated the print. I like it.

(Oh, in case you're wondering what in the world I have in my hand, there is actually the most beautiful baby in the world sitting on a little car at the end of that handle. Not that I'm biased or anything.)


 On this version I added a neck ruffle and cap sleeves (both included in the pattern)


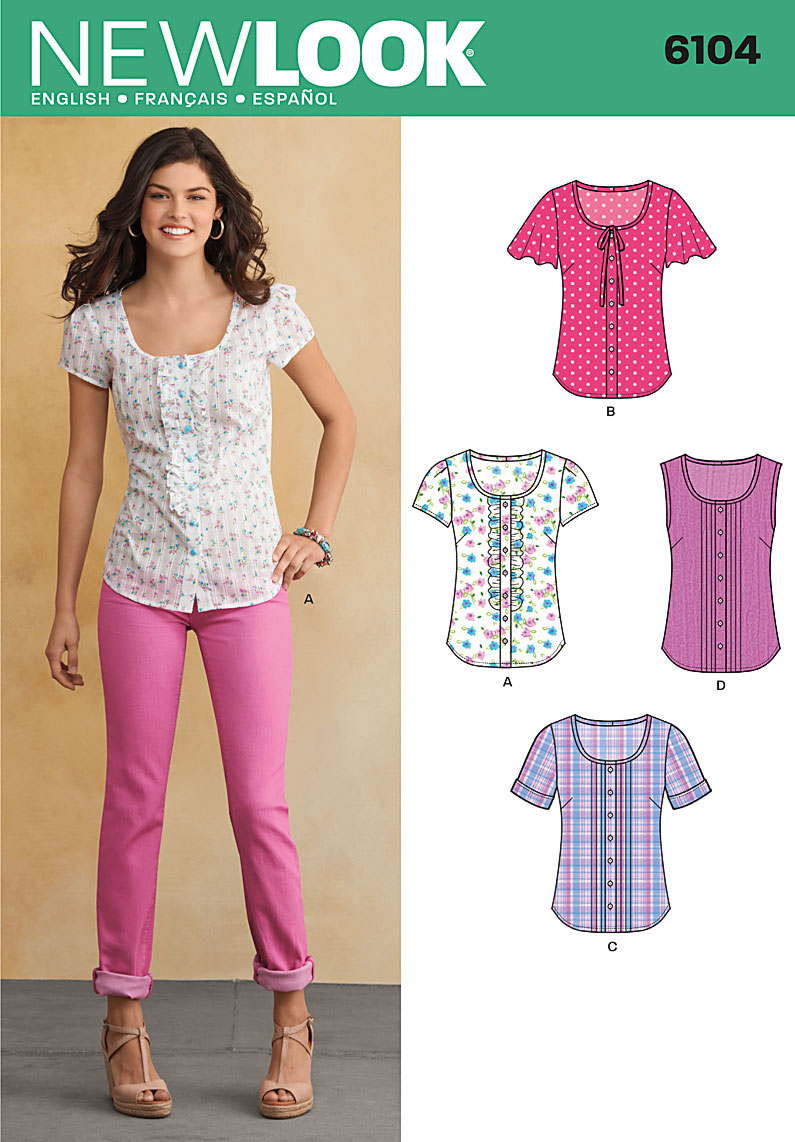
 I like the sleeves because they have a little pleat and nice shape.


 I also added a casing for waist elastic. I used bias tape and 1/4" elastic. Next time I need to move the elastic down about 3/4" Next time? Yes, there will be a next time. I also discovered on version one that I could easily slip this over my head and did not need the button front. So, version 2 here has a fake placket down the front and those buttons do nothing but adorn the blouse. They aren't really the buttons I wanted to use, but since I just had foot surgery, I couldn't run to the store to get something else. It's all about stash-diving right now!

Parting shot:  I just had foot surgery on both of my feet less than two weeks ago.  Even though I have to keep my feet up a lot, I'm still finding time to sew!  When I'm not sewing, this little Emma keeps me entertained!

Saturday, July 07, 2012

Fabric Shopping in Uganda

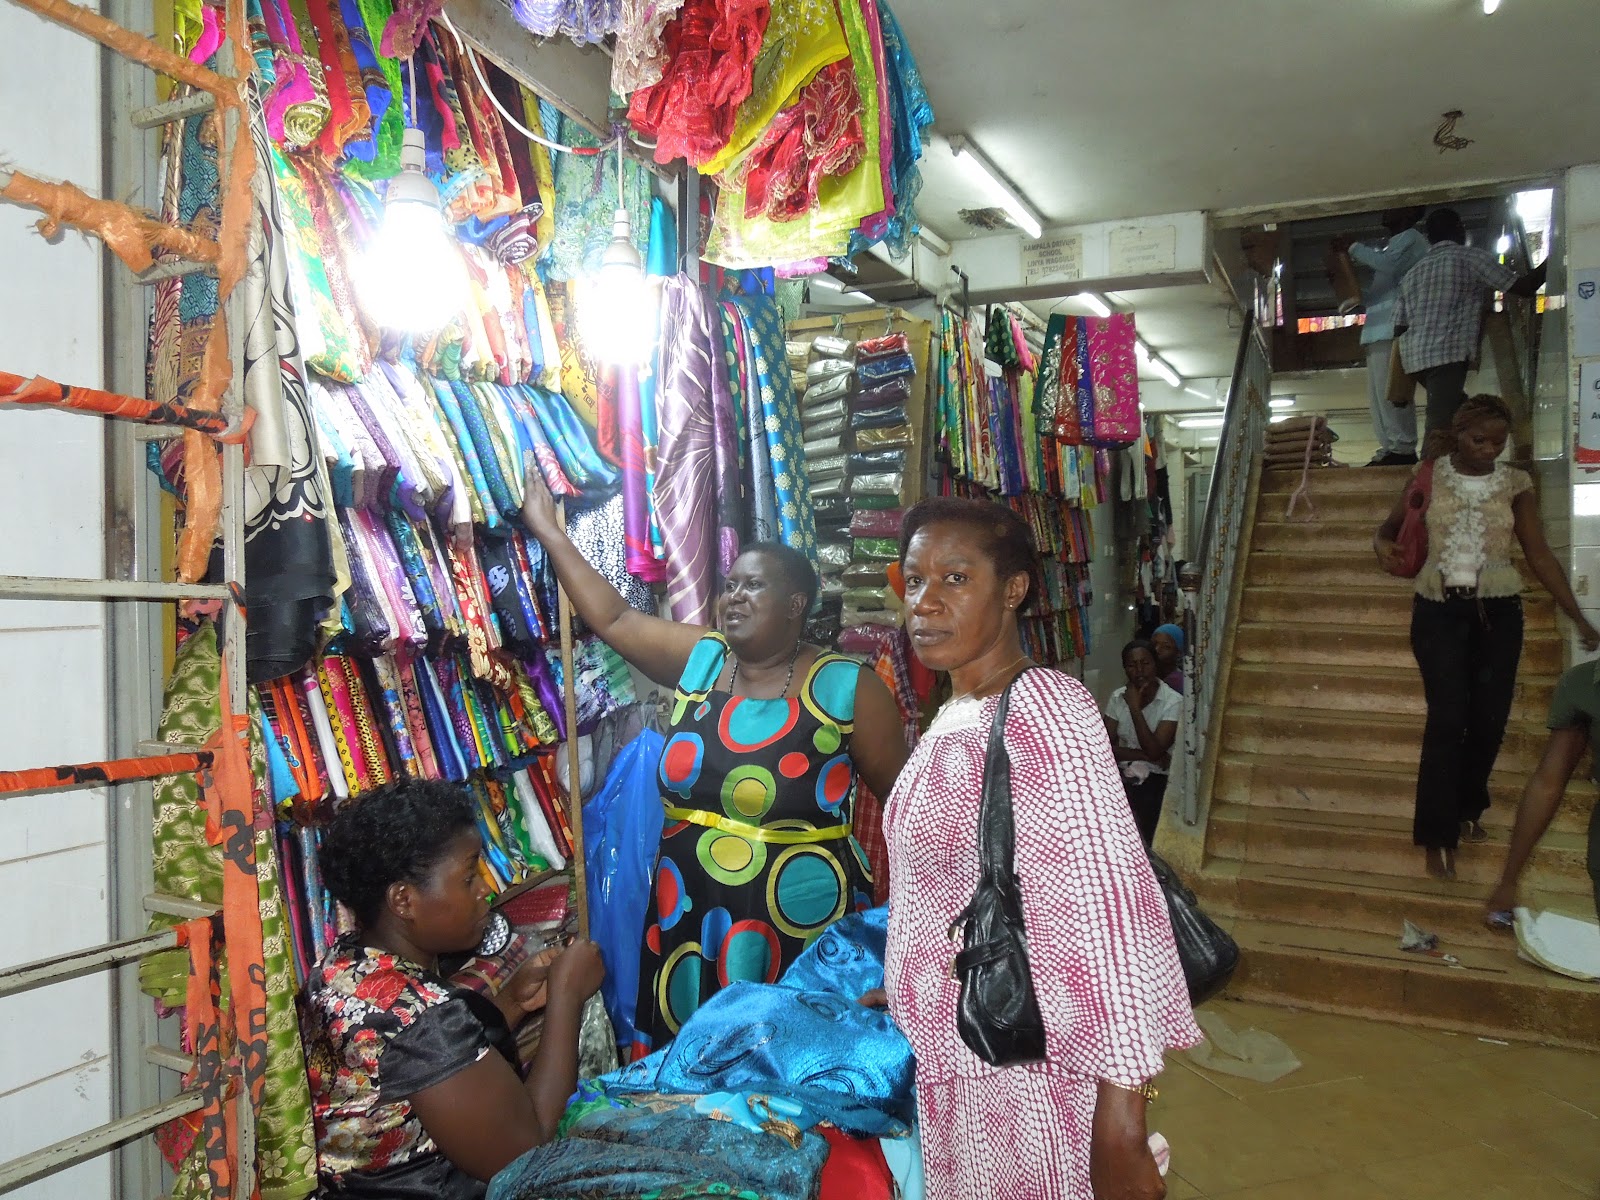
Every year that I go to Uganda, I spend the first day looking for fabric that I will be using with the ladies.  There are hundreds of designs to choose from, but only a couple of types of fabric to buy.

The woman in this picture is wearing a Kitenge
  1. Kitenge fabric (not sure of the spelling on that!)  This is what I usually buy in Uganda.  It is akin to quilting weight cotton - bad quilting cotton.  When you buy the fabric it has some kind of glaze on it and it is stiff as a board. There is no way to tell the texture of the fabric.  This comes in 6 meter lengths.  Sometimes you get a nicer weight cotton, sometimes it is just bad quilt weight, and sometimes it is as heavy as home dec.  No way to tell.  I think I paid 35000 Ugandan schillings for a length, which is a little less than $15.00.  The woman in the picture on the left is wearing a Kitenge.  These dresses come in lots of styles, but they can be one or two piece and usually fit close to the body in the top half.  They can be sleeveless or short sleeved.
  2. "apron" fabric.  They don't call it that, but that's what they use it for.  The ladies often will wrap this fabric around themselves to keep their dress clean.  This is a lighter weight fabric and usually is polyester or a poly/ cotton blend.  It is usually sold in 4 meter lengths.
  3. Polyester charmeuse.  They use this a lot for the "Gomez" which is the traditional Ugandan dress.  Sometimes you will see the Gomez made from cotton.  The two ladies on the floor in this picture are wearing the Gomez.  You can also see how several of them have the fabric wrapped around like aprons.
  4. poly/cotton broadcloth - they use this to make school uniforms and to line the Kitenges.
  5. On my last visit, there was some silk in one of the shops, but I was already out of money by that point, so I didn't even ask how much it was.  Next year I'll be checking that out.
  6. I didn't have time to look this year, but we also walked by some places with beautiful sequined sari fabrics.  There are a lot of muslim and Indian people in Uganda.


Also, this year, in the city of Kampala, we hit a little fabric heaven.  We found a fabric mall!! I'm not kidding - a whole row of shops (probably 20) of all fabric shops.  This was under the street. I'm definitely going back there next year.  Also, the fabric was only 25000 at one of the shops there, so that would be only about $1.75 a yard.  We did buy some fabric there, but one of the other ladies has it and I don't think she has washed it yet to see what it is like.  Click on these photos to enlarge and see the beautiful fabrics.
The woman on the right helped Bea (the one on the left) pick fabrics for her Gomez.
A little bit of fabric heaven


Most of these fabrics are for Gomez

You can see the Gomez fabric on the left and right.  Kitenge fabrics are farther back in this store

This was my favorite shoe.  Look at all that Kitenge fabric!!

Parting shot - these sweet faces from the village of Busanna


Saturday, June 30, 2012

Back from Uganda!

As always, God always does amazing things while we are in Uganda.  I could fill up weeks of posts about the trip, but I will only highlight some of what we did.  Today, Sewing in Uganda.  I had a few plans for sewing, but we were not able to accomplish all of them.

  1. Christine Johnson, of CJPatterns was wonderfully generous and donated patterns and fabric for my trip.  My goal in Kampala was to work with one woman (Betty) and teach her to use the sewing machine, read a pattern, and work with knits.  We had limited time, but she completed a skirt and top while I was there.
  2. I had planned on working with 3 specific women in the village to continue what we had started last year.  This year I wanted to teach them to make a dress b y reading a pattern.  Unfortunately, 2 of the women had moved away and the third didn't show up until later in the day.  I ended up working with some new women and teaching them.  They may never use a commercial pattern again, but the process got them excited about sewing and I know the sewing will continue.
  3. Many thanks to generous donations, I was able to purchase 4 sewing machines and give them to the women.  One electric machine was given to Betty to practice and keep in her home.  Two more treadles were purchased to be used by the women of her church.  The fourth machine was purchased for the village (we purchased 2 others last year.)

Well,  I had many plans for sewing, but God had other plans for me.  The first week we were there, one of the women we were working with in the church fell down with a  seizure.  She was convulsing all over, but was still able to communicate.  Nothing like this had ever happened to her before.  Her name is Florence and she has a 3 month old named Sirus.  She is 20 years old.  When her convulsions did not subside after an hour, we decided to take her to the hospital.  THis was an all day affair, but I was glad I was there and glad I could help.  There is no way this family could have afforded to take her to the hospital.  They finally admitted her, but even though they didn't know what was wrong, they put her in the infectious disease ward where she was exposed to all kinds of illness.  As it turned out, they never did find out what was wrong with her.  She had this "seizure" for about 5 hours before it finally disappeared.  They gave her a saline IV,  tested her for malaria and typhoid; since those came back negative, they decided it was stress.  Stress!!!!????  You don't ever want to get sick in Uganda - believe me.

One of the greatest blessings of going this year was getting to bring along my son, Nick.  Nick is 25 years old and a pre med student.  He has never been to a third world country and has led a pretty sheltered life.  He got to do volunteer  work in the hospital in Jinja while we were there.  Not only was this a great experience for him, he also ended up being partnered with two native Ugandans his own age who are missionary interns.  He got the opportunity to work with them on bible studies and even led the study a couple of times himself.  This was a big step out of his comfort zone and exactly what he needed.  I just saw blessing after blessing on this trip.


Monday, May 28, 2012

Silhouettes Classic Blouse


can't believe I'll be leaving for Uganda in just over a week!  I've been trying to get some sewing done so that I have something to wear on my trip!!  For that reason, I chose the Classic Blouse by Peggy Sagers because I knew it was fast and easy to make.  I'm pretty much a tank-top girl myself in the summer, but in the villages of Uganda, the women do not bare their shoulders or upper arms very often.  In fact, pretty much never!  So, I decided I needed some short sleeved shirts.  Also, in the city, you rarely see the women wearing T-shirts.  Usually they wear dresses, two piece dresses or suits.  Yes, I know that sounds surprising, but the one thing that always stuns me is how well they dress. Their clothes may be old and used, and "out of date" according to US standards, but in the cities you always see their clothes to be very clean (surprisingly white with all that red dirt) and neatly pressed.  The men wear long sleeved button shirts and slacks and the women usually wear fancy dresses.  And by fancy, I mean - think "prom"!  THis cracked me up the first time I went there.  Some women were wearing regular street clothes, most were wearing skirts or dresses, and some (many) wore the kind of dresses that we would only wear to an event.  We're talking sparkles, beads, satin fabric, lace, etc.  First of all, this shocks me because it is so HOT there and I can't believe these women would want to have all of these tight-fitting, long sleeved, heavy clothes on.  The other thing that is surprising is that out in the villages, the traditional dress for the women is something called a "Gomez"  This is a dress made with yards and yards of fabric wrapped multiple times around the body.  The typical fabric for this dress?  Polyester charmeuse!!!  Could we pick a hotter, non-breathable fabric?  It's amazing.  Many of the younger women wear a dress style called a Kitenge (not sure of the spelling)  These are more like a fitted two piece dress made from a wax print cotton fabric.  Of course, they are lined with broadcloth, so they aren't' a whole lot cooler to wear, but at least cotton breathes.  This dress style is more "modern" and I believe it comes from Kenya - but I've heard different stories on that too.
Well, I won't be wearing any Gomez's or Kitenge's (even though I have one) on this trip.  I will be wearing long dresses, long skirts, and short sleeved blouses or tank tops with a blouse over the top.  I picked a poly/cotto broadcloth because it is light weight and should pack easily.  Hopefully it won't need to be ironed.


I have made this blouse before, but knew I needed to adjust the size.  I cut a 1 at the shoulders and 2 at the bust.  I used the "D" cup pattern.  On the blue blouse, which was my second version, I lowered the point of the bust dart by 1/2" and raised (lengthened) the vertical darts in the back.  
This blouse does not have a cuff, but you fold the sleeve, make a button hole, and then fold the buttonhole over to the button.  I had to take this out the first time because the button ended up under my wrist.  If you want to make the long sleeved version of this blouse, I would suggest that you pin that out first before you make any buttonholes.  


The collar on this blouse is one piece, meaning there is not a separate stand. At first I did not like this, but now it does not bother me, and it certainly is faster to make this way.
I will probably make more versions of this blouse this summer.  I have some silk I'd like to try for this.

Wednesday, May 16, 2012

The Africa Dress

Here it is - McCalls 3129.  In the last few years that I've gone to Uganda, I have taught the women how to make skirts and bags.  Last year I worked with three women in particular, Kathy, Florence and Phoebe, and taught them how to make children's, shorts, shirts, and a simple shift for girls.  I asked them what they wanted to learn next.  Well, they said "pants", but I think I would start an uprising in the village if I started the women wearing pants.  I don't even wear pants when I go there!  So, they said they would like to learn to make dresses.  I decided to find a pattern that would be very basic, could be made long, and would have princess seams or darts.  I found this.

I also wanted to make a long dress to take to Uganda this summer, as I usually wear skirts and tops.  A dress is just easier.  I had a few patterns picked out, but then I thought, "I better make the dress I am planning on teaching them to make!"  I had this fabric that I bought last year in Kayunga District and decided to use it.  I also decided to make it exactly how I will have them make it.  Well, I didn't use my treadle, but I did only use straight stitches and no serging!  I did, however, press as I sewed, which probably won't happen there.  The iron's in Uganda have to be filled with hot coals from the fire - well, at least in the villages.

This year I will also be teaching my friend Betty.  She lives in the city of Kampala.  I will be buying her a sewing machine when I get there.  Thank you for those of you who have donated to support this trip.  It is so greatly appreciated.  It is because of your donations that I can buy Betty and machine and fabric.   I still have a way to go to get all of my support, so if you would like to help, check out this post.  For the villages, we always use treadle machines.  Betty may want a treadle or electric.  I will find out when I get there.  But, either way, I still tried to make my dress as simply as I could.

I just turned facings under and stitched, and did a hand picked zipper. Most of the treadle machines have only one foot, so it's not much extra time to put in the zipper by hand - and much faster by hand if you end up having to rip out the machine zip and do it over!  I have a few princess dress patterns, but I like the neckline on this one.  The women there do not wear anything low cut, and this dress is high enough to be modest, but not so close that you feel like you are choking.  I chose to make the dress with sleeves since most of the women in the villages do NOT go sleeveless.  It is different in the cities though.

Surprisingly, this dress went together pretty quickly.  I did a FBA and lowered the shoulder a bit.  I probably need to lower the bust curve a bit (darn gravity!) and maybe add about 1/2" to the bust circumference.